前提・実現したいこと
ConfigurableJoint連結したカプセルをAddRelativeTorqueを使って曲げています。
曲げる際、オレンジカプセルが曲がった状態のままピタッと止めるようにし、重力を働かせたら曲げ状態を維持したまま落ちるようにしたいと考えてます。

発生している問題・エラーメッセージ
Torqueを使いながら曲げると慣性が働いてしまい、ゲームコントローラーの入力がないときにピタッと止めることができませんでした。
またRigidbodyの『Constraints』のFreezeを使うと今度は、ワールド座標で位置が固定されてしまい(空中に浮いた状態)、重力を働かせることができませんでした。
ほかに試したこと
1.慣性をなくす方法で、以下のURL記載の方法も試しました。
https://teratail.com/questions/105824
↓の速度をゼロにしてしまうと、本来効かせたい重力分までゼロになってしまいます。
C#
1rigid.velocity = Vector3.zero;
2.RigidBodyのローカルにConstraintsを働かせる
こちらも試してみました。
https://answers.unity.com/questions/404420/rigidbody-constraints-in-local-space.html
真似して以下のように記載しましたが、ピタッと止めることはできませんでした。
C#
1Vector3 LocalSpeed = transform.InverseTransformDirection(rigid.velocity); 2LocalSpeed.x = 0; 3LocalSpeed.y = 0; 4LocalSpeed.z = 0;
ほかにも『GetRelativePoitVelocity』や『magnitude』を使って、曲げスピードに制限をかけるなども試してみましたが、結果は変わらず、ピタッと止めることができませんでした。
やりたいこと
オレンジカプセルを青色カプセルの子に配置し、
『ゲームコントローラの入力がないとき』
⇒『オレンジカプセルのローカル座標だけに、RigidBodyのConstraintsのFreezePositonを働かせる』
ができれば上記の問題が解決できるのではないかと考えてます。
初歩的な質問で申し訳ございませんが、どなたかご教示いただけると幸いです。
以上です。
###追記(2020年11月12日)ローカル座標を使ったストップ
回転軸をわかりやすくするため、Sphereで説明します。黄色ボールがスクリプトを当ててトルクで回転させたい部品です。

ヒエラルキーの階層は、↓のように段階的に親子関係を作ってます。根本となる青ボールが『Sphere』です。

上記の階層構成を取ることで、個々の黄色ボールのTransformのZ角(25度)の値をきれいに取得することができます。

↓曲げたときの画像

親子関係を取らないと、根本(青ボール側)の角度の合算値が出てしまいます。角度指定が難しくなるかと思います。
この階層構成を使い、黄色ボールのローカルZ角度座標を使って、うまく慣性ストップ・位置固定できないかと考えております。例えば、狙いの角度30度曲がれ!と設定して、30度に近づいたら徐々にスピードが弱まり、30度位置に来たら、ローカル座標Z30度だけを位置キープ(フリーズ)する ということができないか考えております。
以上です。
気になる質問をクリップする
クリップした質問は、後からいつでもMYページで確認できます。
またクリップした質問に回答があった際、通知やメールを受け取ることができます。
バッドをするには、ログインかつ
こちらの条件を満たす必要があります。
回答3件
0
オレンジカプセルの角度を動かしたくない時だけFixedJointを増設して、両者の位置関係をがっちり拘束してしまう...というのはどうでしょうかね?
C#
1using UnityEngine; 2 3[RequireComponent(typeof(Rigidbody), typeof(ConfigurableJoint))] 4public class CapsuleController : MonoBehaviour 5{ 6 [SerializeField] private float torqueMagnitude = 5.0f; 7 private Rigidbody thisRigidbody; 8 private Rigidbody parentRigidbody; 9 private FixedJoint fixedJoint; 10 11 private float input; 12 13 private void Start() 14 { 15 this.thisRigidbody = this.GetComponent<Rigidbody>(); // オレンジ色のカプセル 16 this.parentRigidbody = this.transform.parent.GetComponent<Rigidbody>(); // 青色のカプセル 17 this.SetKinematic(true); 18 } 19 20 private void SetKinematic(bool value) 21 { 22 if (value) 23 { 24 this.parentRigidbody.isKinematic = true; 25 this.thisRigidbody.useGravity = false; 26 this.thisRigidbody.velocity = Vector3.zero; 27 this.thisRigidbody.angularVelocity = Vector3.zero; 28 this.Lock(); 29 } 30 else 31 { 32 this.parentRigidbody.isKinematic = false; 33 this.thisRigidbody.useGravity = true; 34 this.Lock(); 35 } 36 } 37 38 private void Lock() 39 { 40 if (this.fixedJoint != null) 41 { 42 return; 43 } 44 45 this.fixedJoint = this.gameObject.AddComponent<FixedJoint>(); 46 this.fixedJoint.connectedBody = this.parentRigidbody; 47 } 48 49 private void Free() 50 { 51 if (this.fixedJoint == null) 52 { 53 return; 54 } 55 56 Destroy(this.fixedJoint); 57 this.fixedJoint = null; 58 } 59 60 private void Update() 61 { 62 this.input = this.parentRigidbody.isKinematic ? Input.GetAxis("Vertical") : 0.0f; 63 64 // 入力がなければFixedJointを取り付けてロック、入力があれば解除 65 if (Mathf.Approximately(this.input, 0.0f)) 66 { 67 this.Lock(); 68 } 69 else 70 { 71 this.Free(); 72 } 73 74 // スペースバーで青カプセルのisKinematicをオフ、 75 // オレンジカプセルのuseGravityをオンにして落下開始 76 if (Input.GetKeyDown(KeyCode.Space)) 77 { 78 this.SetKinematic(false); 79 } 80 } 81 82 private void FixedUpdate() 83 { 84 // 今回の実験では、オレンジカプセルの回転軸がローカルX軸になるようにしてしまったため 85 // X軸周りのトルクをかけていますが、ご質問者さんの場合はY軸ということでしょうかね? 86 this.thisRigidbody.AddRelativeTorque(this.input * this.torqueMagnitude, 0.0f, 0.0f); 87 } 88}
##追記
根拠のない直感なんですが、ヘビ型ロボットのようなものを作る布石ということを念頭に置くと、個々の体節が駆動する仕組みはなるべくシンプルにしておいた方がいいような予感がします。
駆動方法についても、個人的には当初のAddRelativeTorqueによる方法は「オレンジカプセルを指でつまんでひねる」といったイメージ...つまりヘビ本体の動力ではなく、外部からの力で回転しているような感じがしました。それよりもジョイント部分に仕込まれたモーターで回転させるイメージの方がしっくりくる気がするのですが、いかがでしょうかね?
オレンジカプセルのスクリプトを下記のようにしてみました。本質的なのはUpdateとFixedUpdateで、Start内ではジョイントのパラメーターを設定しているだけです。
ここで設定しなくてもジョイントのインスペクター上に直接入力すればいいのですが、やたら設定項目が多くてどれをいじったか忘れてしまいそうになりこのようにしました。
C#
1using UnityEngine; 2 3[RequireComponent(typeof(ConfigurableJoint))] 4public class CapsuleController2 : MonoBehaviour 5{ 6 [SerializeField] private float angularSpeedInDegrees = 120.0f; 7 [SerializeField] private float damper = 100.0f; 8 [SerializeField] private float angularLimitInDegrees = 60.0f; 9 10 private ConfigurableJoint configurableJoint; 11 private float input; 12 13 private void Start() 14 { 15 this.configurableJoint = this.GetComponent<ConfigurableJoint>(); 16 this.configurableJoint.xMotion = ConfigurableJointMotion.Locked; 17 this.configurableJoint.yMotion = ConfigurableJointMotion.Locked; 18 this.configurableJoint.zMotion = ConfigurableJointMotion.Locked; 19 this.configurableJoint.angularXMotion = ConfigurableJointMotion.Limited; 20 this.configurableJoint.angularYMotion = ConfigurableJointMotion.Locked; 21 this.configurableJoint.angularZMotion = ConfigurableJointMotion.Locked; 22 this.configurableJoint.highAngularXLimit = new SoftJointLimit 23 { 24 limit = this.angularLimitInDegrees 25 }; 26 this.configurableJoint.lowAngularXLimit = new SoftJointLimit 27 { 28 limit = -this.angularLimitInDegrees 29 }; 30 this.configurableJoint.angularXDrive = new JointDrive 31 { 32 maximumForce = float.MaxValue, 33 positionSpring = 0.0f, 34 positionDamper = this.damper 35 }; 36 } 37 38 private void Update() 39 { 40 this.input = Input.GetAxis("Vertical"); 41 } 42 43 private void FixedUpdate() 44 { 45 this.configurableJoint.targetAngularVelocity = new Vector3( 46 this.input * this.angularSpeedInDegrees * Mathf.Deg2Rad, 47 0.0f, 48 0.0f); 49 } 50}
また、両カプセルのコライダーはBoxColliderに差し替えました。丸いカプセルではなく角柱にすることで、地面の上に落ちた後ふとしたはずみにコケてしまうのを防ごうという魂胆です。Freeze Rotation Yをオンにすることも考えたのですが、力の解決の結果すごく大きな力がかかることがあるようで、たまに空高く吹っ飛んでしまうことがありました。
他にも、青カプセルとオレンジカプセルを親子関係にするのはやめました。親子関係になっていると、青カプセルが移動・回転した時に子オブジェクトであるオレンジカプセルも移動・回転してしまうことになります。経験上、物理シミュレーションの制御下にあるオブジェクトの位置や姿勢をダイレクトに操作するとろくなことにならないと思っておりまして、このようなオレンジカプセルの移動・回転もそれと同様の性質を持つだろうと考えてのことです。
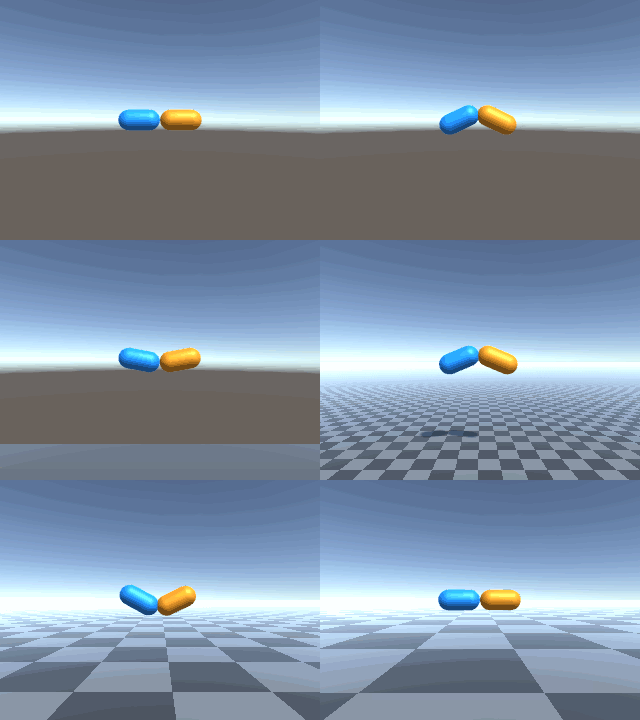
動かしてみると下図のようになりました。コメント欄で申し上げたたとえ話の、スカイダイビングをする人のような挙動になっています。
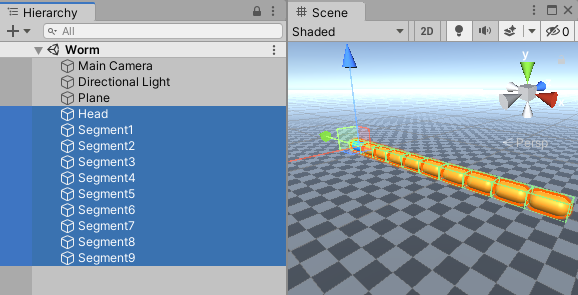
また、このようなコンセプトで駆動する体節を鎖状に繋げるとどんな挙動をするだろうかと気になりまして、下図のようにオブジェクトをセットアップしてみました。Headが青カプセル、Segment1~9がオレンジカプセルで、Segment1~9はConfigurableJointを持っており、Segment1はHeadに、Segment2はSegment1に...といった具合に鎖状につながっています。
コライダーはHeadだけCapsuleCollider、他はBoxColliderとしました。
HeadとSegment1~8はスクリプトを持っておらず、Segment9にだけ下記のようなスクリプトをアタッチしました。
CapsuleController2はtargetAngularVelocityを使ってモーターの速度を設定する方式なのに対し、こちらはtargetRotationを使って目標角度を与える方式になっているという差異はありますが、セグメント間のジョイントが動力になっているという点は同様です。
C#
1using System.Collections.Generic; 2using UnityEngine; 3 4[RequireComponent(typeof(ConfigurableJoint))] 5public class WormController : MonoBehaviour 6{ 7 [SerializeField] private float omegaInDegrees = 90.0f; 8 [SerializeField] private float timeOffset = 0.5f; 9 [SerializeField] private float spring = 500.0f; 10 [SerializeField] private float damper = 100.0f; 11 [SerializeField] private float angularLimitInDegrees = 60.0f; 12 13 private readonly List<ConfigurableJoint> joints = new List<ConfigurableJoint>(); 14 private float time; 15 16 private void Start() 17 { 18 var j = this.GetComponent<ConfigurableJoint>(); 19 do 20 { 21 j.xMotion = ConfigurableJointMotion.Locked; 22 j.yMotion = ConfigurableJointMotion.Locked; 23 j.zMotion = ConfigurableJointMotion.Locked; 24 j.angularXMotion = ConfigurableJointMotion.Free; 25 j.angularYMotion = ConfigurableJointMotion.Locked; 26 j.angularZMotion = ConfigurableJointMotion.Locked; 27 j.angularXDrive = new JointDrive 28 { 29 maximumForce = float.MaxValue, 30 positionSpring = this.spring, 31 positionDamper = this.damper 32 }; 33 this.joints.Add(j); 34 j = j.connectedBody.GetComponent<ConfigurableJoint>(); 35 } while (j != null); 36 } 37 38 private void FixedUpdate() 39 { 40 for (var i = 0; i < this.joints.Count; i++) 41 { 42 var j = this.joints[i]; 43 var t = Mathf.Max(this.time - (i * this.timeOffset), 0.0f); 44 var angle = this.angularLimitInDegrees * Mathf.Sin(t * this.omegaInDegrees * Mathf.Deg2Rad); 45 j.targetRotation = Quaternion.Euler(angle, 0.0f, 0.0f); 46 } 47 48 this.time += Time.deltaTime; 49 } 50}
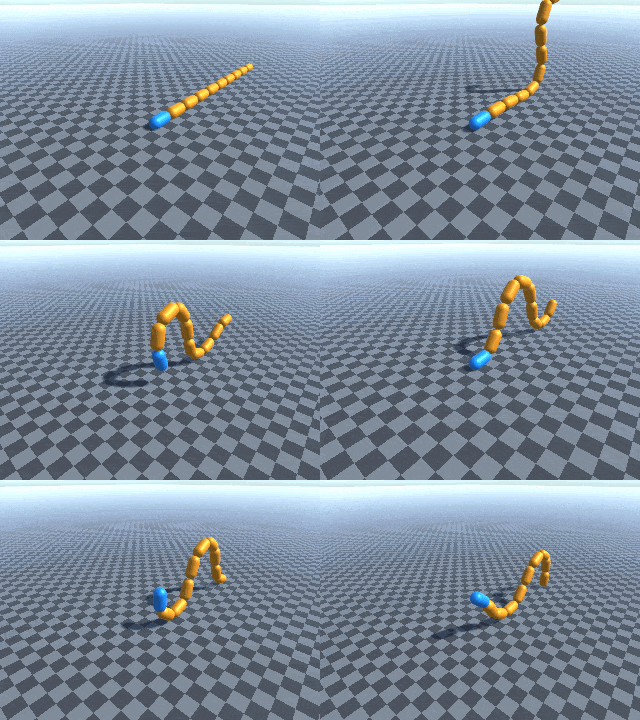
実行してみると、おぞましい化け物のような動きをしました...
##追記: targetRotationによるカプセル操作
C#
1using UnityEngine; 2 3[RequireComponent(typeof(ConfigurableJoint))] 4public class CapsuleController3 : MonoBehaviour 5{ 6 [SerializeField] private float angularSpeedInDegrees = 120.0f; 7 [SerializeField] private float spring = 500.0f; 8 [SerializeField] private float damper = 100.0f; 9 [SerializeField] private float angularLimitInDegrees = 60.0f; 10 11 private ConfigurableJoint configurableJoint; 12 private float angle; 13 14 private void Start() 15 { 16 this.configurableJoint = this.GetComponent<ConfigurableJoint>(); 17 this.configurableJoint.xMotion = ConfigurableJointMotion.Locked; 18 this.configurableJoint.yMotion = ConfigurableJointMotion.Locked; 19 this.configurableJoint.zMotion = ConfigurableJointMotion.Locked; 20 this.configurableJoint.angularXMotion = ConfigurableJointMotion.Free; 21 this.configurableJoint.angularYMotion = ConfigurableJointMotion.Locked; 22 this.configurableJoint.angularZMotion = ConfigurableJointMotion.Locked; 23 this.configurableJoint.angularXDrive = new JointDrive 24 { 25 maximumForce = float.MaxValue, 26 positionSpring = this.spring, 27 positionDamper = this.damper 28 }; 29 } 30 31 private void Update() 32 { 33 var input = Input.GetAxis("Vertical"); 34 this.angle = Mathf.Clamp( 35 this.angle + (this.angularSpeedInDegrees * Time.deltaTime * input), 36 -this.angularLimitInDegrees, 37 this.angularLimitInDegrees); 38 this.configurableJoint.targetRotation = Quaternion.Euler(this.angle, 0.0f, 0.0f); 39 } 40}
投稿2020/10/21 20:53
編集2020/11/10 20:00総合スコア10811
0
ベストアンサー
ArticulationBodyを試してみました。
コメント欄でご紹介いただいた内視鏡をイメージして、下記のように役割分担しています。
- Root...アーティキュレーションのルートとして空のオブジェクトに
ArticulationBodyをアタッチしただけのもの。 - Tail...青い直方体。タイプは
PrismaticJointで、体軸方向への平行移動だけを許可する。内視鏡を配管内へ挿入する腕のつもり。 - PassiveSegment...グレーのカプセル。タイプは
SphericalJointで、±90°までスイングできる。スイングのstiffnessは0、dampingはある程度大きな値とし、これを鎖状に繋いである程度の固さを持つ紐として振る舞わせる。自由にツイスト可能とするが、ツイストのstiffnessは非常に大きな値、dampingはかなり大きな値とする(ツイストをLockedMotionにして完全に回転を禁止しようとすると、無理にねじれを解消しようとした結果なのか暴れ回ることがあったため、多少のねじれは許容するようにした)。内視鏡のコードのつもり。 - ActiveSegment...黄色のカプセル。タイプは
SphericalJointで、±後述の回転角上限÷セグメント数°までスイングできる。stiffnessは非常に大きな値として目標角度まで速やかに回転しつつ、dampingもかなり大きな値としてオーバーシュートがなるべく起こらないようにした。stiffnessが大きいので重力などの外力ではへたれにくく、曲がった形を維持できる。目標角度への追従性が高いため、目標角度は急激に変化させずゆったりと動かすことでそれらしい挙動になると思われる。とはいえ、PassiveSegmentのたわみなどのせいで内視鏡全体としてはいくらかのバネ運動をしてしまうようだった。また、根元のセグメントだけはツイスト可能とし、目標角度操作によって体軸周りに回転できるようにした。内視鏡先端の可動部分のつもり。 - Head...赤いシリンダー。タイプは
FixedJointで、ActiveSegmentの末端に固定された状態にある。後述のEndoscopeControllerがアタッチされている。動作上必須なパーツではないが、アーティキュレーションの動作制御役として具体的な形状を与えたくなったためこのようにした。おまけとしてカメラを搭載しており、内視鏡の映像を見ることができる。
各部位のArticulationBodyの設定は、シーン編集時点ではアンカーの位置・向きを調整する程度にとどめ(今回の場合はアンカーのX軸を体軸方向であるローカルZ軸方向に向けています)、各種物理特性はHeadにアタッチしたEndoscopeControllerで設定させました。
C#
1using System.Collections.Generic; 2using System.Linq; 3using UnityEngine; 4 5public class EndoscopeController : MonoBehaviour 6{ 7 [SerializeField] private float linearSpeed = 5.0f; 8 [SerializeField] private float angleLimit = 150.0f; 9 [SerializeField] private float angularSpeed = 60.0f; 10 [SerializeField] private float activeSegmentStiffness = 1e+07f; 11 [SerializeField] private float activeSegmentDamping = 1e+05f; 12 [SerializeField] private float passiveSegmentSwingDamping = 1e+04f; 13 [SerializeField] private float passiveSegmentTwistStiffness = 1e+07f; 14 [SerializeField] private float passiveSegmentTwistDamping = 1e+05f; 15 [SerializeField] private float tailDamping = 1e+04f; 16 [SerializeField] private bool lockPassiveSegmentSwingH; 17 [SerializeField] private bool lockPassiveSegmentSwingV; 18 [SerializeField] private bool lockPassiveSegmentTwist; 19 [SerializeField] private float headMass = 0.1f; 20 [SerializeField] private float activeSegmentMass = 0.1f; 21 [SerializeField] private float passiveSegmentMass = 1.0f; 22 [SerializeField] private float tailMass = 2.0f; 23 [SerializeField] private string twistInputName = "Horizontal"; 24 [SerializeField] private string linearInputName = "Vertical"; 25 [SerializeField] private string swingInputXName = "Horizontal2"; 26 [SerializeField] private string swingInputYName = "Vertical2"; 27 28 // 各部位 29 private ArticulationBody head; 30 private readonly List<ArticulationBody> activeSegments = new List<ArticulationBody>(); 31 private ArticulationBody lastActiveSegment; 32 private readonly List<ArticulationBody> passiveSegments = new List<ArticulationBody>(); 33 private ArticulationBody tail; 34 private ArticulationBody root; 35 36 // 目標角度 37 private Vector2 targetSwingAngle; 38 private float targetTwistAngle; 39 40 private void Awake() 41 { 42 // まず各部位を取得する 43 this.head = this.GetComponent<ArticulationBody>(); 44 var nextBody = this.head.transform.parent.GetComponent<ArticulationBody>(); 45 while (nextBody.name.Contains("Active")) 46 { 47 this.activeSegments.Add(nextBody); 48 nextBody = nextBody.transform.parent.GetComponent<ArticulationBody>(); 49 } 50 this.lastActiveSegment = this.activeSegments.Last(); 51 while (nextBody.name.Contains("Passive")) 52 { 53 this.passiveSegments.Add(nextBody); 54 nextBody = nextBody.transform.parent.GetComponent<ArticulationBody>(); 55 } 56 this.tail = nextBody; 57 this.root = this.tail.transform.parent.GetComponent<ArticulationBody>(); 58 Debug.Log($"Active segments: {this.activeSegments.Count}, Passive segments: {this.passiveSegments.Count}"); 59 60 // 頭の設定 61 this.head.mass = this.headMass; 62 this.head.jointType = ArticulationJointType.FixedJoint; 63 64 // アクティブセグメントの設定 65 var angleLimitOfSegment = this.angleLimit / this.activeSegments.Count; 66 foreach (var segment in this.activeSegments) 67 { 68 segment.mass = this.activeSegmentMass; 69 segment.jointType = ArticulationJointType.SphericalJoint; 70 segment.swingYLock = segment.swingZLock = ArticulationDofLock.LimitedMotion; 71 segment.twistLock = ArticulationDofLock.LockedMotion; 72 segment.yDrive = segment.zDrive = new ArticulationDrive 73 { 74 upperLimit = angleLimitOfSegment, 75 lowerLimit = -angleLimitOfSegment, 76 stiffness = this.activeSegmentStiffness, 77 damping = this.activeSegmentDamping, 78 forceLimit = float.MaxValue 79 }; 80 } 81 82 // 根元のアクティブセグメントだけ設定を一部変える 83 this.lastActiveSegment.twistLock = ArticulationDofLock.FreeMotion; 84 this.lastActiveSegment.xDrive = new ArticulationDrive 85 { 86 stiffness = this.activeSegmentStiffness, 87 damping = this.activeSegmentDamping, 88 forceLimit = float.MaxValue 89 }; 90 91 // パッシブセグメントの設定 92 foreach (var segment in this.passiveSegments) 93 { 94 segment.mass = this.passiveSegmentMass; 95 segment.jointType = ArticulationJointType.SphericalJoint; 96 segment.swingYLock = this.lockPassiveSegmentSwingH 97 ? ArticulationDofLock.LockedMotion 98 : ArticulationDofLock.LimitedMotion; 99 segment.swingZLock = this.lockPassiveSegmentSwingV 100 ? ArticulationDofLock.LockedMotion 101 : ArticulationDofLock.LimitedMotion; 102 segment.twistLock = this.lockPassiveSegmentTwist 103 ? ArticulationDofLock.LockedMotion 104 : ArticulationDofLock.FreeMotion; 105 segment.xDrive = new ArticulationDrive 106 { 107 stiffness = this.passiveSegmentTwistStiffness, 108 damping = this.passiveSegmentTwistDamping, 109 forceLimit = float.MaxValue 110 }; 111 segment.yDrive = segment.zDrive = new ArticulationDrive 112 { 113 upperLimit = 90.0f, 114 lowerLimit = -90.0f, 115 damping = this.passiveSegmentSwingDamping, 116 forceLimit = float.MaxValue 117 }; 118 } 119 120 // 尻尾の設定 121 this.tail.mass = this.tailMass; 122 this.tail.jointType = ArticulationJointType.PrismaticJoint; 123 this.tail.linearLockX = ArticulationDofLock.FreeMotion; 124 this.tail.linearLockY = this.tail.linearLockZ = ArticulationDofLock.LockedMotion; 125 this.tail.xDrive = new ArticulationDrive 126 { 127 damping = this.tailDamping, 128 forceLimit = float.MaxValue 129 }; 130 131 // ルートの設定 132 this.root.useGravity = false; 133 this.root.immovable = true; 134 } 135 136 private void FixedUpdate() 137 { 138 // アクティブセグメントの屈曲 139 var swingInput = new Vector2( 140 Input.GetAxis(this.swingInputXName), 141 Input.GetAxis(this.swingInputYName)); 142 this.targetSwingAngle += Time.deltaTime * this.angularSpeed * swingInput; 143 this.targetSwingAngle.x = Mathf.Clamp(this.targetSwingAngle.x, -this.angleLimit, this.angleLimit); 144 this.targetSwingAngle.y = Mathf.Clamp(this.targetSwingAngle.y, -this.angleLimit, this.angleLimit); 145 var targetAngleOfSegment = this.targetSwingAngle / this.activeSegments.Count; 146 foreach (var segment in this.activeSegments) 147 { 148 var segmentDrive = segment.yDrive; 149 segmentDrive.target = targetAngleOfSegment.x; 150 segment.yDrive = segmentDrive; 151 segmentDrive.target = targetAngleOfSegment.y; 152 segment.zDrive = segmentDrive; 153 } 154 155 // アクティブセグメントのひねり 156 var twistInput = Input.GetAxis(this.twistInputName); 157 this.targetTwistAngle += Time.deltaTime * this.angularSpeed * twistInput; 158 var lastActiveSegmentDrive = this.lastActiveSegment.xDrive; 159 lastActiveSegmentDrive.target = this.targetTwistAngle; 160 this.lastActiveSegment.xDrive = lastActiveSegmentDrive; 161 162 // 尻尾の押し引き 163 var linearInput = Input.GetAxis(this.linearInputName); 164 var tailDrive = this.tail.xDrive; 165 tailDrive.targetVelocity = linearInput * this.linearSpeed; 166 this.tail.xDrive = tailDrive; 167 } 168}
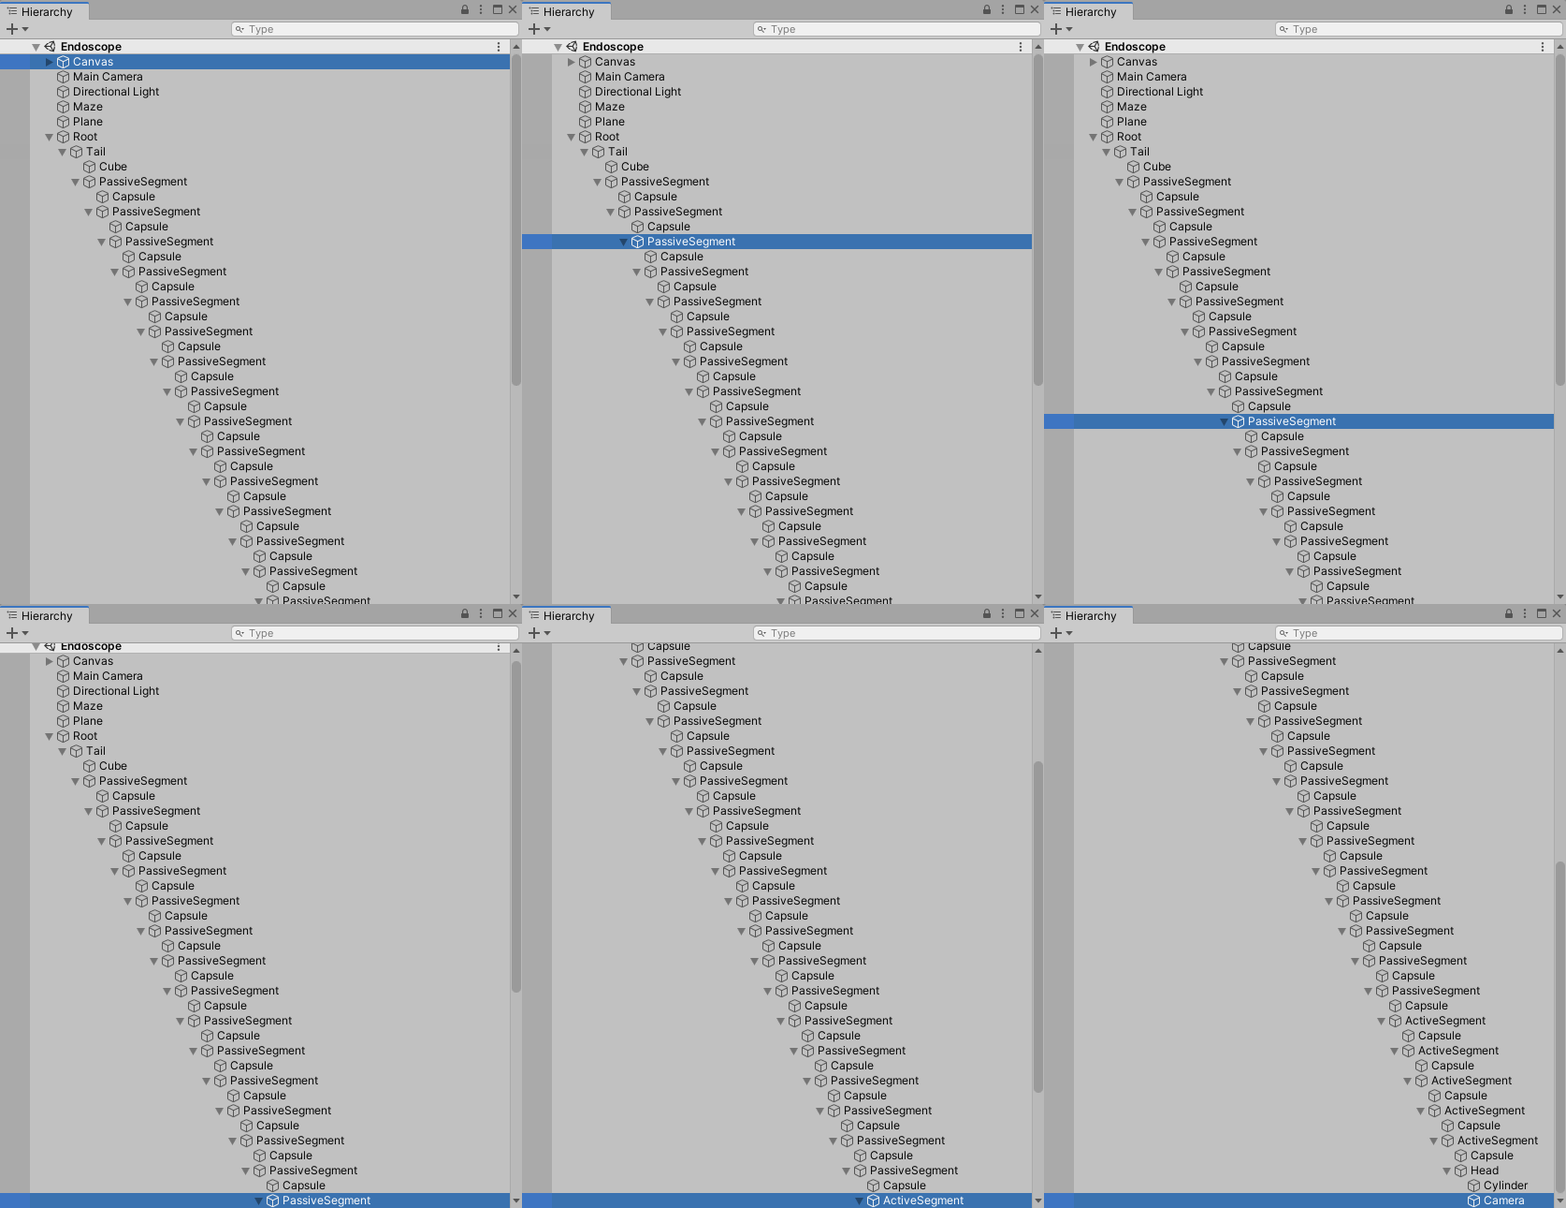
ヒエラルキーは壮絶な様相を呈しています。
操作方法としては、左スティック上下で尻尾を押し引きする、左スティック左右で可動部をひねる、右スティックで可動部を上下左右に屈曲させる...といったもの想定してみました。
頭部を動かしてみましたが、今のところ操作をやめるとピタッと静止するという風にはできておらず、若干揺れています。もしかすると適当なところで妥協した方がいいかもしれません。静止させるために過剰な拘束を行うと、拘束に反する力がかかった時にそれを解消しようとして大暴れするようなこともありました...
せっかくなので迷路の中を探検させてみましたが、コードが短くてあまり奥までは進めません。アーティキュレーションは最大64連結までの制限があるらしいので、あまり長くはできないかもしれませんね。
コード部分を通常のRigidbodyの鎖にするような方針もあり得るかもしれませんが、RigidbodyとArticulationBodyを手軽に接続できるジョイントみたいなものは見当たらず、ちょっと手間がかかりそうです。
投稿2020/11/15 22:22
総合スコア10811
バッドをするには、ログインかつ
こちらの条件を満たす必要があります。
0
ヒンジジョイントではどうなるか試してみました。
実験に使ったオブジェクトはメニューから作成できる単なるSphereで、それらを横に4個並べてそれぞれRigidbody、HingeJoint、後述のArmSegmentスクリプトをアタッチしています。RigidbodyやHingeJointはアタッチしたての状態のままで、ジョイントの設定はスクリプト内で行いました。
また、ご質問者さんのスクリーンショットにならって親、子、孫、ひ孫の階層構造にしました。親には青いマテリアル、子には黄色いマテリアルを割り当てましたが、それらマテリアルの柄をビーチボールみたいな市松模様にして回転状態を見やすくしてみようと思いました。
ArmSegmentは下記のようになっています。インスペクター上で(または別のスクリプトから)targetAngleを操作すると、それに向かってヒンジの角度を調整しようとします。
C#
1using UnityEngine; 2 3#if UNITY_EDITOR 4using UnityEditor; 5#endif 6 7[RequireComponent(typeof(Rigidbody), typeof(HingeJoint))] 8public class ArmSegment : MonoBehaviour 9{ 10 // 目標角度 11 public float targetAngle; 12 13 // ヒンジの軸の向き 14 [SerializeField] private Vector3 axis = Vector3.forward; 15 16 // オフならヒンジのspring、damper、targetPositionでコントロールし 17 // オンならgain、derivativeTime、integrationTimeでコントロールする 18 [SerializeField] private bool usePidControl; 19 20 [Header("Spring-Damper Control")] 21 22 // ヒンジジョイントのバネ強度 23 [SerializeField] private float spring = 100000.0f; 24 25 // ヒンジジョイントのダンパー強度 26 [SerializeField] private float damper = 10000.0f; 27 28 [Header("PID Control")] 29 30 // 目標角からの偏差に比例したトルクをかける際の比例定数 31 [SerializeField] private float gain = 1000.0f; 32 33 // 微分項の効きの強さ 34 [SerializeField] private float derivativeTime = 0.2f; 35 36 // 積分項の効きの弱さ 37 [SerializeField] private float integrationTime = 100.0f; 38 39 // 前回のFixedUpdate時の目標角からの偏差...偏差変化率の算出に使う 40 // targetAngleが大きく変更された、あるいはアームに衝撃が加わって 41 // 角度が目標角から急激にずれたときにこの値が変動する 42 // derivativeTimeを上げるとずれを補正する追加のトルクがかかる 43 private float previousDeltaAngle; 44 45 // 目標角からの偏差を積算したもの 46 // もしこれがゼロからずれているときは、長時間にわたって目標角度を超えたまま、 47 // あるいは足りないままであると考えられる 48 // integrationTimeを下げるとずれを補正する追加のトルクがかかる 49 private float integratedDeltaAngle; 50 51 private ArmSegment parent; 52 private new Rigidbody rigidbody; 53 private HingeJoint joint; 54 55 private void Awake() 56 { 57 // ヒンジのanchorはVector3.zeroとし、ボールの中心を回転軸とする 58 var p = this.transform.parent; 59 this.parent = p == null ? null : p.GetComponent<ArmSegment>(); 60 this.rigidbody = this.GetComponent<Rigidbody>(); 61 this.joint = this.GetComponent<HingeJoint>(); 62 this.joint.autoConfigureConnectedAnchor = true; 63 this.joint.axis = this.axis; 64 this.joint.anchor = Vector3.zero; 65 } 66 67 private void Start() 68 { 69 // ひ孫のヒンジを孫のRigidbodyに、孫のヒンジを子のRigidbodyに、 70 // 子のヒンジを親のRigidbodyに繋ぎ、親のヒンジはワールド空間に繋ぐ 71 this.joint.connectedBody = this.parent == null ? null : this.parent.rigidbody; 72 } 73 74 private void FixedUpdate() 75 { 76 this.joint.useSpring = !this.usePidControl; 77 if (this.usePidControl) 78 { 79 // AddRelativeTorqueを使う場合 80 var deltaAngle = this.targetAngle - this.joint.angle; 81 this.integratedDeltaAngle += deltaAngle; 82 var deltaAngleVelocity = (deltaAngle - this.previousDeltaAngle) / Time.deltaTime; 83 var control = Mathf.Deg2Rad * this.gain * ( 84 deltaAngle + 85 (this.integratedDeltaAngle / this.integrationTime) + 86 (deltaAngleVelocity * this.derivativeTime)); 87 this.rigidbody.AddRelativeTorque(this.joint.axis * control); 88 this.previousDeltaAngle = deltaAngle; 89 } 90 else 91 { 92 // ヒンジのバネを使う場合 93 this.joint.spring = new JointSpring 94 { 95 spring = this.spring, 96 damper = this.damper, 97 targetPosition = this.targetAngle 98 }; 99 } 100 } 101 102 #if UNITY_EDITOR 103 private void OnDrawGizmos() 104 { 105 if (this.joint == null) 106 { 107 return; 108 } 109 110 Handles.Label(this.transform.position, $"T: {this.targetAngle:F1}\nA: {this.joint.angle:F1}"); 111 } 112 #endif 113}
各部位の角度としてはHingeJoint.angleを使用しました。ご質問者さんのおっしゃる通り、親子関係を持たない場合はTransformから相対角度を求めるのに座標系変換が必要で一手間かかるでしょう。今回はご質問者さんのやり方に沿って親子関係を構築しましたが、ジョイントによってはこういった手軽な方法で角度を得られますので、親子関係を作らない場合でもそれらに頼ればさほど面倒はないように思います。
ヒンジジョイントにも駆動機構がありますので、まずはそれを使って制御させてみました。usePidControlをオフにするとそのような動作になります。
ヒエラルキー上の4つのオブジェクトを全部選択して、インスペクターでtargetAngleを一斉に操作したところ下図のようになりました。
一方、ご質問者さんが想定しているようなトルクを加える方法だと、トルクの大きさを自前で調整してやる必要があるでしょう。usePidControlをオンにすると下図のようになりました。
「PID制御 - Wikipedia」の記事をまねてみたつもりですが、ご覧の通り追従性が悪く、動きがプルプルしています...
以前申し上げたようにロボットとか制御工学は無知でして、計算が間違っているかパラメーター調整が甘いか、あるいは物理シミュレーション上の制限...タイムステップが長すぎるとかの原因があるのだろうと思います。まあポンコツロボットみたいでかわいいので、表現上面白い使い道があるかもしれませんが...
自前でトルクをかける方法は、Unity組み込みのヒンジ駆動機構より自由度が高く調整の余地があると言えるでしょう。おそらくご質問者さんの方がこういった制御についてお詳しいように思いますので、うまくやれば安定性と目標角度到達性を両立できるかもしれません。
投稿2020/11/12 22:31
総合スコア10811
バッドをするには、ログインかつ
こちらの条件を満たす必要があります。
あなたの回答
tips
太字
斜体
打ち消し線
見出し
引用テキストの挿入
コードの挿入
リンクの挿入
リストの挿入
番号リストの挿入
表の挿入
水平線の挿入
プレビュー
質問の解決につながる回答をしましょう。 サンプルコードなど、より具体的な説明があると質問者の理解の助けになります。 また、読む側のことを考えた、分かりやすい文章を心がけましょう。


バッドをするには、ログインかつ
こちらの条件を満たす必要があります。
2020/10/22 01:57
2020/10/22 03:22
2020/10/22 06:17 編集
2020/10/22 13:25
2020/10/22 14:20
2020/11/10 10:26
2020/11/10 12:16
2020/11/10 13:30
2020/11/10 20:03 編集
2020/11/12 05:05
2020/11/12 22:31
2020/11/13 01:34
2020/11/15 23:02 編集