
「クリックした場所を赤くするShader」とのシェーダーがどのようなものかご提示いただけますと対処法検討の参考になるかもしれません。タイトルによるとシェーダーグラフでしょうか? グラフの内容がわかるようなスクリーンショットですとか、あるいはもしご参考になさったWebサイトがありましたらご提示いただけると参考になりそうに思います。
前提
Meshに色塗りする為に、
クリックした場所を赤くするShaderを作成
画面左Image:塗り状況保存用RenderTexture(UV画像)
画面中央Mesh:クリックした場所を赤くするShader

--!追記
Shader画像追加

実現したいこと
クリック時しか適応できてないので、塗り状況保存するために、
shader適応後のTexture?RenderTexture?を取得したい
該当のソースコード
C#
1 m_mat.SetMatrix("_MeshObjectWorld", gameObject.transform.localToWorldMatrix); 2 RaycastHit hit; 3 Ray ray = Camera.main.ScreenPointToRay(Input.mousePosition); 4 Vector4 mwp = Vector3.positiveInfinity; 5 6 if (Physics.Raycast(ray, out hit)) 7 { 8 mwp = hit.point; 9 10 mwp.w = Input.GetMouseButton(0) ? 1 : 0;//クリックしてるか 11 12 m_mat.SetVector("_Mouse", mwp);//Shaderにぶつかった場所を渡す 13 }
試したこと
Graphics.Blit?を使用してる例があったのでコピペしてみましたが、paintedTexture(塗り状況保存用RenderTexture)は灰色一色になりました
C#
1 var mainPaintTextureBuffer = RenderTexture.GetTemporary(paintedTexture.width, paintedTexture.height, 0, RenderTextureFormat.ARGB32, RenderTextureReadWrite.Linear); 2 m_mat.SetVector("_Mouse", mwp); 3 Graphics.Blit(paintedTexture, mainPaintTextureBuffer, m_mat); 4 Graphics.Blit(mainPaintTextureBuffer, paintedTexture); 5 RenderTexture.ReleaseTemporary(mainPaintTextureBuffer);
補足情報(FW/ツールのバージョンなど)
Unity 2021.3.16f.1
3D(URP)
気になる質問をクリップする
クリップした質問は、後からいつでもMYページで確認できます。
またクリップした質問に回答があった際、通知やメールを受け取ることができます。
追記いたしました
クリックした場所を赤くするのは実現できたかなと思ってましたが、Shaderについて詳しくないので間違っている箇所があればご教授いただければ幸いです。
回答1件
0
![]() ベストアンサー
ベストアンサー
すみませんがモデル用シェーダーをいじって考えているうちに少々ノード構成が変わってしまいまして、下図のようになりました。ですがワールド空間上でマウスポインタとの距離を測ってブラシ色を乗せるという方針はそのままです。グラフの作りに不明点がありましたらご遠慮なくコメントください。

これに対して、UV空間上で色塗りをするとなると、画面上のレンダリングとは別にもう一度UV空間上でのレンダリングを行う必要があると思います。それ用のシェーダーは下記のようにしてみました。当初はモデル用シェーダーにノードを追加してUVレンダリングにも転用できるようにしようかと思ったのですが、どうにも意図通りの挙動にできず挫折しまして、別ファイルで記述することにしました。
ShaderLab
1Shader "Unlit/RenderMeshToTexture" 2{ 3 Properties 4 { 5 _BrushColor ("Brush Color", Color) = (1.0, 0.0, 0.0, 1.0) 6 _BrushSize ("Brush Size", Float) = 1.0 7 _BrushStrength ("Brush Strength", Range(0.0, 1.0)) = 0.75 8 _Mouse ("World Space Mouse Position", Vector) = (0.0, 0.0, 0.0, 0.0) 9 } 10 11 SubShader 12 { 13 Tags { "RenderType" = "Transparent" "Queue" = "Transparent" "RenderPipeline" = "UviversalRenderPipeline" } 14 15 Pass 16 { 17 Cull Off 18 ZWrite Off 19 ZTest Always 20 Blend SrcAlpha OneMinusSrcAlpha 21 22 HLSLPROGRAM 23 24 #pragma vertex vert 25 #pragma fragment frag 26 27 #include "Packages/com.unity.render-pipelines.universal/ShaderLibrary/Core.hlsl" 28 29 struct Attributes 30 { 31 float4 positionOS : POSITION; 32 float2 uv : TEXCOORD0; 33 }; 34 35 struct Varyings 36 { 37 float3 positionWS : TEXCOORD0; 38 float4 positionHCS : SV_POSITION; 39 }; 40 41 Varyings vert(Attributes IN) 42 { 43 Varyings OUT; 44 45 // ブラシとの距離を測定するのにワールド座標が必要になるので、 46 // ワールド座標をフラグメントシェーダーに送る 47 OUT.positionWS = TransformObjectToWorld(IN.positionOS.xyz); 48 49 // UV空間でレンダリングしたいので、UV座標を頂点座標とみなして用いる 50 OUT.positionHCS = float4(IN.uv * 2.0 - 1.0, 0.0, 1.0); 51 52 // プラットフォームによってレンダーテクスチャの 53 // 座標系の上下が違うので、適宜ひっくり返す 54 #if UNITY_UV_STARTS_AT_TOP 55 OUT.positionHCS.y *= -1.0; 56 #endif 57 58 return OUT; 59 } 60 61 half4 _BrushColor; 62 float _BrushSize; 63 float _BrushStrength; 64 float4 _Mouse; 65 66 half4 frag(Varyings IN) : SV_Target 67 { 68 // シェーダーグラフでの場合と同様の手順でブラシの不透明度を算出し... 69 float alpha = (1.0 - smoothstep(_BrushSize * _BrushStrength, _BrushSize, distance(_Mouse.xyz, IN.positionWS))) * _Mouse.w * _BrushColor.a; 70 71 // 十分に透明なフラグメントはレンダリングする必要がないためクリッピングし... 72 clip(alpha - 0.0001); 73 74 // ブラシの色と不透明度を組み合わせて出力する 75 return half4(_BrushColor.rgb, alpha); 76 } 77 78 ENDHLSL 79 } 80 } 81}
そして、モデルオブジェクトにアタッチするスクリプトは下記のようにしました。
C#
1using UnityEngine; 2 3[RequireComponent(typeof(MeshRenderer), typeof(MeshFilter))] 4public class MeshPainter : MonoBehaviour 5{ 6 static readonly int s_mainTextureProperty = Shader.PropertyToID("_MainTexture"); 7 static readonly int s_brushColorProperty = Shader.PropertyToID("_BrushColor"); 8 static readonly int s_brushSizeProperty = Shader.PropertyToID("_BrushSize"); 9 static readonly int s_brushStrengthProperty = Shader.PropertyToID("_BrushStrength"); 10 static readonly int s_mouseProperty = Shader.PropertyToID("_Mouse"); 11 12 // インスペクター上で、ここに前述のレンダーテクスチャ描画用のシェーダーをセットしておく 13 [SerializeField] Shader m_renderToTextureShader; 14 15 Material m_mat; 16 Material m_renderToTextureMat; 17 Texture m_initialTexture; 18 RenderTexture m_paintedTexture; 19 Mesh m_mesh; 20 21 void Start() 22 { 23 // Start時にモデルのマテリアルのテクスチャを 24 // 元々のテクスチャをコピーしたレンダーテクスチャに差し替えておく 25 m_mat = GetComponent<MeshRenderer>().material; 26 m_initialTexture = m_mat.GetTexture(s_mainTextureProperty); 27 m_paintedTexture = new RenderTexture(m_initialTexture.width, m_initialTexture.height, 0); 28 Graphics.Blit(m_initialTexture, m_paintedTexture); 29 m_mat.SetTexture(s_mainTextureProperty, m_paintedTexture); 30 31 // レンダーテクスチャ描画用のマテリアルを作っておく 32 m_renderToTextureMat = new Material(m_renderToTextureShader); 33 m_renderToTextureMat.SetColor(s_brushColorProperty, m_mat.GetColor(s_brushColorProperty)); 34 m_renderToTextureMat.SetFloat(s_brushSizeProperty, m_mat.GetFloat(s_brushSizeProperty)); 35 m_renderToTextureMat.SetFloat(s_brushStrengthProperty, m_mat.GetFloat(s_brushStrengthProperty)); 36 37 // メッシュも取得しておく 38 m_mesh = GetComponent<MeshFilter>().sharedMesh; 39 } 40 41 void OnDestroy() 42 { 43 // コンポーネント破壊時には不要なオブジェクトも破壊し、 44 // テクスチャも元に戻すことにする 45 Destroy(m_renderToTextureMat); 46 Destroy(m_paintedTexture); 47 m_mat.mainTexture = m_initialTexture; 48 } 49 50 void Update() 51 { 52 Ray ray = Camera.main.ScreenPointToRay(Input.mousePosition); 53 Vector4 mwp = Vector4.zero; 54 55 if (Input.GetMouseButton(0) && Physics.Raycast(ray, out RaycastHit hit)) 56 { 57 mwp = hit.point; 58 mwp.w = 1.0f; 59 60 // マウスボタンを押しており、かつレイがヒットしているなら 61 // レンダーテクスチャへのレンダリングも行う 62 RenderTexture activeTexture = RenderTexture.active; 63 RenderTexture.active = m_paintedTexture; 64 m_renderToTextureMat.SetVector(s_mouseProperty, mwp); 65 m_renderToTextureMat.SetPass(0); 66 Graphics.DrawMeshNow(m_mesh, transform.localToWorldMatrix); 67 RenderTexture.active = activeTexture; 68 } 69 70 m_mat.SetVector(s_mouseProperty, mwp); 71 } 72}
これにより、メインの3Dモデル描画とは別に、モデルのテクスチャへもブラシの塗りが描き込まれることで色塗り状態が保持されるかと思います。

ただし上図の通り、UVが不連続になっている部分で塗り漏らしが発生し、下地がスジとして見えてしまうという欠陥があります。これについては、だいぶ前の話になってしまいますが「[Unity]UV共有してる面にもUV2を使って一か所だけにペイントしたい」とのご質問で同様の現象がありまして、toranoさんの場合は隙間を埋めるよう画像処理を加えることで、私の場合はメッシュのポリゴンを膨張させた状態で再度レンダリングすることで対処しました。
ご質問者さんの包丁も、ご提示のUV展開図を拝見しますにけっこうUV不連続があるようですので、スジが目立って見苦しくなってしまうかもしれません。その場合はコメントいただければ対策を組み込んでみようかと思うのですが、あいにく本職の方で面倒な仕事が来てしまったところでして、Unityをいじれるのは後日となってしまうかと思います。
画面上へのレンダリングとテクスチャ上へのレンダリングを統合
グラフの全体図は下図のようになりました。テクスチャ上へのレンダリングもこのシェーダーでまかなうようにした都合上、Render FaceはBothとして裏面も描画するように設定しています。
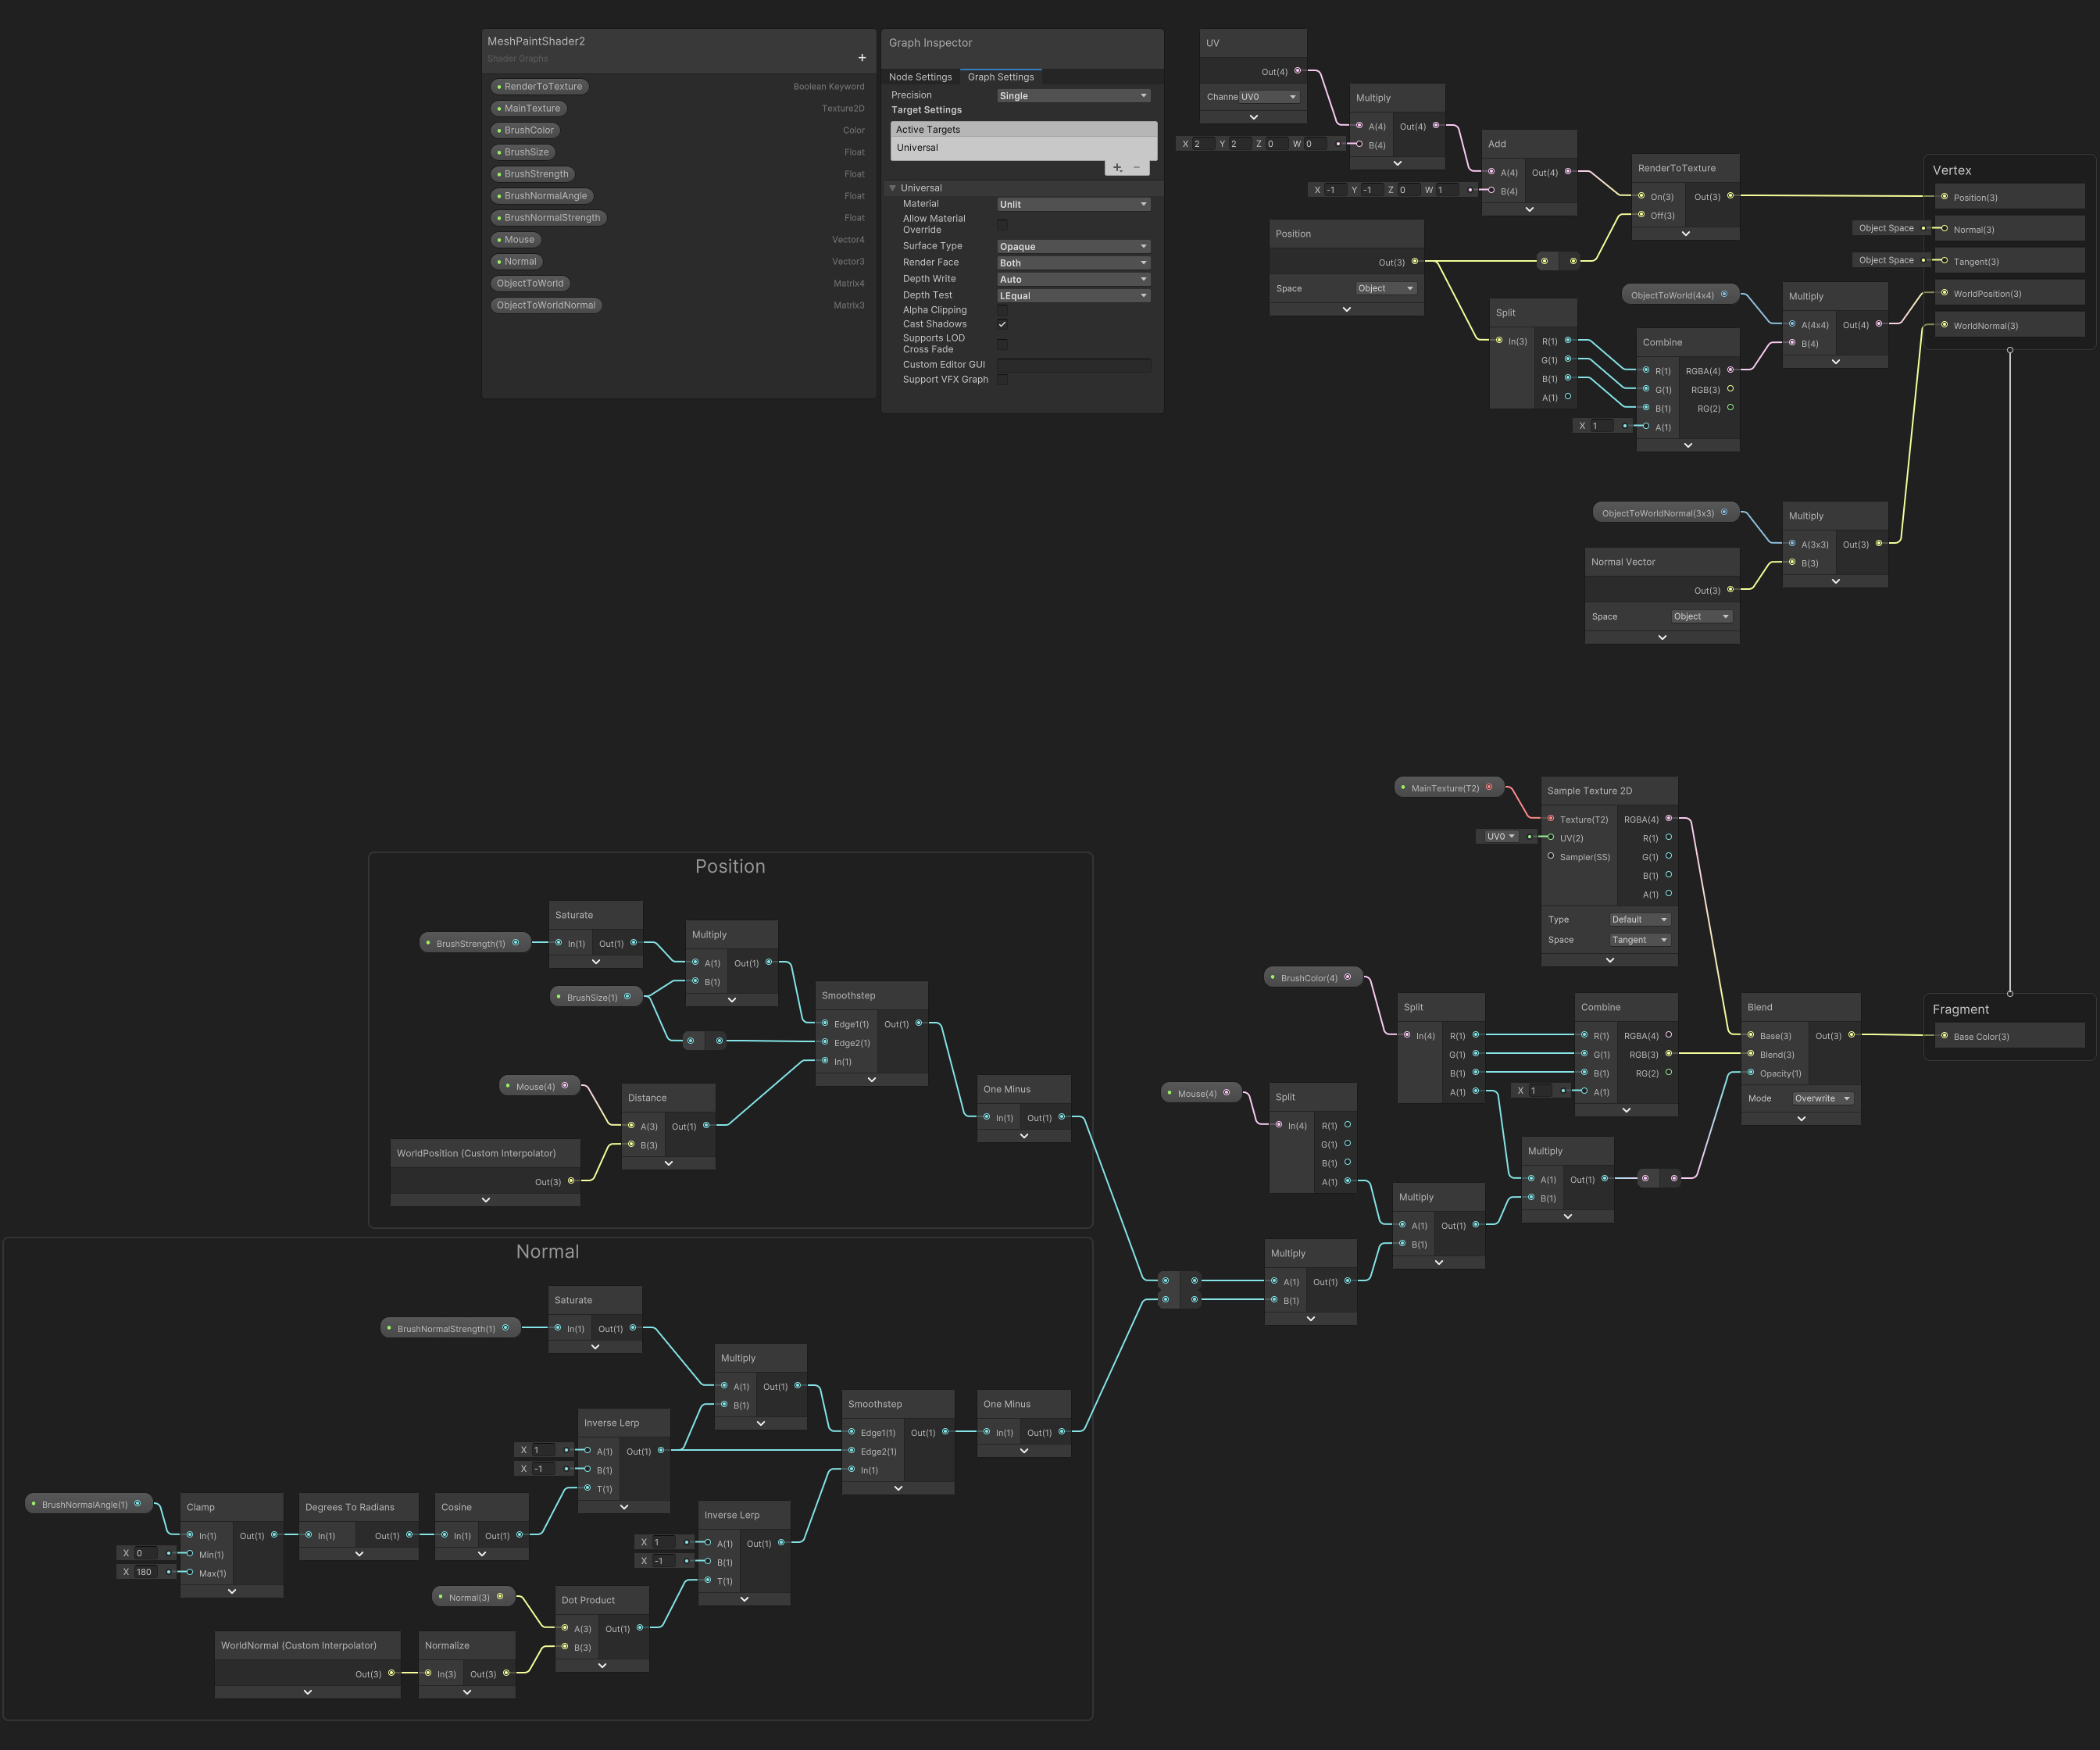
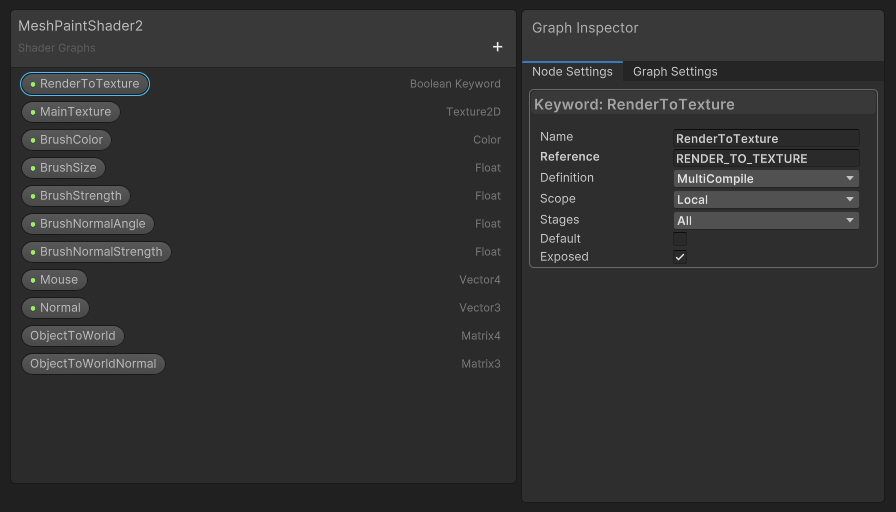
Blackboardに追加したRenderToTextureはブーリアンキーワードで、画面レンダリングモードとテクスチャレンダリングモードを切り替えるためのものです。
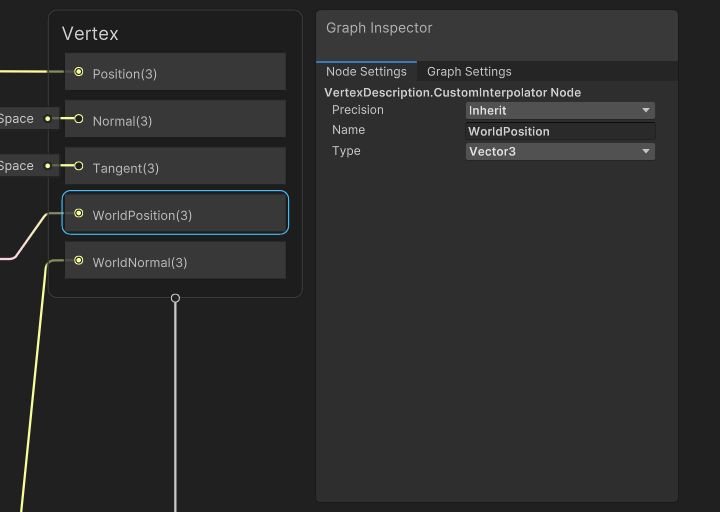
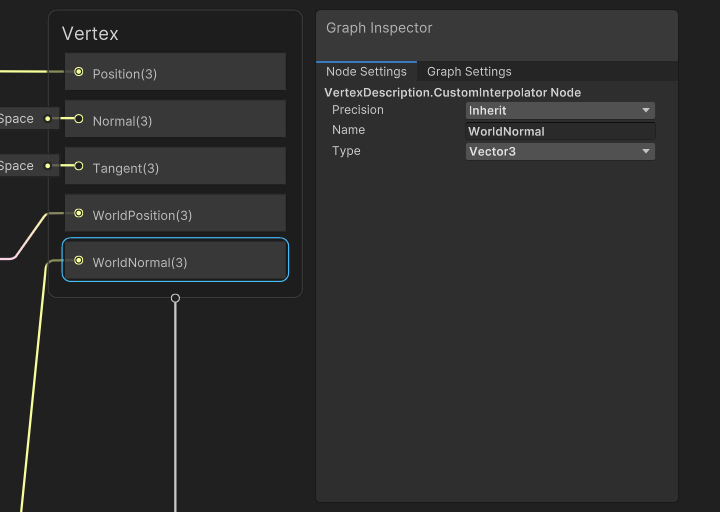
VertexコンテキストにはCustom InterpolatorとしてWorldPositionとWorldNormalを追加しています。
そして、オブジェクトにアタッチするスクリプトは下記のように変更しました。
C#
1using UnityEngine; 2using UnityEngine.Rendering; 3 4[RequireComponent(typeof(MeshRenderer), typeof(MeshFilter))] 5public class MeshPainter2 : MonoBehaviour 6{ 7 static readonly int s_mainTextureProperty = Shader.PropertyToID("_MainTexture"); 8 static readonly int s_objectToWorldProperty = Shader.PropertyToID("_ObjectToWorld"); 9 static readonly int s_objectToWorldNormalProperty = Shader.PropertyToID("_ObjectToWorldNormal"); 10 static readonly int s_mouseProperty = Shader.PropertyToID("_Mouse"); 11 static readonly int s_normalProperty = Shader.PropertyToID("_Normal"); 12 13 public bool m_updateMainTextureEveryFrame; 14 15 Material m_mat; 16 Mesh m_mesh; 17 Texture2D m_mainTexture; 18 RenderTexture m_paintedTexture; 19 LocalKeyword m_renderToTextureKeyword; 20 int m_passIndex = -1; 21 22 public void UpdateMainTexture() 23 { 24 if (m_paintedTexture == null) 25 { 26 return; 27 } 28 29 // レンダーテクスチャの内容をメインテクスチャに読み取る 30 RenderTexture activeTexture = RenderTexture.active; 31 RenderTexture.active = m_paintedTexture; 32 m_mainTexture.ReadPixels(new Rect(0, 0, m_paintedTexture.width, m_paintedTexture.height), 0, 0); 33 m_mainTexture.Apply(); 34 RenderTexture.active = activeTexture; 35 } 36 37 void Start() 38 { 39 // マテリアルからメインテクスチャを取得しておく 40 m_mat = GetComponent<MeshRenderer>().material; 41 m_mainTexture = m_mat.GetTexture(s_mainTextureProperty) as Texture2D; 42 m_paintedTexture = new RenderTexture(m_mainTexture.width, m_mainTexture.height, 0, m_mainTexture.graphicsFormat); 43 Graphics.Blit(m_mainTexture, m_paintedTexture); 44 m_mat.SetTexture(s_mainTextureProperty, m_paintedTexture); 45 46 // シェーダーのモードを切り替えるためのキーワードを用意しておく 47 m_renderToTextureKeyword = new LocalKeyword(m_mat.shader, "RENDER_TO_TEXTURE"); 48 49 // メッシュも取得しておく 50 m_mesh = GetComponent<MeshFilter>().sharedMesh; 51 } 52 53 void LateUpdate() 54 { 55 Ray ray = Camera.main.ScreenPointToRay(Input.mousePosition); 56 Vector4 mwp = Vector4.zero; 57 Vector4 mwn = Vector4.zero; 58 59 if (Input.GetMouseButton(0) && Physics.Raycast(ray, out RaycastHit hit)) 60 { 61 mwp = hit.point; 62 mwp.w = 1.0f; 63 mwn = hit.normal; 64 } 65 66 m_mat.SetVector(s_mouseProperty, mwp); 67 68 if (mwp.w > 0.0f) 69 { 70 // マウスボタンを押しており、かつレイがヒットしているなら 71 // レンダーテクスチャへのレンダリングも行う 72 m_mat.SetVector(s_normalProperty, mwn); 73 m_mat.SetMatrix(s_objectToWorldProperty, transform.localToWorldMatrix); 74 m_mat.SetMatrix(s_objectToWorldNormalProperty, transform.worldToLocalMatrix.transpose); 75 RenderTexture activeTexture = RenderTexture.active; 76 RenderTexture tempTexture = RenderTexture.GetTemporary(m_paintedTexture.descriptor); 77 Graphics.Blit(m_paintedTexture, tempTexture); 78 RenderTexture.active = tempTexture; 79 m_mat.EnableKeyword(m_renderToTextureKeyword); 80 81 if (m_passIndex < 0) 82 { 83 m_passIndex = m_mat.FindPass("Universal Forward"); 84 } 85 86 GL.PushMatrix(); 87 m_mat.SetPass(m_passIndex); 88 Camera currentCamera = Camera.current; 89 GL.LoadProjectionMatrix(currentCamera == null ? Matrix4x4.identity : currentCamera.cameraToWorldMatrix); 90 Graphics.DrawMeshNow(m_mesh, Matrix4x4.identity); 91 GL.PopMatrix(); 92 Graphics.Blit(tempTexture, m_paintedTexture); 93 RenderTexture.active = activeTexture; 94 RenderTexture.ReleaseTemporary(tempTexture); 95 m_mat.DisableKeyword(m_renderToTextureKeyword); 96 97 // m_updateMainTextureEveryFrameがtrueなら、ペイント中は 98 // 毎フレームm_paintedTextureの内容をm_mainTextureに読み取る 99 // ただし、この読み取りは比較的重い部類の処理なので要注意 100 if (m_updateMainTextureEveryFrame) 101 { 102 UpdateMainTexture(); 103 } 104 } 105 } 106}
投稿2023/01/16 19:00
編集2023/01/28 08:00総合スコア10818
![]()
ご丁寧な対応をしていただきありがとうございます。
UV上でペイントする物が必要なのかなと考えていたのでソースまで提示いただいてありがとうございます
Shader初心者なのでShaderGraphなら分かりやすいかなと思って勉強始めたのですが、RenderMeshToTextureがShaderGraphではない理由を教えていただけたら幸いです。
m_paintedTextureをRawImageで画面に出していると塗った箇所が動的に変わってますが、m_mat(Mesh)の方は何故塗り状況が保持されているんでしょうか?
塗り状態が保持されたUVのRenderTextureを取得したいです
見ていて気付いたのですが距離で塗ってると思うので裏側の面まで塗られてしまいます、その対処としてはNormal Vectorを使用する事でしょうか?
UV展開図は自分がBlenderで展開したものなので、変な箇所があるかもしれないです。。
下地がスジとして見えてしまうという欠陥に関しては、今回塗り状態が保持されたUVを取得したいので問題ないです
必要だと思ったら提示いただいたページで勉強致します
なかなかUnityをいじる時間が取れず返信が遅くなりましたことをお詫びいたします。RenderMeshToTextureにシェーダーグラフを使わなかったのは私の未熟ゆえでして、UV展開図の形に頂点を変形するのをシェーダーグラフで表現するにはどうするべきか案が思いつかず、それなら多少は使い慣れているShaderLabで書いてしまおう...と逃げたのです。
コメントを受けましてシェーダーグラフでできないか再挑戦し、ひとまず形になったようだったので結果を追記いたしました。
今回は通常の画面上へのレンダリングとUV空間のテクスチャへのレンダリングを単一のグラフでまかなう方針にしました。当初の2シェーダー方式ですと、ブラシによる塗りのロジックを画面用とテクスチャ用の2箇所に書かなければならず不便だったのに対し、単一のグラフになっていれば改変が容易になると思います。
またシェーダーグラフなら、ShaderLabだと自前で何とかしないといけないノイズ関数などの便利なノードが使えますので、ブラシの塗りにノイズを乗せてかすれた質感を与える...みたいな改造もやりやすそうです。
「塗り状態が保持されたUVのRenderTextureを取得したいです」とおっしゃる件については、レンダーテクスチャへの書き込み内容をメインテクスチャへ反映させたいということだろうか...と考えまして、スクリプトにそのような機能を追加してみました。他のスクリプトから`UpdateMainTexture`を実行することでメインテクスチャも色塗り状態になるかと思います。
また、`m_updateMainTextureEveryFrame`を`true`に設定するとブラシ塗り時に自動的に`UpdateMainTexture`を実行するような作りにもしてみましたが、テクスチャのサイズが大きいとパフォーマンス的に重いかもしれません。こういった`Texture2D`へのデータ読み取りは毎フレーム行うようなことはなるべく避けて、たとえば1ストローク塗り終わったタイミング(マウスボタンを放したとき)だとかだけで行う方針の方がいいかもしれませんね。
なお`UpdateMainTexture`を正常に実行するには、あらかじめメインテクスチャのインスペクター上の「Advanced」→「Read/Write」をオンにしておき、「Format」は「RGBA32」などの`ReadPixels`が可能な形式に設定しておく必要があります。
また、これはあくまでもUnity上で作られた`Texture2D`のデータを書き換えているだけであり、画像ファイルのデータは元のままですので、Unityを再起動したりメインテクスチャを再インポートしたりすると塗りは消えてしまうはずです。塗りを残すには別途データ保存機能を追加してやる必要があるかと思います。たとえば「【Unity(C#)】テクスチャを画像データに変換して端末に保存、読み込み - Qiita」(https://qiita.com/OKsaiyowa/items/21a9ca438efbf605c52d )のような風にPNGデータにエンコードして保存するとかでしょうかね?
裏面まで塗られてしまうという件について、Normal Vectorを使って対処するのはいいアイディアだと思います。「[Unity]UV共有してる面にもUV2を使って一か所だけにペイントしたい」ではシャドウマッピングに似た要領でブラシから見える領域を判定しており、あれを組み込むとなるとちょっと大がかりな改造が必要になってしまうでしょうが、法線を使った方法なら組み込みやすいでしょう。
追記しましたシェーダーグラフにも法線による判定を導入してみまして、グラフ上で「Normal」と表示されたグループ枠が処理を担当しています。Blackboardにも法線判定に関するパラメーターが追加されており、BrushNormalAngleはブラシを当てた点の法線とメッシュの法線の角度差の許容幅です。0~180の範囲で設定し、たとえば90にすればブラシに対して90°以上傾いた面には色が塗られなくなるでしょう。BrushNormalStrengthはBrushStrengthと同様に0~1の範囲のパラメーターで、1より小さくすることでエッジにグラデーションを施します。
法線による判定だと、奥に隠れているけれどこちらを向いた面...たとえば回答中の図の考える人の右脚だとかは塗られてしまうはずですが、ご質問者さんの包丁のような形状の背面を塗らないようにする上では問題ないかと思います。
あなたの回答
tips
太字
斜体
打ち消し線
見出し
引用テキストの挿入
コードの挿入
リンクの挿入
リストの挿入
番号リストの挿入
表の挿入
水平線の挿入
プレビュー
質問の解決につながる回答をしましょう。 サンプルコードなど、より具体的な説明があると質問者の理解の助けになります。 また、読む側のことを考えた、分かりやすい文章を心がけましょう。


