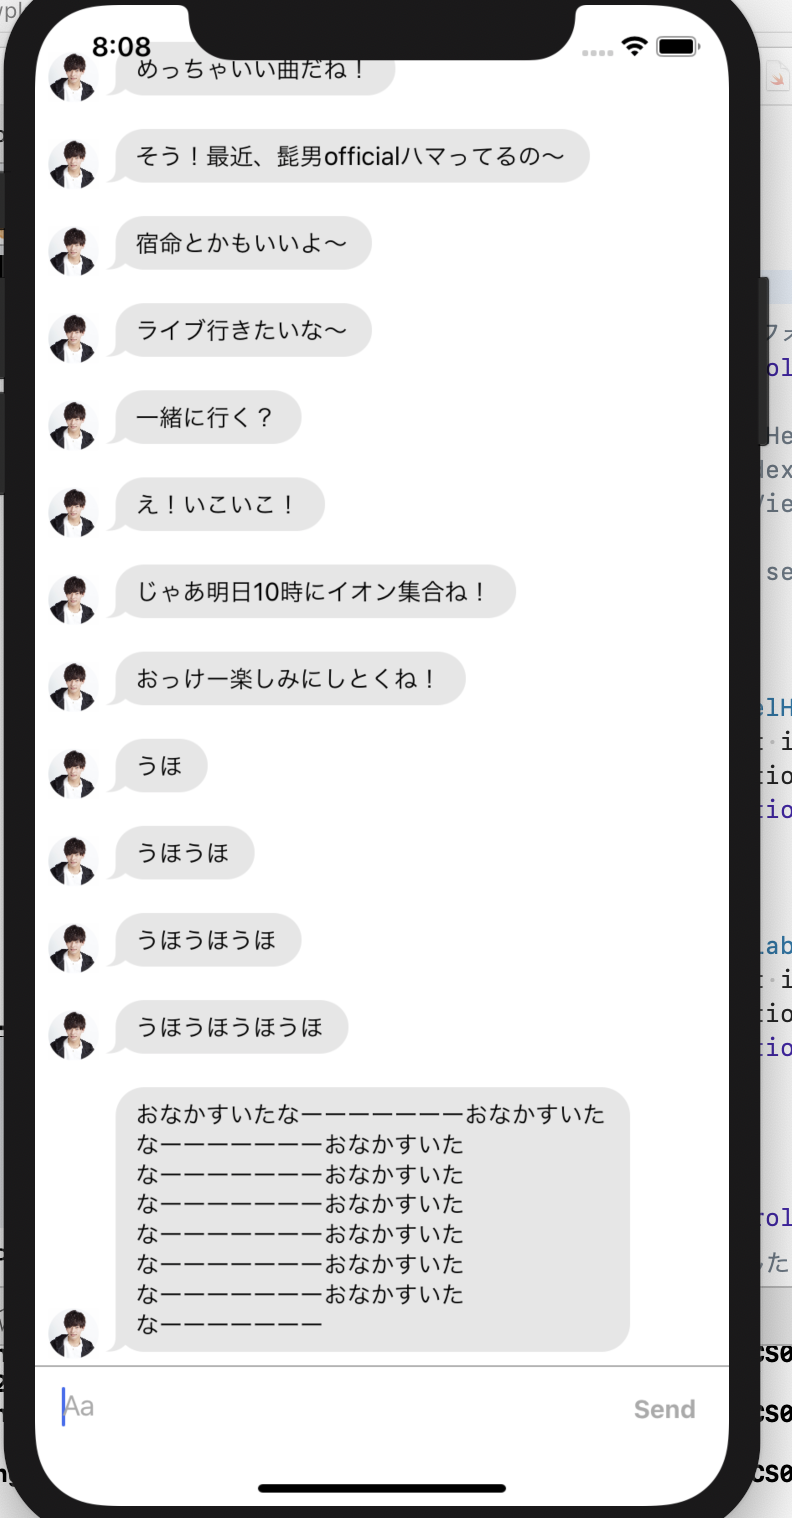
前提・実現したいこと
Swift+FirebaseでiOSアプリを開発中。
MessageKitを使用しチャット画面を作っています。
発生している問題・エラーメッセージ
以下の記事を参考に実装したのですがいくつかうまくいかない点があります。
(少しだけカスタマイズした)
- ナビゲーションバーが表示されない
- is initial view controllerにしないと下部の入力フォームが表示されない
ナビゲーションコントローラーを設置したり、stroyboardでナビゲーションバーを設置したりしてもナビゲーションバーが表示されず、画面の高さ最大値までチャット画面が表示されてしまいます。
また、該当のコントローラーを is initial view controllerにすると画面下部のチャット入力フォームが表示されるのですが、違うコントローラーに is initial view controllerを設定すると表示されません。
該当のソースコード
Swift
1 2 3import UIKit 4import MessageKit 5 6class TalkViewController: MessagesViewController { 7 8 var messageList: [MockMessage] = [] 9 10 lazy var formatter: DateFormatter = { 11 let formatter = DateFormatter() 12 formatter.dateStyle = .medium 13 return formatter 14 }() 15 16 override func viewDidLoad() { 17 super.viewDidLoad() 18 19 DispatchQueue.main.async { 20 // messageListにメッセージの配列をいれて 21 self.messageList = self.getMessages() 22 // messagesCollectionViewをリロードして 23 self.messagesCollectionView.reloadData() 24 // 一番下までスクロールする 25 self.messagesCollectionView.scrollToBottom() 26 } 27 28 messagesCollectionView.messagesDataSource = self 29 messagesCollectionView.messagesLayoutDelegate = self 30 messagesCollectionView.messagesDisplayDelegate = self 31 messagesCollectionView.messageCellDelegate = self 32 messageInputBar.delegate = self 33 messageInputBar.sendButton.tintColor = UIColor.lightGray 34 35// メッセージ入力時に一番下までスクロール 36// scrollsToBottomOnKeybordBeginsEditing = true // default false 37// maintainPositionOnKeyboardFrameChanged = true // default false 38 } 39 40 41 // サンプル用に適当なメッセージ 42 func getMessages() -> [MockMessage] { 43 return [ 44 createMessage(text: "めっちゃいい曲だね!"), 45 createMessage(text: "そう!最近、髭男officialハマってるの〜"), 46 createMessage(text: "宿命とかもいいよ〜"), 47 createMessage(text: "ライブ行きたいな〜"), 48 createMessage(text: "一緒に行く?"), 49 createMessage(text: "え!いこいこ!"), 50 createMessage(text: "じゃあ明日10時にイオン集合ね!"), 51 createMessage(text: "おっけー楽しみにしとくね!"), 52 createMessage(text: "うほ"), 53 createMessage(text: "うほうほ"), 54 createMessage(text: "うほうほうほ"), 55 createMessage(text: "うほうほうほうほ"), 56 createMessage(text: "おなかすいたなーーーーーーーおなかすいたなーーーーーーーおなかすいたなーーーーーーーおなかすいたなーーーーーーーおなかすいたなーーーーーーーおなかすいたなーーーーーーーおなかすいたなーーーーーーーおなかすいたなーーーーーーー"), 57 ] 58 } 59 60 61 func createMessage(text: String) -> MockMessage { 62 let attributedText = NSAttributedString(string: text, attributes: [.font: UIFont.systemFont(ofSize: 15), 63 .foregroundColor: UIColor.black]) 64 return MockMessage(attributedText: attributedText, sender: otherSender(), messageId: UUID().uuidString, date: Date()) 65 } 66 67 override func didReceiveMemoryWarning() { 68 super.didReceiveMemoryWarning() 69 } 70} 71 72extension TalkViewController: MessagesDataSource{ 73 74 func currentSender() -> SenderType { 75 return Sender(id: "123", displayName: "自分") 76 } 77 78 func otherSender() -> Sender { 79 return Sender(id: "456", displayName: "相手名") 80 } 81 82 func numberOfSections(in messagesCollectionView: MessagesCollectionView) -> Int { 83 return messageList.count 84 } 85 86 func messageForItem(at indexPath: IndexPath, in messagesCollectionView: MessagesCollectionView) -> MessageType { 87 return messageList[indexPath.section] 88 } 89 90 // メッセージの上に文字を表示 91 func cellTopLabelAttributedText(for message: MessageType, at indexPath: IndexPath) -> NSAttributedString? { 92 if indexPath.section % 3 == 0 { 93 return NSAttributedString( 94 string: MessageKitDateFormatter.shared.string(from: message.sentDate), 95 attributes: [NSAttributedString.Key.font: UIFont.boldSystemFont(ofSize: 10), 96 NSAttributedString.Key.foregroundColor: UIColor.darkGray] 97 ) 98 } 99 return nil 100 } 101 102 103} 104 105 106 107// メッセージのdelegate 108extension TalkViewController: MessagesDisplayDelegate { 109 110 // メッセージの色を変更(デフォルトは自分:白、相手:黒) 111 func textColor(for message: MessageType, at indexPath: IndexPath, in messagesCollectionView: MessagesCollectionView) -> UIColor { 112 return isFromCurrentSender(message: message) ? .white : .darkText 113 } 114 115 // メッセージの背景色を変更している(自分:紫、相手:グレー) 116 func backgroundColor(for message: MessageType, at indexPath: IndexPath, in messagesCollectionView: MessagesCollectionView) -> UIColor { 117 return isFromCurrentSender(message: message) ? 118 UIColor(red: 176/255, green: 97/255, blue: 253/255, alpha: 1) : //自分 119 UIColor(red: 230/255, green: 230/255, blue: 230/255, alpha: 1) //相手 120 } 121 122 123 124 // アイコンをセット 125 func configureAvatarView(_ avatarView: AvatarView, for message: MessageType, at indexPath: IndexPath, in messagesCollectionView: MessagesCollectionView) { 126 127 128 let avatar: Avatar 129 let image = UIImage(named: "profile5") 130 avatar = Avatar(image: image) 131 avatarView.set(avatar: avatar) 132 133 } 134 135} 136 137 138// 各ラベルの高さを設定(デフォルト0なので必須) 139extension TalkViewController: MessagesLayoutDelegate { 140 141 func cellTopLabelHeight(for message: MessageType, at indexPath: IndexPath, in messagesCollectionView: MessagesCollectionView) -> CGFloat { 142 if indexPath.section % 3 == 0 { return 10 } 143 return 0 144 } 145 146 func messageTopLabelHeight(for message: MessageType, at indexPath: IndexPath, in messagesCollectionView: MessagesCollectionView) -> CGFloat { 147 return 8 148 } 149 150 func messageBottomLabelHeight(for message: MessageType, at indexPath: IndexPath, in messagesCollectionView: MessagesCollectionView) -> CGFloat { 151 return 4 152 } 153} 154 155extension TalkViewController: MessageCellDelegate { 156 // メッセージをタップした時の挙動 157 func didTapMessage(in cell: MessageCollectionViewCell) { 158 print("Message tapped") 159 } 160} 161 162extension TalkViewController: MessageInputBarDelegate { 163 // メッセージ送信ボタンをタップした時の挙動 164 func messageInputBar(_ inputBar: MessageInputBar, didPressSendButtonWith text: String) { 165 for component in inputBar.inputTextView.components { 166 if let image = component as? UIImage { 167 168 let imageMessage = MockMessage(image: image, sender: currentSender() as! Sender, messageId: UUID().uuidString, date: Date()) 169 messageList.append(imageMessage) 170 messagesCollectionView.insertSections([messageList.count - 1]) 171 172 } else if let text = component as? String { 173 174 let attributedText = NSAttributedString(string: text, attributes: [.font: UIFont.systemFont(ofSize: 15), 175 .foregroundColor: UIColor.white]) 176 let message = MockMessage(attributedText: attributedText, sender: currentSender() as! Sender, messageId: UUID().uuidString, date: Date()) 177 messageList.append(message) 178 messagesCollectionView.insertSections([messageList.count - 1]) 179 } 180 } 181 inputBar.inputTextView.text = String() 182 messagesCollectionView.scrollToBottom() 183 } 184} 185 186 187
試したこと
コード上でチャットの高さを指定しているものが見当たらないため、Storyboardで設定すればナビゲーションバーが表示されると思っていたのですがされません。
ご教授いただけると大変嬉しいです。
補足情報(FW/ツールのバージョンなど)
ここにより詳細な情報を記載してください。
質問は1つのページにつき1つにしてください。
なお、試した方法、その画面等載せてくれないと、お答えできません。
つまり、Navigationbarを表示したいなら、
NavigationBarを生成しているコードなり、
NavigationBarを配置したstoryboardとその階層の状態等
2も同様です。


