質問をすることでしか得られない、回答やアドバイスがある。

15分調べてもわからないことは、質問しよう!

新規登録して質問してみよう
ただいま回答率
85.48%
SQLite

SQLiteはリレーショナルデータベース管理システムの1つで、サーバーではなくライブラリとして使用されている。

Java

Javaは、1995年にサン・マイクロシステムズが開発したプログラミング言語です。表記法はC言語に似ていますが、既存のプログラミング言語の短所を踏まえていちから設計されており、最初からオブジェクト指向性を備えてデザインされています。セキュリティ面が強力であることや、ネットワーク環境での利用に向いていることが特徴です。Javaで作られたソフトウェアは基本的にいかなるプラットフォームでも作動します。

Android Studio

Android Studioは、 Google社によって開発された、 Androidのネイティブアプリケーション開発に特化した統合開発ツールです。

Q&A

解決済

1回答

888閲覧

ListViewの中のトグルボタンに初期値を設定したいです。

gemfighter

総合スコア38

SQLite

SQLiteはリレーショナルデータベース管理システムの1つで、サーバーではなくライブラリとして使用されている。

Java

Javaは、1995年にサン・マイクロシステムズが開発したプログラミング言語です。表記法はC言語に似ていますが、既存のプログラミング言語の短所を踏まえていちから設計されており、最初からオブジェクト指向性を備えてデザインされています。セキュリティ面が強力であることや、ネットワーク環境での利用に向いていることが特徴です。Javaで作られたソフトウェアは基本的にいかなるプラットフォームでも作動します。

Android Studio

Android Studioは、 Google社によって開発された、 Androidのネイティブアプリケーション開発に特化した統合開発ツールです。

0グッド

0クリップ

投稿2022/10/05 15:12

編集2022/10/05 16:53

前提

リストの中のトグルボタンにSQLで取得した値を初期値として入れる方法が解りません。
一応「〇〇.setChecked(false);」で値を入れることはわかっていますが、どうやってリストの中のそれぞれの値を設定するかが解らないのです。(〇〇はトグルスイッチの名前)
追加してほしい情報があれば随時追加していきます。

該当のソースコード

SimpleCursorAdapterの中身 public class Sub_ListAdapter extends SimpleCursorAdapter { Sub_ListAdapter sc_adapter; // コンストラクタ public Sub_ListAdapter(Context context, int layout, Cursor c, String[] from, int[] to, int flags) { super(context, layout, c, from, to, flags); } // 指定データのビューを取得 @Override public View getView(int position, View convertView, ViewGroup parent) { View view = super.getView(position, convertView, parent); // 削除ボタン オブジェクトを取得 ImageButton btnDel = (ImageButton) view.findViewById(R.id.button_delete); CompoundButton toggleSwitch = (Switch) view.findViewById(R.id.toggle_switch); // ボタンにリスト内の位置を設定 btnDel.setTag(position); toggleSwitch.setTag(position); return view; } }
ublic class MainActivity3 extends AppCompatActivity { private DatabaseHelper helper = null; Sub_ListAdapter sc_adapter; //前の画面からの引数 private String name_p; @Override protected void onCreate(Bundle savedInstanceState) { super.onCreate(savedInstanceState); setContentView(R.layout.activity_main3); FloatingActionButton fab = findViewById(R.id.fab); setSupportActionBar(findViewById(R.id.toolbar)); getSupportActionBar().setDisplayHomeAsUpEnabled(true); Intent intent = getIntent(); name_p = intent.getStringExtra(DBEntry_2.Name); fab.setOnClickListener(new View.OnClickListener() { @Override public void onClick(View view) { Intent intent = new Intent(getApplication(), Add_task_3.class); intent.putExtra("name_p",name_p); startActivity(intent); } }); } @Override public void onStart(){ super.onStart(); ActionBar actionBar = getSupportActionBar(); if (actionBar != null) { actionBar.setTitle("〇〇"); } helper = new DatabaseHelper(this); onShow(); } // データを一覧表示 protected void onShow() { // データベースヘルパーを準備 helper = new DatabaseHelper(this); // データベースを検索する項目を定義 String sql = "SELECT Child._id,Child.Name FROM Child WHERE Child.Parent = ?;"; String[] selectionArgs ={name_p}; // 読み込みモードでデータベースをオープン try (SQLiteDatabase db = helper.getReadableDatabase()){ // データベースを検索 Cursor cursor = db.rawQuery(sql, selectionArgs); // 検索結果から取得する項目を定義 String[] from = {DBEntry_2.Name}; // データを設定するレイアウトのフィールドを定義 int[] to = {R.id.title}; // ListViewの1行分のレイアウト(row_main.xml)と検索結果を関連付け sc_adapter = new Sub_ListAdapter( this, R.layout.raw_sub,cursor,from,to,0); // activity_main.xmlに定義したListViewオブジェクトを取得 ListView list = findViewById(R.id.mainList); // ListViewにアダプターを設定 list.setAdapter(sc_adapter); } }
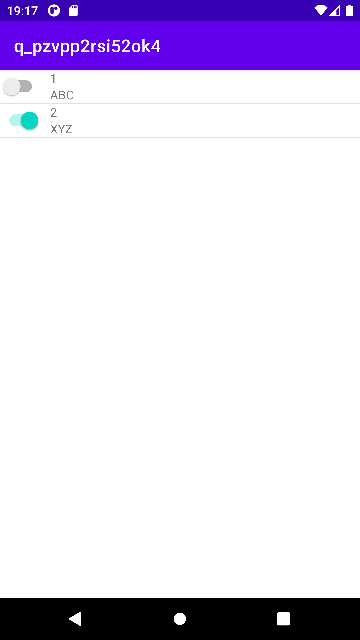
以下のような画面が出てきます。
イメージ説明

<?xml version="1.0" encoding="utf-8"?> <LinearLayout xmlns:android="http://schemas.android.com/apk/res/android" xmlns:tools="http://schemas.android.com/tools" android:layout_width="match_parent" android:layout_height="match_parent" android:orientation="horizontal" android:descendantFocusability="blocksDescendants"> <Switch android:id="@+id/toggle_switch" android:layout_width="74dp" android:layout_height="48dp" android:minHeight="48dp" android:onClick="btnSwi_click" android:textColor="#3e3e3e" /> <TextView android:id="@+id/title" android:layout_width="265dp" android:layout_height="wrap_content" android:gravity="center_vertical" android:paddingLeft="10dp" android:paddingRight="10dp" android:textSize="32dp" /> <ImageButton android:id="@+id/button_delete" android:layout_width="50dp" android:layout_height="wrap_content" android:background="#00000000" android:contentDescription="@string/app_name" android:gravity="center_horizontal|center_vertical" android:onClick="btnDel_onClick" android:src="@android:drawable/ic_menu_close_clear_cancel" /> </LinearLayout>
public class DatabaseHelper extends SQLiteOpenHelper { static final private int VERSION = 2; static final private String DBNAME = "Task.db"; public DatabaseHelper(Context context) { super(context, DBNAME, null, VERSION); } public void onCreate(SQLiteDatabase db) { // テーブルを作成 db.execSQL( "CREATE TABLE "+ DBEntry.Table_Name + " (" + DBEntry._ID + " INTEGER PRIMARY KEY, " + DBEntry.Name + " TEXT default 'カテゴリー名'" + " ) " ); db.execSQL( "CREATE TABLE "+ DBEntry_2.Table_Name + " (" + DBEntry_2._ID + " INTEGER PRIMARY KEY, " + DBEntry_2.Name + " TEXT default 'タスク名', " + DBEntry_2.flag + " INTEGER default '0'," + DBEntry_2.category + " TEXT default ' ', " + DBEntry_2.parent + " TEXT default ' ', " + DBEntry_2.child + " TEXT default ' ', " + DBEntry_2.Date + " INTEGER DEFAULT (datetime(CURRENT_TIMESTAMP,'localtime')), " + DBEntry_2.Data_flag + " INTEGER default '0', " + DBEntry_2.ranking + " INTEGER default '0', " + DBEntry_2.prerequisite + " TEXT default '前提条件' " + " ) " ); db.execSQL( "CREATE TRIGGER trigger_samp_tbl_update AFTER UPDATE ON " + DBEntry.Table_Name + " BEGIN "+ " UPDATE " + DBEntry.Table_Name + " SET up_date = DATETIME('now', 'localtime') WHERE rowid == NEW.rowid; "+ " END;"); } // データベースをバージョンアップした時、テーブルを削除してから再作成 public void onUpgrade(SQLiteDatabase db, int i, int i1) { db.execSQL("DROP TABLE IF EXISTS " + DBEntry.Table_Name); onCreate(db); } }

気になる質問をクリップする

クリップした質問は、後からいつでもMYページで確認できます。

またクリップした質問に回答があった際、通知やメールを受け取ることができます。

バッドをするには、ログインかつ

こちらの条件を満たす必要があります。

jimbe

2022/10/05 16:49

画像のマークダウンをコードのマークダウンの中に入れてしまっては、画像は表示されません。 コードのマークダウンの外に出してください。
guest

回答1

0

ベストアンサー

SimpleCursorAdapter

An easy adapter to map columns from a cursor to TextViews or ImageViews defined in an XML file.

「カーソルから XML ファイルで定義された TextViews または ImageViews に列をマップするための簡単なアダプター。」by Google翻訳

と書かれていますので、トグルボタンには対応していません。
対応していないビューに対して動作させたい場合は、 SimpleCursorAdapter.ViewBinder を用いるようです。
Y.A.M の 雑記帳 - Android SimpleCursorAdapter で ViewBinder を使う

getView を上書きしてどうにかしたいのでしたら、 SimpleCursorAdapter のソースコードを確認してどのようにすれば良いのかを調べるべきに思います。


MainActivity.java

java

1import androidx.appcompat.app.AppCompatActivity; 2import androidx.appcompat.widget.SwitchCompat; 3import androidx.cursoradapter.widget.SimpleCursorAdapter; 4 5import android.database.Cursor; 6import android.database.sqlite.*; 7import android.os.Bundle; 8import android.widget.ListView; 9 10public class MainActivity extends AppCompatActivity { 11 @Override 12 protected void onCreate(Bundle savedInstanceState) { 13 super.onCreate(savedInstanceState); 14 setContentView(R.layout.activity_main); 15 16 SQLiteOpenHelper helper = new DatabaseHelper(this); 17 SQLiteDatabase db = helper.getReadableDatabase(); 18 Cursor cursor = db.rawQuery("SELECT _id,name,toggle FROM table1", null); 19 20 SimpleCursorAdapter adapter = new SimpleCursorAdapter(this, R.layout.list_item, cursor, 21 new String[]{"_id", "name", "toggle"}, 22 new int[]{R.id.id, R.id.name, R.id.toggle}, 23 0); 24 adapter.setViewBinder((v, c, i) -> { 25 if(i == c.getColumnIndex("toggle")) { 26 ((SwitchCompat)v).setChecked(c.getInt(i) == 1); 27 return true; 28 } 29 return false; 30 }); 31 32 ListView listview = findViewById(R.id.listview); 33 listview.setAdapter(adapter); 34 } 35}

res/layout/activity_main.xml

xml

1<?xml version="1.0" encoding="utf-8"?> 2<ListView 3 android:id="@+id/listview" 4 xmlns:android="http://schemas.android.com/apk/res/android" 5 xmlns:tools="http://schemas.android.com/tools" 6 android:layout_width="match_parent" 7 android:layout_height="match_parent" 8 tools:context=".MainActivity" />

res/layout/list_item.xml

xml

1<?xml version="1.0" encoding="utf-8"?> 2<androidx.constraintlayout.widget.ConstraintLayout 3 xmlns:android="http://schemas.android.com/apk/res/android" 4 xmlns:app="http://schemas.android.com/apk/res-auto" 5 android:layout_width="match_parent" 6 android:layout_height="wrap_content"> 7 8 <androidx.appcompat.widget.SwitchCompat 9 android:id="@+id/toggle" 10 android:layout_width="wrap_content" 11 android:layout_height="0dp" 12 android:paddingEnd="10dp" 13 app:layout_constraintBottom_toBottomOf="parent" 14 app:layout_constraintStart_toStartOf="parent" 15 app:layout_constraintTop_toTopOf="parent" /> 16 <TextView 17 android:id="@+id/id" 18 android:layout_width="0dp" 19 android:layout_height="wrap_content" 20 android:text="_id" 21 app:layout_constraintEnd_toEndOf="parent" 22 app:layout_constraintStart_toEndOf="@id/toggle" 23 app:layout_constraintTop_toTopOf="parent" /> 24 <TextView 25 android:id="@+id/name" 26 android:layout_width="0dp" 27 android:layout_height="wrap_content" 28 android:text="name" 29 app:layout_constraintEnd_toEndOf="parent" 30 app:layout_constraintStart_toEndOf="@id/toggle" 31 app:layout_constraintTop_toBottomOf="@id/id" /> 32</androidx.constraintlayout.widget.ConstraintLayout>

DatabaseHelper.java

java

1import android.content.Context; 2import android.database.sqlite.*; 3 4import androidx.annotation.*; 5 6public class DatabaseHelper extends SQLiteOpenHelper { 7 public DatabaseHelper(@Nullable Context context) { 8 super(context, "testdb", null, 1); 9 } 10 11 @Override 12 public void onCreate(SQLiteDatabase db) { 13 db.execSQL("CREATE TABLE table1 (_id INTEGER PRIMARY KEY, name TEXT, toggle INTEGER)"); 14 15 db.execSQL("INSERT INTO table1 (_id,name,toggle) VALUES (1,'ABC',0)"); 16 db.execSQL("INSERT INTO table1 (_id,name,toggle) VALUES (2,'XYZ',1)"); 17 } 18 19 @Override 20 public void onUpgrade(SQLiteDatabase db, int oldVersion, int newVersion) { 21 db.execSQL("DROP TABLE IF EXISTS table1"); 22 onCreate(db); 23 } 24}

実行結果
エミュレータスクリーンショット

投稿2022/10/05 17:01

編集2022/10/06 04:09
jimbe

総合スコア12632

バッドをするには、ログインかつ

こちらの条件を満たす必要があります。

あなたの回答

tips

太字

斜体

打ち消し線

見出し

引用テキストの挿入

コードの挿入

リンクの挿入

リストの挿入

番号リストの挿入

表の挿入

水平線の挿入

プレビュー

15分調べてもわからないことは
teratailで質問しよう!

ただいまの回答率
85.48%

質問をまとめることで
思考を整理して素早く解決

テンプレート機能で
簡単に質問をまとめる

質問する

関連した質問