質問をすることでしか得られない、回答やアドバイスがある。

15分調べてもわからないことは、質問しよう!

新規登録して質問してみよう
ただいま回答率
85.48%
Java

Javaは、1995年にサン・マイクロシステムズが開発したプログラミング言語です。表記法はC言語に似ていますが、既存のプログラミング言語の短所を踏まえていちから設計されており、最初からオブジェクト指向性を備えてデザインされています。セキュリティ面が強力であることや、ネットワーク環境での利用に向いていることが特徴です。Javaで作られたソフトウェアは基本的にいかなるプラットフォームでも作動します。

Android

Androidは、Google社が開発したスマートフォンやタブレットなど携帯端末向けのプラットフォームです。 カーネル・ミドルウェア・ユーザーインターフェイス・ウェブブラウザ・電話帳などのアプリケーションやソフトウェアをひとつにまとめて構成。 カーネル・ライブラリ・ランタイムはほとんどがC言語/C++、アプリケーションなどはJavaSEのサブセットとAndroid環境で書かれています。

Android Studio

Android Studioは、 Google社によって開発された、 Androidのネイティブアプリケーション開発に特化した統合開発ツールです。

Q&A

解決済

2回答

1401閲覧

Android studio の画像付きListViewについて

akiraaaa

総合スコア13

Java

Javaは、1995年にサン・マイクロシステムズが開発したプログラミング言語です。表記法はC言語に似ていますが、既存のプログラミング言語の短所を踏まえていちから設計されており、最初からオブジェクト指向性を備えてデザインされています。セキュリティ面が強力であることや、ネットワーク環境での利用に向いていることが特徴です。Javaで作られたソフトウェアは基本的にいかなるプラットフォームでも作動します。

Android

Androidは、Google社が開発したスマートフォンやタブレットなど携帯端末向けのプラットフォームです。 カーネル・ミドルウェア・ユーザーインターフェイス・ウェブブラウザ・電話帳などのアプリケーションやソフトウェアをひとつにまとめて構成。 カーネル・ライブラリ・ランタイムはほとんどがC言語/C++、アプリケーションなどはJavaSEのサブセットとAndroid環境で書かれています。

Android Studio

Android Studioは、 Google社によって開発された、 Androidのネイティブアプリケーション開発に特化した統合開発ツールです。

0グッド

0クリップ

投稿2022/11/03 07:39

前提

初めてアプリ開発を行っており、Java初心者です。
一日がかりで調べたり格闘しましたがどうにもならなかったので皆様の知恵をお借りできればと思います。

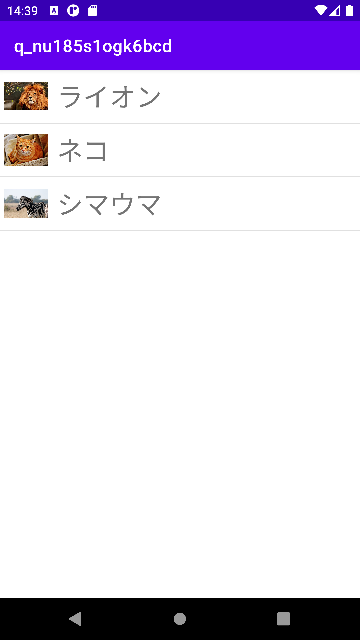
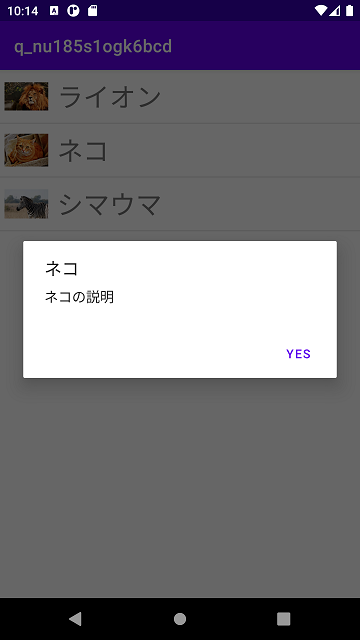
ListViewを使って画像付きリストを表示し、リスト内をタップすれば詳細を表示できるアプリを作成しています。
文字のリストは出来たのですが、左側に画像を入れることができず困っています。

実現したいこと

リストの各項目左側に対応する画像を表示
以下のイメージでは1枚だけ画像を入れる事が出来たのですが、これをリスト1行ずつにそれぞれ入力したいです。

イメージ説明

発生している問題・エラーメッセージ

Javaコードの "//画像" ~ "//リストの表示" について、
int[]で画像配列を指定すればArrayAdapter作成時にエラーとなり、
Integer[] で画像配列を指定すればsetImageResource作成時にエラーとなるため、
どのように配列内すべてを処理させるのかわかりませんでした。

該当のソースコード

MainActivity.java

1package com.example.myapptesut; 2 3import androidx.appcompat.app.AppCompatActivity; 4import android.app.AlertDialog; 5import android.media.Image; 6import android.os.Bundle; 7import android.view.View; 8import android.view.ViewGroup; 9import android.widget.AdapterView; 10import android.widget.ArrayAdapter; 11import android.widget.ListView; 12import android.widget.ImageView; 13 14import java.util.Collections; 15 16public class MainActivity extends AppCompatActivity { 17 //データ 18 String[] str = { 19 "ライオン", 20 "ネコ", 21 "シマウマ" 22 }; 23 24 //データ2 25 String[] context = { 26 "ライオンの説明", 27 "ネコの説明", 28 "シマウマの説明" 29 }; 30 31 //画像 32 Integer[] images = { 33 R.drawable.img25, 34 R.drawable.img16, 35 R.drawable.img61, 36 }; 37 38 @Override 39 protected void onCreate(Bundle savedInstanceState) { 40 super.onCreate(savedInstanceState); 41 setContentView(R.layout.activity_main); 42 43 //アダプター 44 ArrayAdapter adapter = new ArrayAdapter( 45 this, 46 R.layout.list_item, 47 str 48 ); 49 50 ArrayAdapter adapter2 = new ArrayAdapter( 51 this, 52 R.layout.list_item, 53 images 54 ); 55 56 57 //リストの表示 58 ((ListView)findViewById(R.id.lv)).setAdapter(adapter); 59 ((ImageView)findViewById(R.id.ig)).setImageResource(adapter2); 60 61 //クリック処理 62 ((ListView)findViewById(R.id.lv)).setOnItemClickListener( 63 new AdapterView.OnItemClickListener() { 64 @Override 65 public void onItemClick(AdapterView<?> parent, View view, int position, long id) { 66 //クリックしたときのプログラム 67 new AlertDialog.Builder(MainActivity.this) 68 .setTitle(str[position]) 69 .setMessage(context[position]) 70 .setPositiveButton("yes",null) 71 .show(); 72 } 73 } 74 ); 75 } 76}

activity_main.xml

1<?xml version="1.0" encoding="utf-8"?> 2<androidx.constraintlayout.widget.ConstraintLayout xmlns:android="http://schemas.android.com/apk/res/android" 3 xmlns:app="http://schemas.android.com/apk/res-auto" 4 xmlns:tools="http://schemas.android.com/tools" 5 android:layout_width="match_parent" 6 android:layout_height="match_parent" 7 android:padding="6dp"> 8 9 <ImageView 10 android:id="@+id/ig" 11 android:layout_width="50dp" 12 android:layout_height="50dp" 13 tools:src="@tools:sample/avatars" 14 app:layout_constraintStart_toStartOf="parent" 15 app:layout_constraintTop_toTopOf="parent" /> 16 17 <ListView 18 android:id="@+id/lv" 19 android:layout_width="wrap_content" 20 android:layout_height="wrap_content" 21 tools:text="動物名" 22 android:textSize="18sp" 23 android:layout_marginStart="6dp" 24 android:layout_marginLeft="6dp" 25 app:layout_constraintStart_toEndOf="@+id/ig" 26 app:layout_constraintTop_toTopOf="@+id/ig" /> 27 28</androidx.constraintlayout.widget.ConstraintLayout>

list_item.xml

1<?xml version="1.0" encoding="utf-8"?> 2<TextView xmlns:android="http://schemas.android.com/apk/res/android" 3 android:layout_width="match_parent" 4 android:layout_height="match_parent" 5 android:padding="16dp"> 6</TextView> 7

strings.xml

1<resources> 2 <string name="app_name">My Apptesut</string> 3</resources>

試したこと

そもそもリストに表示させる方法としてあっているのかもわからず、
strとimagesを1セットにまとめた方がいいのかと考えたり色々試行錯誤しましたが、
解決には至りませんでした。

よろしくお願いいたします。

気になる質問をクリップする

クリップした質問は、後からいつでもMYページで確認できます。

またクリップした質問に回答があった際、通知やメールを受け取ることができます。

バッドをするには、ログインかつ

こちらの条件を満たす必要があります。

jimbe

2022/11/06 04:01

もしこの質問について解決していましたら、ベストアンサーを選んで解決済みとしてください。 解決していなければ、質問を編集して問題となっている点等の情報を追加してください。
guest

回答2

0

ベストアンサー

まず、基本的な構造からです。

データ、データ2、画像の各要素が1:1で関係し、例えば表にすると

番号データ(name)データ2(explanation)画像(image)
0ライオンライオンの説明R.drawable.img25
1ネコネコの説明R.drawable.img16
2シマウマシマウマの説明R.drawable.img61

を表す場合、"データ"の配列、"データ2"の配列、"画像"の配列という3つの配列を用意するのでは無く、"データ・データ2・画像の3つの情報を持つクラス"の配列1つを用意します。つまり縦割りでは無く横割りです。

java

1 //1行分のデータが入っているクラスを新設 2 class Animal { 3 final String name; //データ 4 final String explanation; //データ2 5 final int image; //画像(リソースID) 6 Animal(String name, String explanation, int image) { 7 this.name = name; 8 this.explanation = explanation; 9 this.image = image; 10 } 11 } 12 //データを用意 13 Animal[] animals = { 14 new Animal("ライオン", "ライオンの説明", R.drawable.img25), 15 new Animal("ネコ", "ネコの説明", R.drawable.img16), 16 new Animal("シマウマ", "シマウマの説明", R.drawable.img61) 17 };

これにより、各データの関係が明白になり、追加とか修正とかの場合にどれかの配列にやり忘れたとかも無くなります。

その上で、 ListView に表示するように構成したほうが良いと思います。


ArrayAdapter はテキスト1つの表示しか出来ません。同類の SimpleAdapter は Map 構造のデータで無いと使えません。ですので BaseAdapter から自作します(AnimalAdapter)。

MainActivity.java

java

1import androidx.annotation.DrawableRes; 2import androidx.appcompat.app.*; 3 4import android.os.Bundle; 5import android.view.*; 6import android.widget.*; 7 8import java.util.*; 9 10public class MainActivity extends AppCompatActivity { 11 private static class Animal { 12 final String name; //データ 13 final String explanation; //データ2 14 final @DrawableRes int image; //画像(リソースID) 15 Animal(String name, String explanation, @DrawableRes int image) { 16 this.name = name; 17 this.explanation = explanation; 18 this.image = image; 19 } 20 } 21 22 @Override 23 protected void onCreate(Bundle savedInstanceState) { 24 super.onCreate(savedInstanceState); 25 setContentView(R.layout.activity_main); 26 27 Animal[] animals = { 28 new Animal("ライオン", "ライオンの説明", R.drawable.img25), 29 new Animal("ネコ", "ネコの説明", R.drawable.img16), 30 new Animal("シマウマ", "シマウマの説明", R.drawable.img61) 31 }; 32 33 ListView listView = findViewById(R.id.listView); 34 listView.setAdapter(new AnimalAdapter(animals)); 35 listView.setOnItemClickListener((parent, view, position, id) -> { 36 Animal animal = (Animal)listView.getItemAtPosition(position); 37 new AlertDialog.Builder(MainActivity.this) 38 .setTitle(animal.name) 39 .setMessage(animal.explanation) 40 .setPositiveButton("yes",null) 41 .show(); 42 }); 43 } 44 45 private static class AnimalAdapter extends BaseAdapter { 46 private static class ViewHolder { 47 final ImageView imageView; 48 final TextView nameView; 49 ViewHolder(View itemView) { 50 imageView = itemView.findViewById(R.id.image); 51 nameView = itemView.findViewById(R.id.name); 52 } 53 } 54 55 private List<Animal> animalList; 56 57 AnimalAdapter(Animal[] animals) { 58 this.animalList = Arrays.asList(animals); 59 } 60 61 @Override 62 public int getCount() { 63 return animalList.size(); 64 } 65 66 @Override 67 public Object getItem(int position) { 68 return animalList.get(position); 69 } 70 71 @Override 72 public long getItemId(int position) { 73 return position; 74 } 75 76 @Override 77 public View getView(int position, View convertView, ViewGroup parent) { 78 if(convertView == null) { 79 convertView = LayoutInflater.from(parent.getContext()).inflate(R.layout.list_item, parent, false); 80 convertView.setTag(new ViewHolder(convertView)); 81 } 82 83 Animal animal = animalList.get(position); 84 ViewHolder vh = (ViewHolder)convertView.getTag(); 85 vh.nameView.setText(animal.name); 86 vh.imageView.setImageResource(animal.image); 87 88 return convertView; 89 } 90 } 91}

res/layout/activity_main.xml

xml

1<?xml version="1.0" encoding="utf-8"?> 2<ListView 3 xmlns:android="http://schemas.android.com/apk/res/android" 4 xmlns:tools="http://schemas.android.com/tools" 5 android:id="@+id/listView" 6 android:layout_width="match_parent" 7 android:layout_height="match_parent" 8 tools:context=".MainActivity" />

res/layout/list_item.xml

xml

1<?xml version="1.0" encoding="utf-8"?> 2<androidx.constraintlayout.widget.ConstraintLayout 3 xmlns:android="http://schemas.android.com/apk/res/android" 4 android:layout_width="match_parent" 5 android:layout_height="wrap_content" 6 xmlns:app="http://schemas.android.com/apk/res-auto"> 7 8 <ImageView 9 android:id="@+id/image" 10 android:layout_width="50dp" 11 android:layout_height="50dp" 12 android:layout_margin="5dp" 13 app:layout_constraintBottom_toBottomOf="parent" 14 app:layout_constraintStart_toStartOf="parent" 15 app:layout_constraintTop_toTopOf="parent" /> 16 <TextView 17 android:id="@+id/name" 18 android:layout_width="0dp" 19 android:layout_height="wrap_content" 20 android:textSize="30dp" 21 android:text="sample" 22 android:layout_marginStart="10dp" 23 android:layout_marginEnd="10dp" 24 app:layout_constraintBottom_toBottomOf="parent" 25 app:layout_constraintEnd_toEndOf="parent" 26 app:layout_constraintStart_toEndOf="@id/image" 27 app:layout_constraintTop_toTopOf="parent" /> 28</androidx.constraintlayout.widget.ConstraintLayout>

実行結果
実行時スクリーンショット(初期表示)実行時スクリーンショット("ネコ"クリック)

投稿2022/11/03 09:51

編集2022/11/04 10:19
jimbe

総合スコア12646

バッドをするには、ログインかつ

こちらの条件を満たす必要があります。

akiraaaa

2022/11/04 07:33

ご返信ありがとうございます。 構造の説明からご親切に教えていただけて、とても嬉しいです。 本当に初歩的なことも把握できておらず、すみません...。 自分の環境でも無事表示することができ、感謝申し上げます。 まだ記述内容全ての理解には至っておりませんが、調べる中でどうしても分からない部分がありましたら 改めて質問させていただければと思います。
jimbe

2022/11/05 10:43 編集

java の基本であるオブジェクト(クラスを含む)は、int とか String とかより大きなレベルで『データの塊』(本件では動物の情報としてのAnimalクラス)を表すものです。ですので如何にその塊を見出だせるかが最初になります。 Adapter は大抵の紹介記事では、 ArrayAdapter や SimpleAdapter を用いていると思いますが、残念ながら使い方が(相対的に)簡単な分出来ることが限られ、本件のように少し表示を増やそうとか、チェックボックスやボタンを~等とすると動かなくなってしまいます。 ListView と Adapter は実際かなり本格的(?)な構造で繋がっていますし、 Adapter は View の再利用もしていますのでなかなか大変かと思いますが、回答の AnimalAdapter は ListView の Adapter の基本構造として個人的に使い回しているものですので、参考になれば。
guest

0

ヘディングのテキスト

投稿2022/11/06 08:05

Openyo

総合スコア4

バッドをするには、ログインかつ

こちらの条件を満たす必要があります。

あなたの回答

tips

太字

斜体

打ち消し線

見出し

引用テキストの挿入

コードの挿入

リンクの挿入

リストの挿入

番号リストの挿入

表の挿入

水平線の挿入

プレビュー

15分調べてもわからないことは
teratailで質問しよう!

ただいまの回答率
85.48%

質問をまとめることで
思考を整理して素早く解決

テンプレート機能で
簡単に質問をまとめる

質問する

関連した質問