
回答編集履歴
4
sample url
answer
CHANGED
|
@@ -1,4 +1,4 @@
|
|
|
1
|
-
⭐️ **動作確認用サンプル:** https://jsfiddle.net/
|
|
1
|
+
⭐️ **動作確認用サンプル:** https://jsfiddle.net/2ub63Lto/
|
|
2
2
|
|
|
3
3
|
### 処理の概要
|
|
4
4
|
- まずは、フォーカス可能な要素に座標番号のデータ属性をJSで動的に付与します。
|
3
不具合修正(重要)
answer
CHANGED
|
@@ -71,12 +71,13 @@
|
|
|
71
71
|
}
|
|
72
72
|
```
|
|
73
73
|
```javascript
|
|
74
|
+
const wrapper = document.querySelector('#wrapper');
|
|
74
75
|
const focusableContainers = document.querySelectorAll('.focusable-container');
|
|
75
76
|
const focusableItemsMap = [...focusableContainers].map(fc => [...fc.querySelectorAll('.focusable-item')]);
|
|
76
77
|
const focusableItems = focusableItemsMap.flatMap(elems => elems);
|
|
77
78
|
|
|
78
79
|
window.addEventListener('DOMContentLoaded', setDataCoord, false);
|
|
79
|
-
|
|
80
|
+
wrapper.addEventListener('keydown', manipulateFocus, false);
|
|
80
81
|
|
|
81
82
|
function setDataCoord() {
|
|
82
83
|
const coords = [...focusableItemsMap].flatMap((elems, x) => elems.map((_, y) => `${x}-${y}`));
|
|
@@ -106,6 +107,9 @@
|
|
|
106
107
|
/**
|
|
107
108
|
* 要素の取得
|
|
108
109
|
*/
|
|
110
|
+
// #wrapper要素を取得
|
|
111
|
+
const wrapper = document.querySelector('#wrapper');
|
|
112
|
+
|
|
109
113
|
// .focusable-container要素を取得
|
|
110
114
|
const focusableContainers = document.querySelectorAll('.focusable-container');
|
|
111
115
|
|
|
@@ -119,7 +123,7 @@
|
|
|
119
123
|
* イベントリスナー設定
|
|
120
124
|
*/
|
|
121
125
|
window.addEventListener('DOMContentLoaded', setDataCoord, false); // ページロード時
|
|
122
|
-
|
|
126
|
+
wrapper.addEventListener('keydown', manipulateFocus, false); // キーを押している間
|
|
123
127
|
|
|
124
128
|
/**
|
|
125
129
|
* 座標番号(data-coord属性)を要素に付与する関数
|
2
コードの不具合修正(重要)
answer
CHANGED
|
@@ -1,11 +1,11 @@
|
|
|
1
|
-
⭐️ **動作確認用サンプル:** https://jsfiddle.net/
|
|
1
|
+
⭐️ **動作確認用サンプル:** https://jsfiddle.net/u38mxwb0/
|
|
2
2
|
|
|
3
3
|
### 処理の概要
|
|
4
4
|
- まずは、フォーカス可能な要素に座標番号のデータ属性をJSで動的に付与します。
|
|
5
5
|
- 例えば、`data-coord="0-0"`を付与
|
|
6
6
|
- → `<button data-coord="0-0"><span>ボタン1</span></button>`
|
|
7
7
|
- JSにより自動で付与されますので、自分で考えながらHTMLに座標番号を書かなくてもいいです。
|
|
8
|
-
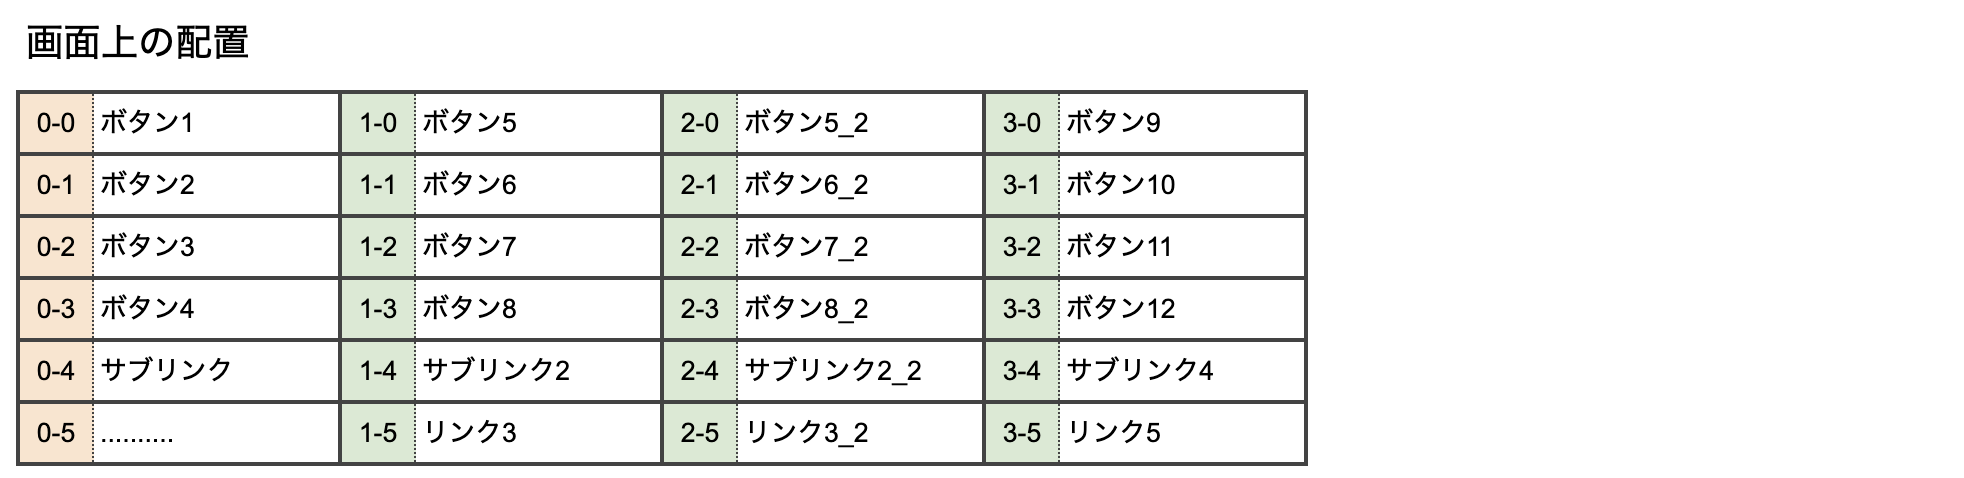
- 左上を起点`(0, 0)`とすると、座標は以下の画像の
|
|
8
|
+
- 左上を起点として`(x=0, y=0)`とすると、各要素の座標は以下の画像の通りとなります。
|
|
9
9
|
|
|
10
10
|
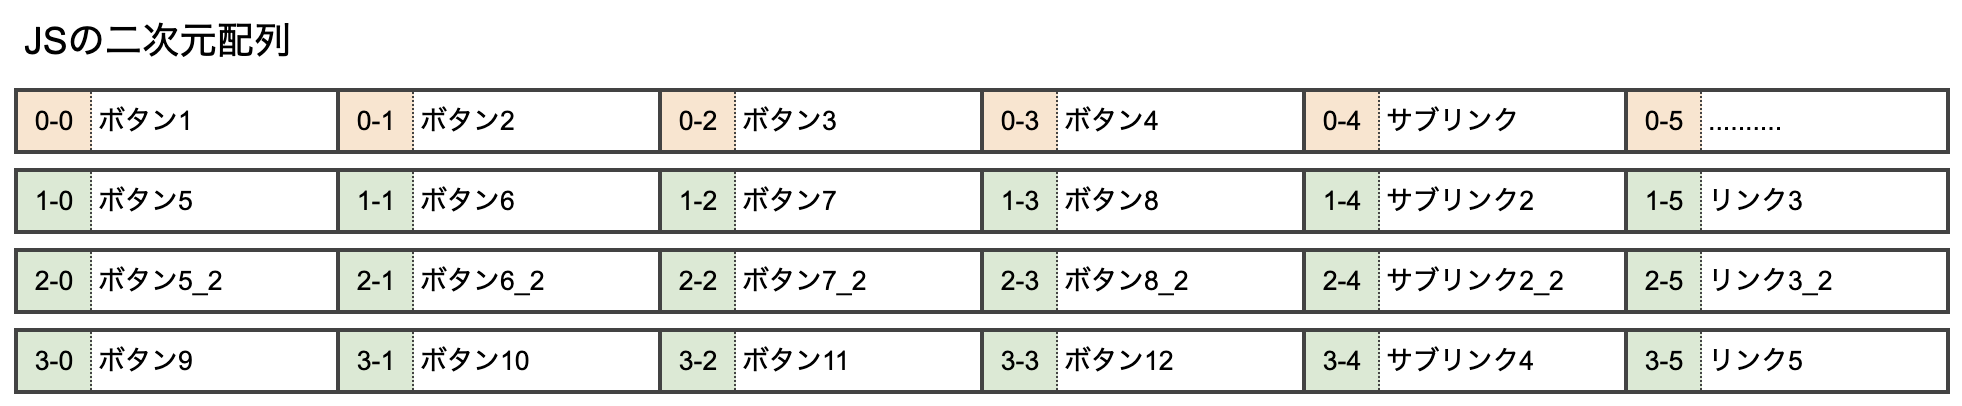
- JavaScriptでフォーカス可能な要素を全て取得し、2次元配列に格納して、繰り返し処理で座標番号を付与しています。
|
|
11
11
|
|
|
@@ -84,11 +84,11 @@
|
|
|
84
84
|
}
|
|
85
85
|
|
|
86
86
|
function manipulateFocus(event) {
|
|
87
|
-
event.preventDefault();
|
|
88
87
|
const keys = {'ArrowLeft': [-1, 0], 'ArrowRight': [1, 0], 'ArrowUp': [0, -1], 'ArrowDown': [0, 1]};
|
|
89
88
|
|
|
90
89
|
for (const [key, [x, y]] of Object.entries(keys)) {
|
|
91
90
|
if (event.key === key) {
|
|
91
|
+
event.preventDefault();
|
|
92
92
|
const currentCoord = event.target.dataset.coord;
|
|
93
93
|
const targetCoord = currentCoord ? currentCoord.replace(/(\d+)-(\d+)/, (_, px, py) => [Number(px) + x, Number(py) + y].join('-')) : '0-0';
|
|
94
94
|
const [targetElem] = document.querySelectorAll(`[data-coord="${targetCoord}"]`);
|
|
@@ -97,7 +97,6 @@
|
|
|
97
97
|
}
|
|
98
98
|
}
|
|
99
99
|
}
|
|
100
|
-
|
|
101
100
|
```
|
|
102
101
|
|
|
103
102
|
### コメントによる解説付きJavaScriptコード
|
|
@@ -148,8 +147,6 @@
|
|
|
148
147
|
* 矢印キーでフォーカスを操作する関数
|
|
149
148
|
*/
|
|
150
149
|
function manipulateFocus(event) {
|
|
151
|
-
// デフォルトの矢印キーの動きをリセット
|
|
152
|
-
event.preventDefault();
|
|
153
150
|
|
|
154
151
|
// 矢印キーによって加算される座標値
|
|
155
152
|
const keys = {'ArrowLeft': [-1, 0], 'ArrowRight': [1, 0], 'ArrowUp': [0, -1], 'ArrowDown': [0, 1]};
|
|
@@ -160,6 +157,9 @@
|
|
|
160
157
|
// 押したキーとオブジェクトkeysのプロパティ名が一致するとき、
|
|
161
158
|
if (event.key === key) {
|
|
162
159
|
|
|
160
|
+
// デフォルトの矢印キーの動きを停止
|
|
161
|
+
event.preventDefault();
|
|
162
|
+
|
|
163
163
|
// 現在フォーカスしている操作ボタンの座標番号を取得
|
|
164
164
|
const currentCoord = event.target.dataset.coord;
|
|
165
165
|
|
1
.forEach() -> for...of
answer
CHANGED
|
@@ -1,14 +1,15 @@
|
|
|
1
|
-
⭐️ **動作確認用サンプル:** https://jsfiddle.net/
|
|
1
|
+
⭐️ **動作確認用サンプル:** https://jsfiddle.net/5u0ys7vt/
|
|
2
2
|
|
|
3
3
|
### 処理の概要
|
|
4
4
|
- まずは、フォーカス可能な要素に座標番号のデータ属性をJSで動的に付与します。
|
|
5
5
|
- 例えば、`data-coord="0-0"`を付与
|
|
6
6
|
- → `<button data-coord="0-0"><span>ボタン1</span></button>`
|
|
7
|
+
- JSにより自動で付与されますので、自分で考えながらHTMLに座標番号を書かなくてもいいです。
|
|
7
8
|
- 左上を起点`(0, 0)`とすると、座標は以下の画像のようになります。
|
|
8
9
|

|
|
9
10
|
- JavaScriptでフォーカス可能な要素を全て取得し、2次元配列に格納して、繰り返し処理で座標番号を付与しています。
|
|
10
11
|

|
|
11
|
-
- 矢印キーを押下したら
|
|
12
|
+
- 矢印キーを押下したら現在の座標番号を取得し、移動先の座標番号を計算します。
|
|
12
13
|
|
|
13
14
|
##### 座標計算の例
|
|
14
15
|
- 例えば、現在フォーカスしている要素が「ボタン7」の場合 → 座標番号は`1-2`
|
|
@@ -23,7 +24,7 @@
|
|
|
23
24
|
### 完成コード例
|
|
24
25
|
htmlに`.focusable-container`と`focusable-item`というclassを追加
|
|
25
26
|
```html
|
|
26
|
-
|
|
27
|
+
<div id="wrapper">
|
|
27
28
|
<div class="inner_left">
|
|
28
29
|
<div class="frame_button focusable-container"> <!-- class追加 -->
|
|
29
30
|
<button class="focusable-item"><span>ボタン1</span></button> <!-- class追加 -->
|
|
@@ -83,24 +84,20 @@
|
|
|
83
84
|
}
|
|
84
85
|
|
|
85
86
|
function manipulateFocus(event) {
|
|
86
|
-
|
|
87
|
+
event.preventDefault();
|
|
88
|
+
const keys = {'ArrowLeft': [-1, 0], 'ArrowRight': [1, 0], 'ArrowUp': [0, -1], 'ArrowDown': [0, 1]};
|
|
87
89
|
|
|
88
|
-
const keys = {
|
|
89
|
-
'ArrowLeft': [-1, 0],
|
|
90
|
-
'ArrowRight': [1, 0],
|
|
91
|
-
'ArrowUp': [0, -1],
|
|
92
|
-
'ArrowDown': [0, 1]
|
|
93
|
-
};
|
|
94
|
-
|
|
95
|
-
|
|
90
|
+
for (const [key, [x, y]] of Object.entries(keys)) {
|
|
96
91
|
if (event.key === key) {
|
|
97
92
|
const currentCoord = event.target.dataset.coord;
|
|
98
93
|
const targetCoord = currentCoord ? currentCoord.replace(/(\d+)-(\d+)/, (_, px, py) => [Number(px) + x, Number(py) + y].join('-')) : '0-0';
|
|
99
94
|
const [targetElem] = document.querySelectorAll(`[data-coord="${targetCoord}"]`);
|
|
100
95
|
if (targetElem) targetElem.focus();
|
|
96
|
+
return;
|
|
101
97
|
}
|
|
102
|
-
}
|
|
98
|
+
}
|
|
103
99
|
}
|
|
100
|
+
|
|
104
101
|
```
|
|
105
102
|
|
|
106
103
|
### コメントによる解説付きJavaScriptコード
|
|
@@ -140,7 +137,7 @@
|
|
|
140
137
|
// ['3-0', '3-1', '3-2', '3-3', '3-4', '3-5']
|
|
141
138
|
// ]
|
|
142
139
|
|
|
143
|
-
//
|
|
140
|
+
// 1次元配列化しています
|
|
144
141
|
// ['0-0', '0-1', '0-2', '0-3', '0-4', '0-5', '1-0', '1-1', '1-2', '1-3', '1-4', '1-5', '2-0', '2-1', '2-2', '2-3', '2-4', '2-5', '3-0', '3-1', '3-2', '3-3', '3-4', '3-5']
|
|
145
142
|
|
|
146
143
|
// 生成した座標をデータ属性として、.focusable-itemに付与していく
|
|
@@ -155,27 +152,29 @@
|
|
|
155
152
|
event.preventDefault();
|
|
156
153
|
|
|
157
154
|
// 矢印キーによって加算される座標値
|
|
158
|
-
const keys = {
|
|
159
|
-
|
|
155
|
+
const keys = {'ArrowLeft': [-1, 0], 'ArrowRight': [1, 0], 'ArrowUp': [0, -1], 'ArrowDown': [0, 1]};
|
|
160
|
-
'ArrowRight': [1, 0],
|
|
161
|
-
'ArrowUp': [0, -1],
|
|
162
|
-
'ArrowDown': [0, 1]
|
|
163
|
-
};
|
|
164
156
|
|
|
157
|
+
// オブジェクトkeysの中身を一つずつ確認
|
|
165
|
-
|
|
158
|
+
for (const [key, [x, y]] of Object.entries(keys)) {
|
|
159
|
+
|
|
160
|
+
// 押したキーとオブジェクトkeysのプロパティ名が一致するとき、
|
|
166
161
|
if (event.key === key) {
|
|
162
|
+
|
|
167
163
|
// 現在フォーカスしている操作ボタンの座標番号を取得
|
|
168
164
|
const currentCoord = event.target.dataset.coord;
|
|
169
|
-
|
|
165
|
+
|
|
170
166
|
// 移動先の座標番号を計算(矢印キー押下時、何もフォーカスしていなかったら移動先の座標は'0-0')
|
|
171
167
|
const targetCoord = currentCoord ? currentCoord.replace(/(\d+)-(\d+)/, (_, px, py) => [Number(px) + x, Number(py) + y].join('-')) : '0-0';
|
|
172
|
-
|
|
168
|
+
|
|
173
169
|
// 移動先の要素を取得する
|
|
174
170
|
const [targetElem] = document.querySelectorAll(`[data-coord="${targetCoord}"]`);
|
|
175
|
-
|
|
171
|
+
|
|
176
172
|
// その座標番号を持つ要素が存在していたら、その要素をフォーカスする
|
|
177
173
|
if (targetElem) targetElem.focus();
|
|
174
|
+
|
|
175
|
+
// ここで繰り返し処理を完全に終了(残りのオブジェクトの中身はチェックされないので無駄な処理を少なく!)
|
|
176
|
+
return;
|
|
178
177
|
}
|
|
179
|
-
}
|
|
178
|
+
}
|
|
180
179
|
}
|
|
181
180
|
```
|