
ご回答ありがとうございます。 gridbaglayoutの定義はこれでよろしいのでしょうか。
このやり方ですと、症状が治らないのですが・・・
import javax.swing.JFrame;
import javax.swing.JPanel;
import javax.swing.JLabel;
import javax.swing.JButton;
import java.awt.Dimension;
import java.awt.Color;
import java.awt.Font;
import java.awt.GridBagLayout;
public class INBEDA{
public static void main(String[] args){
frame();
}
//フレームを作成
public static void frame(){
JFrame jf = new JFrame("かんたん電卓 by(^.^)");
jf.setDefaultCloseOperation(JFrame.EXIT_ON_CLOSE);
jf.setSize(300, 600);
jf.setLocationRelativeTo(null);
jf.setVisible( true );
//親パネルを作成し、フレームに貼り付け
JPanel bc = new JPanel();
bc.setBackground(Color.CYAN);
jf.add( bc );
//タイトルを表示、親パネルに貼り付け
JLabel ti = new JLabel("かんたん電卓");
Font f = new Font(Font.MONOSPACED,Font.BOLD,30);
ti.setForeground( Color.RED );
ti.setFont(f);
bc.add( ti );
//各ボタンを作成、親パネルに貼り付け
JButton button1 = new JButton("1");
button1.setLayout(new GridBagLayout() );
button1.setBackground(Color.WHITE);
button1.setBounds(20, 200, 80, 50);
button1.setPreferredSize(new Dimension(100, 100));
bc.add( button1 );
}
}
前回の質問時にはコマンドラインでの電卓を作っていましたが、現在ではswingを使った電卓の制作に挑戦しています。
JButtonでボタンを作り、親パネルに貼り付けているのですが、フルスクリーン表示にすると位置が変わってしまい、画面サイズを戻しても位置が戻りません。
最初は文字の下にあったボタンが、フルスクリーンにすると横に、という具合です。
説明が下手で申し訳ありませんが、どうかご教授よろしくお願いいたします。
以下が、コードとなります。
import javax.swing.JFrame;
import javax.swing.JPanel;
import javax.swing.JLabel;
import javax.swing.JButton;
import java.awt.Dimension;
import java.awt.Color;
import java.awt.Font;
public class DENTAKU{
public static void main(String[] args){
frame();
}
//フレームを作成
public static void frame(){
JFrame jf = new JFrame("かんたん電卓 by(^.^)");
jf.setDefaultCloseOperation(JFrame.EXIT_ON_CLOSE);
jf.setSize(1000, 600);
jf.setLocationRelativeTo(null);
jf.setVisible( true );
	//親パネルを作成し、フレームに貼り付け
	JPanel bc = new JPanel();
	bc.setBackground(Color.CYAN);
	jf.add( bc );

	//タイトルを表示、親パネルに貼り付け
	JLabel ti = new JLabel("かんたん電卓");
	Font f = new Font(Font.MONOSPACED,Font.BOLD,100);
	ti.setForeground( Color.RED );
	ti.setFont(f);
	bc.add( ti );

	//各ボタンを作成、親パネルに貼り付け
	JButton button1 = new JButton("1");
	button1.setLayout(null);
	button1.setBackground(Color.WHITE);
	button1.setBounds(100, 200, 150, 50);
	button1.setPreferredSize(new Dimension(100, 100));
	bc.add( button1 );

}
}
気になる質問をクリップする
クリップした質問は、後からいつでもMYページで確認できます。
またクリップした質問に回答があった際、通知やメールを受け取ることができます。
回答2件
0
まずはレイアウトマネージャーを検索して理解しましょう。
GridBagLayoutもレイアウトマネージャーの一つです。
GridBagLayoutは多少使い方が複雑なので、初心者向きでないのかもしれません。
BorderLayoutとGridLayoutを使ったサンプルを載せておきます。
import
1import java.awt.Color; 2import java.awt.Dimension; 3import java.awt.Font; 4import java.awt.GridLayout; 5 6import javax.swing.JButton; 7import javax.swing.JFrame; 8import javax.swing.JLabel; 9import javax.swing.JPanel; 10 11public class Dentaku { 12 public static void main(String[] args) { 13 frame(); 14 } 15 16 // フレームを作成 17 public static void frame() { 18 JFrame jf = new JFrame("かんたん電卓 by(^.^)"); 19 jf.setDefaultCloseOperation(JFrame.EXIT_ON_CLOSE); 20 jf.setSize(1000, 600); 21 jf.setLocationRelativeTo(null); 22 jf.setVisible(true); 23 24 // 親パネルを作成し、フレームに貼り付け 25 JPanel bc = new JPanel(new BorderLayout()); 26 bc.setBackground(Color.CYAN); 27 jf.add(bc); 28 29 // タイトルを表示、親パネルに貼り付け 30 JLabel ti = new JLabel("かんたん電卓"); 31 Font f = new Font(Font.MONOSPACED, Font.BOLD, 100); 32 ti.setForeground(Color.RED); 33 ti.setFont(f); 34 bc.add(ti, BorderLayout.NORTH); 35 36 JPanel mainPanel = new JPanel(new GridLayout(3, 3)); 37 // 各ボタンを作成、mainパネルに貼り付け 38 for(int i = 1; i <= 9; i++) { 39 JButton button1 = new JButton(String.valueOf(i)); 40 button1.setLayout(null); 41 button1.setBackground(Color.WHITE); 42 button1.setBounds(100, 200, 150, 50); 43 button1.setPreferredSize(new Dimension(100, 100)); 44 mainPanel.add(button1); 45 } 46 bc.add(mainPanel, BorderLayout.CENTER); 47 } 48}
投稿2015/12/22 08:30
総合スコア12
0
![]() ベストアンサー
ベストアンサー
レイアウトマネージャーの問題かな。
gridbaglayout とか使えばいいんじゃないでしょか。
模範回答?作ったのでコピペで実行確認してみてください。
変な書き方でかいてありますが、ちゃんとあなたの希望通りです。
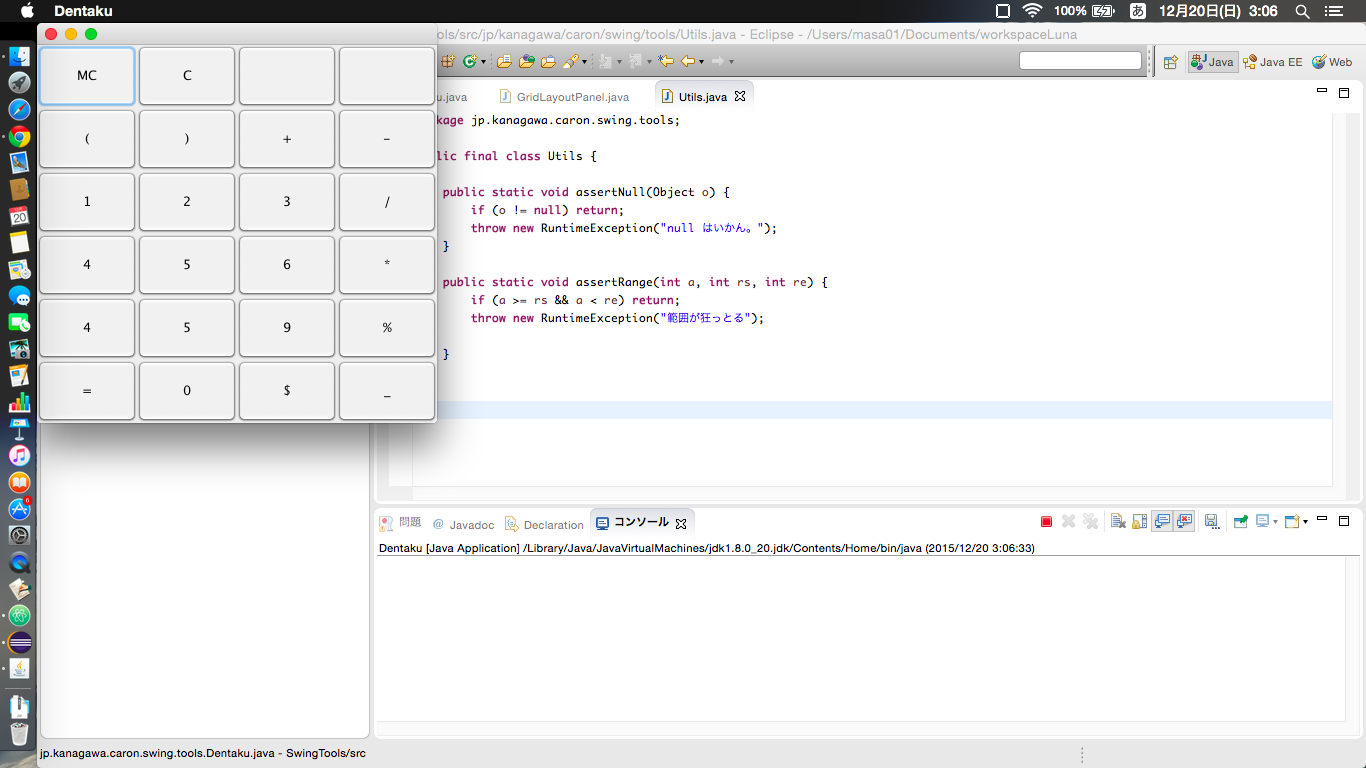
動作環境:Mac, Eclipse Luna Java1.8 swing
Debtaku.java で保存
java
1package jp.kanagawa.caron.swing.tools; 2 3import java.awt.BorderLayout; 4import java.awt.event.ActionEvent; 5import java.awt.event.ActionListener; 6import java.util.HashMap; 7import java.util.Map; 8 9import javax.script.ScriptEngine; 10import javax.script.ScriptEngineManager; 11import javax.swing.JButton; 12import javax.swing.JFrame; 13import javax.swing.JPanel; 14 15/** 16 * swing で電卓、普通の四則演算ができる電卓を作ります。 17 * MC,C, , 18 * (,),+,- 19 * 1,2,3,/ 20 * 4,5,6,* 21 * 7,8,9,% 22 * =,0,$,_ 23 * ( 左かっこ 24 * ) 右かっこ 25 * MC = Memory Clear 26 * C = Clear 27 * 0-9 Number 28 * + prefix / add 29 * - prefix / sub 30 * "/" div 31 * "%" mod 32 * "*" mul 33 * "$" register $0-$7 まで。 34 * 35 * 計算部分は、ScriptEngine による大幅な手抜き動作です。 36 * 最近はやりの 3 * 1/3 + 1 が 10になるってのも Javascript なら正しい結果になります。 37 * 38 * @author masa01 39 * 40 */ 41public class Dentaku extends JFrame { 42 43 /** 44 * 45 */ 46 private static final long serialVersionUID = 1L; 47 48 public static void main(String...args) { 49 50 new Dentaku(); 51 52 } 53 54 private ScriptEngine engine; 55 56 private Map<String, Object> paramMap; 57 58 private StringBuilder buffer; 59 60 public Dentaku() { 61 // JavaScript Engine nathhorn を取得 62 engine = new ScriptEngineManager().getEngineByName("JavaScript"); 63 paramMap = new HashMap<String, Object>(); 64 buffer = new StringBuilder(500); 65 66 init(); 67 68 initLayout(); 69 70 super.setDefaultCloseOperation(EXIT_ON_CLOSE); 71 72 super.setSize(400, 400); 73 74 super.setVisible(true); 75 76 } 77 private void init() { 78 // 電卓計算結果の途中保存用レジスタの登録と初期化 79 paramMap.put("$0", null); 80 paramMap.put("$1", null); 81 paramMap.put("$2", null); 82 paramMap.put("$3", null); 83 paramMap.put("$4", null); 84 paramMap.put("$5", null); 85 paramMap.put("$6", null); 86 paramMap.put("$7", null); 87 88 //$err エラーメッセージ格納用変数を定義する 89 paramMap.put("$err", null); 90 91 // レジスタを使わない計算の結果はすべてここに入る 92 paramMap.put("$ans", null); 93 94 // バッファクリア 95 buffer.setLength(0); 96 } 97 98 /** 99 * try { sys.$ans = ("画面で入力した羅列"); } catch (e) { sys.$err = e; } 100 * を作ります。ScriptEngine の eval を実行すると結果が java から取得できるっていう感じですね。 101 * @return 102 */ 103 private String createJs() { 104 return null; 105 } 106 107 /** 108 * 画面レイアウトを変更するならオーバーライドしてください。 109 * デフォルトでは、 110 * BorderLayout で、 111 * North : 計算入力用テキストフィールド(直接入力不可)、readonly 112 * Center: 数字と記号とその他パーツを 4 * 4 のマトリクスにしたもの 113 * South : 実行結果の履歴 114 * 115 */ 116 protected void initLayout() { 117 118 ActionListener be = new ActionListener() { 119 120 @Override 121 public void actionPerformed(ActionEvent e) { 122 123 System.out.println(e.getActionCommand()); 124 } 125 }; 126 127 JPanel gp = new GridLayoutPanel(6, 4) 128 .add(0, 0, createButton("MC", "MC", "MC", be)) 129 .add(0, 1, createButton("C", "C", "C", be)) 130 .add(0, 2, createButton(" ", " ", "NOP", be)) 131 .add(0, 3, createButton(" ", " ", "NOP", be)) 132 133 .add(1, 0, createButton("LPAR", "(", "LPAR", be)) 134 .add(1, 1, createButton("RPAR", ")", "RPAR", be)) 135 .add(1, 2, createButton("ADD", "+", "ADD", be)) 136 .add(1, 3, createButton("SUB", "-", "SUB", be)) 137 138 .add(2, 0, createButton("ONE", "1", "ONE", be)) 139 .add(2, 1, createButton("TWO", "2", "TWO", be)) 140 .add(2, 2, createButton("TRE", "3", "TRE", be)) 141 .add(2, 3, createButton("DIV", "/", "DIV", be)) 142 143 .add(3, 0, createButton("FOR", "4", "FOR", be)) 144 .add(3, 1, createButton("FIV", "5", "FIV", be)) 145 .add(3, 2, createButton("SIX", "6", "SIX", be)) 146 .add(3, 3, createButton("MUL", "*", "MUL", be)) 147 148 .add(4, 0, createButton("SVN", "4", "SVN", be)) 149 .add(4, 1, createButton("EGT", "5", "EGT", be)) 150 .add(4, 2, createButton("NIN", "9", "NIN", be)) 151 .add(4, 3, createButton("MOD", "%", "MOD", be)) 152 153 .add(5, 0, createButton("EQU", "=", "EQU", be)) 154 .add(5, 1, createButton("ZRO", "0", "ZRO", be)) 155 .add(5, 2, createButton("DOL", "$", "DOL", be)) 156 .add(5, 3, createButton("USC", "_", "USC", be)) 157 158 .done(); 159 /* 160 * MC,C, , 161 * (,),+,- 162 * 1,2,3,/ 163 * 4,5,6,* 164 * 7,8,9,% 165 * =,0,$,_ 166 */ 167 168 super.getContentPane().add(gp, BorderLayout.CENTER); 169 170 } 171 /** 172 * ボタンを作る、アイコンボタンにしたいならオーバーライドする 173 * @param name 174 * @param text 175 * @param command 176 * @return 177 */ 178 protected JButton createButton(String name, String text, String command, ActionListener actionListener) { 179 JButton jb = new JButton(text); 180 // アクションコマンド設定、集約イベントハンドラ内でこのコマンドを取得して対応アクションで処理する 181 jb.setActionCommand(command); 182 // 名前を設定 183 jb.setName(name); 184 // 集約?イベントを設定する 185 jb.addActionListener(actionListener); 186 return jb; 187 } 188 189 /** 190 * @author masa01 191 * 192 */ 193 194} 195
GridLayoutPanel.java で保存
java
1package jp.kanagawa.caron.swing.tools; 2 3import java.awt.Component; 4import java.awt.GridLayout; 5import java.util.ArrayList; 6import java.util.Comparator; 7import java.util.List; 8 9import javax.swing.JPanel; 10 11public class GridLayoutPanel extends GridLayout { 12 13 /** 14 * 15 */ 16 private static final long serialVersionUID = 1L; 17 18 private List<Compo> comps; 19 private int rows, cols; 20 21 class Compo { 22 int x, y; 23 int val; 24 Component compo; 25 public Compo(int x, int y, Component compo) { 26 this.x = x; 27 this.y = y; 28 this.compo = compo; 29 this.val = (x + 1) * (y + 1); 30 } 31 } 32 33 public GridLayoutPanel(int row, int col) { 34 super(row, col); 35 36 rows = row; 37 cols = col; 38 comps = new ArrayList<Compo>(); 39 } 40 41 public GridLayoutPanel add(int row, int col, Component comp) { 42 43 Utils.assertRange(row, 0, rows); 44 Utils.assertRange(col, 0, cols); 45 Utils.assertNull(comp); 46 47 comps.add(new Compo(col, row, comp)); 48 return this; 49 } 50 public JPanel done() { 51 comps.sort(new Comparator<Compo>() { 52 @Override 53 public int compare(Compo o1, Compo o2) { 54 // o1 - o2 は昇順ソート 55 // o2 - o1 は降順ソート 56 int v1 = o1.y * rows + o1.x; 57 int v2 = o2.y * rows + o2.x; 58 59 return v1 - v2; 60 61 62 } 63 }); 64 JPanel jp = new JPanel(this); 65 for (Compo c : comps) { 66 jp.add(c.compo); 67 } 68 69 return jp; 70 } 71} 72 73
Utils.java で保存
java
1package jp.kanagawa.caron.swing.tools; 2 3public final class Utils { 4 5 public static void assertNull(Object o) { 6 if (o != null) return; 7 throw new RuntimeException("null はいかん。"); 8 } 9 10 public static void assertRange(int a, int rs, int re) { 11 if (a >= rs && a < re) return; 12 throw new RuntimeException("範囲が狂っとる"); 13 14 } 15 16} 17
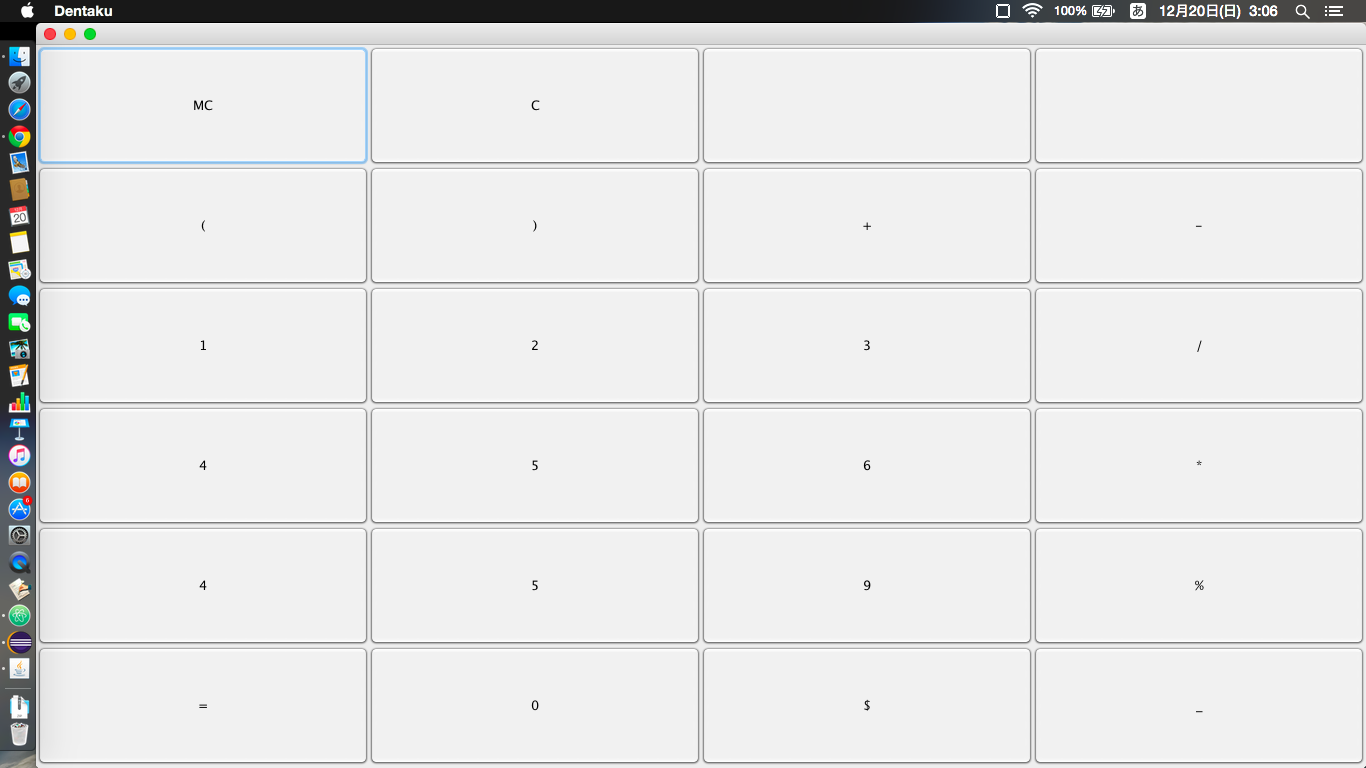
全部対応するファイル名で保存、パッケージパスを自分とこに合わせて、Dentaku.java を実行してみてください。
画面サイズを変更しても元に戻すとちゃんとレイアウトが戻ります。
投稿2015/12/19 16:12
編集2015/12/19 18:08総合スコア1693
![]()
初心者だからって、変数名に手抜きしては駄目です。
java のクラス名の命名ルールは、アッパーキャメルケース、
変数名の基本は、クラス名の先頭文字を小文字にしたロワーキャメルケースです。
title を ti とか省略して記述するのは半年くらい早いです。
なぜ、100万年じゃなくて半年かというと、半年勉強して研鑽を積めば、たぶん君のスキルの方が自分よりも上になるだろうから。経験値では分があるけど、最新技術ではね、
返信が遅れて申し訳ありません、ご回答ありがとうございます!
正しいコードまで書いていただき、本当にありがたいです。
貴方様のお言葉を胸に、これから勉強していきます。
あなたの回答
tips
太字
斜体
打ち消し線
見出し
引用テキストの挿入
コードの挿入
リンクの挿入
リストの挿入
番号リストの挿入
表の挿入
水平線の挿入
プレビュー
質問の解決につながる回答をしましょう。 サンプルコードなど、より具体的な説明があると質問者の理解の助けになります。 また、読む側のことを考えた、分かりやすい文章を心がけましょう。


2015/12/22 09:28