

###前提・実現したいこと
初めまして,iOSアプリの開発をしている者です.
TODOアプリの開発途中で,機能の一つであるカレンダーの枠組みを作成しています.
###発生している問題・エラーメッセージ
以下のコードでビルドしたところ,シミュレーターでの表示が次のようになりました.
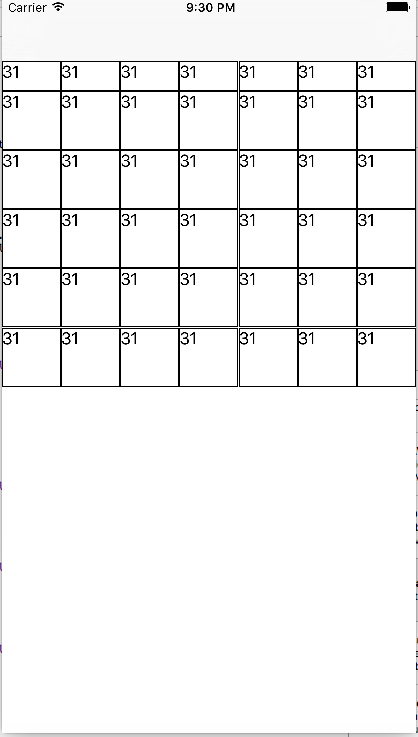
このように,左から5本目の縦線と上から5本目の縦線に小さな隙間ができます.
この隙間を詰めたいのですが,どうすればよろしいでしょうか.
また,次のコードで上から1段目のラベルを中央に,それ以外の段のラベルを左上に配置したいのですが,それが反映されません.
swift
1 func collectionView(collectionView: UICollectionView, cellForItemAtIndexPath indexPath: NSIndexPath) -> UICollectionViewCell { 2 let cell = collectionView.dequeueReusableCellWithReuseIdentifier("cell", forIndexPath: indexPath) 3 let label = cell.viewWithTag(1) as! UILabel 4 5 cell.layer.borderColor = UIColor.blackColor().CGColor 6 cell.layer.borderWidth = 1.0 7 8 if indexPath.section == 0{ 9 label.layer.position.x = cell.layer.position.x + (cell.frame.size.width - label.frame.size.width) / 2 10 label.layer.position.y = cell.layer.position.y + (cell.frame.size.height - label.frame.size.width) / 2 11 }else{ 12 label.layer.position.x = cell.layer.position.x 13 label.layer.position.y = cell.layer.position.y 14 } 15 16 return cell 17 }
StoryBoard上では,ラベルはセルの左上に配置していて,AutoLayoutは設定していない状態です.
ラベル配置を調整するコードはcollectionView(collectionView: UICollectionView, cellForItemAtIndexPath indexPath: NSIndexPath)に書いていますが,レイアウト関係の処理なので viewDidLayoutSubviews内に書いた方がいいかとも思ったのですが,その場合indexPathの取得をどのようにすればいいかが分からない状態となっています.
回答いただけるとありがたいです...
###該当のソースコード
swift
1 2import UIKit 3 4class Test: UIViewController,UICollectionViewDataSource, UICollectionViewDelegate, UICollectionViewDelegateFlowLayout { 5 6 let dateManager = DateManager() 7 let daysPerWeek = 7 8 9 @IBOutlet weak var calendarCollectionView: UICollectionView! 10 11 12 13 override func viewDidLoad() { 14 super.viewDidLoad() 15 16 //collection viewの設定 17 calendarCollectionView.delegate = self 18 calendarCollectionView.dataSource = self 19 calendarCollectionView.backgroundColor = UIColor.whiteColor() 20 21 //collectionViewはスクロールさせない 22 calendarCollectionView.scrollEnabled = false 23 } 24 25 //レイアウトに関する処理 26 override func viewDidLayoutSubviews() { 27 super.viewDidLayoutSubviews() 28 self.view.layoutIfNeeded() 29 30 //collectionViewの高さを,セルの大きさに応じて調節する 31 //高さ=ステータスバーの高さ+ナビゲーションバーの高さ+曜日セルの高さ+日付セルの高さ*週の数 32 let cellSize = self.view.frame.size.width / CGFloat(daysPerWeek) 33 calendarCollectionView.frame = CGRectMake(0, 0, self.view.frame.size.width, UIApplication.sharedApplication().statusBarFrame.height + (self.navigationController?.navigationBar.frame.size.height)! + CGFloat(30) + cellSize * CGFloat(dateManager.weeksPerMonth) ) 34 } 35 36 /*collectionViewの処理(ここから)*/ 37 func numberOfSectionsInCollectionView(collectionView: UICollectionView) -> Int { 38 return 2 39 } 40 41 func collectionView(collectionView: UICollectionView, numberOfItemsInSection section: Int) -> Int { 42 switch section { 43 case 0: 44 return 7 45 default: 46 return dateManager.daysAcquisition() 47 } 48 } 49 50 func collectionView(collectionView: UICollectionView, cellForItemAtIndexPath indexPath: NSIndexPath) -> UICollectionViewCell { 51 let cell = collectionView.dequeueReusableCellWithReuseIdentifier("cell", forIndexPath: indexPath) 52 let label = cell.viewWithTag(1) as! UILabel 53 54 cell.layer.borderColor = UIColor.blackColor().CGColor 55 cell.layer.borderWidth = 1.0 56 57 if indexPath.section == 0{ 58 label.layer.position.x = cell.layer.position.x + (cell.frame.size.width - label.frame.size.width) / 2 59 label.layer.position.y = cell.layer.position.y + (cell.frame.size.height - label.frame.size.width) / 2 60 }else{ 61 label.layer.position.x = cell.layer.position.x 62 label.layer.position.y = cell.layer.position.y 63 } 64 65 return cell 66 } 67 68 func collectionView(collectionView: UICollectionView, layout collectionViewLayout: UICollectionViewLayout, sizeForItemAtIndexPath indexPath: NSIndexPath) -> CGSize { 69 let width:CGFloat = collectionView.frame.size.width / CGFloat(daysPerWeek) 70 let height:CGFloat = indexPath.section == 0 ? 30 : width * 1.0 71 72 return CGSizeMake(width, height) 73 } 74 75 /*セルの隙間を詰めるための処理(ここから)*/ 76 func collectionView(collectionView: UICollectionView, layout collectionViewLayout: UICollectionViewLayout, insetForSectionAtIndex section: Int) -> UIEdgeInsets { 77 return UIEdgeInsetsMake(0.0, 0.0, 0.0, 0.0) 78 } 79 80 //セルの垂直方向のマージンを設定 81 func collectionView(collectionView: UICollectionView, layout collectionViewLayout: UICollectionViewLayout, minimumLineSpacingForSectionAtIndex section: Int) -> CGFloat { 82 return 0.0//cellMargin 83 } 84 85 //セルの水平方向のマージンを設定 86 func collectionView(collectionView: UICollectionView, layout collectionViewLayout: UICollectionViewLayout, minimumInteritemSpacingForSectionAtIndex section: Int) -> CGFloat { 87 return 0.0//cellMargin 88 } 89 /*セルの隙間を詰めるための処理(ここまで)*/ 90 91 /*collectionViewの処理(ここまで)*/ 92}
swift
1 2import Foundation 3 4extension NSDate { 5 func monthAgoDate() -> NSDate { 6 let addValue = -1 7 let calendar = NSCalendar.currentCalendar() 8 let dateComponents = NSDateComponents() 9 dateComponents.month = addValue 10 return calendar.dateByAddingComponents(dateComponents, toDate: self, options: NSCalendarOptions(rawValue: 0))! 11 } 12 13 func monthLaterDate() -> NSDate { 14 let addValue: Int = 1 15 let calendar = NSCalendar.currentCalendar() 16 let dateComponents = NSDateComponents() 17 dateComponents.month = addValue 18 return calendar.dateByAddingComponents(dateComponents, toDate: self, options: NSCalendarOptions(rawValue: 0))! 19 } 20 21} 22 23class DateManager: NSObject { 24 var currentMonthOfDates = [NSDate]() //表記する月の配列 25 var selectedDate = NSDate() 26 let daysPerWeek: Int = 7 27 var numberOfItems: Int! 28 var weeksPerMonth: Int! //月あたりの週の数 29 30 //月ごとのセルの数を返すメソッド 31 internal func daysAcquisition() -> Int { 32 let rangeOfWeeks = NSCalendar.currentCalendar().rangeOfUnit(NSCalendarUnit.WeekOfMonth, inUnit: NSCalendarUnit.Month, forDate: firstDateOfMonth()) 33 weeksPerMonth = rangeOfWeeks.length //月が持つ週の数 34 numberOfItems = weeksPerMonth * daysPerWeek //週の数×列の数 35 return numberOfItems 36 } 37 38 //月の初日を取得 39 private func firstDateOfMonth() -> NSDate { 40 let components = NSCalendar.currentCalendar().components([.Year, .Month, .Day], 41 fromDate: selectedDate) 42 components.day = 1 43 let firstDateMonth = NSCalendar.currentCalendar().dateFromComponents(components)! 44 return firstDateMonth 45 } 46 47 // ⑴表記する日にちの取得 48 private func dateForCellAtIndexPath(numberOfItems: Int) { 49 // ①「月の初日が週の何日目か」を計算する 50 let ordinalityOfFirstDay = NSCalendar.currentCalendar().ordinalityOfUnit(NSCalendarUnit.Day, inUnit: NSCalendarUnit.WeekOfMonth, forDate: firstDateOfMonth()) 51 for i in 0 ..< numberOfItems { 52 // ②「月の初日」と「indexPath.item番目のセルに表示する日」の差を計算する 53 let dateComponents = NSDateComponents() 54 dateComponents.day = i - (ordinalityOfFirstDay - 1) 55 // ③ 表示する月の初日から②で計算した差を引いた日付を取得 56 let date = NSCalendar.currentCalendar().dateByAddingComponents(dateComponents, toDate: firstDateOfMonth(), options: NSCalendarOptions(rawValue: 0))! 57 // ④配列に追加 58 currentMonthOfDates.append(date) 59 } 60 } 61 62 // ⑵表記の変更 63 internal func conversionDateFormat(indexPath: NSIndexPath) -> String { 64 //currentMonthOfDatesが空の場合,新たに取得する 65 if currentMonthOfDates.count != numberOfItems!{ 66 dateForCellAtIndexPath(numberOfItems) 67 } 68 let formatter: NSDateFormatter = NSDateFormatter() 69 formatter.dateFormat = "d" 70 return formatter.stringFromDate(currentMonthOfDates[indexPath.row]) 71 } 72 73 //前月の表示 74 func prevMonth(date: NSDate) -> NSDate { 75 currentMonthOfDates = [] 76 selectedDate = date.monthAgoDate() 77 return selectedDate 78 } 79 //次月の表示 80 func nextMonth(date: NSDate) -> NSDate { 81 currentMonthOfDates = [] 82 selectedDate = date.monthLaterDate() 83 return selectedDate 84 } 85}
###試したこと
Testクラス中にcollectionViewCell間の間隔を詰めるために関数collectionView(collectionView: UICollectionView, layout collectionViewLayout: UICollectionViewLayout, insetForSectionAtIndex section: Int), collectionView(collectionView: UICollectionView, layout collectionViewLayout: UICollectionViewLayout, minimumLineSpacingForSectionAtIndex section: Int), collectionView(collectionView: UICollectionView, layout collectionViewLayout: UICollectionViewLayout, minimumInteritemSpacingForSectionAtIndex section: Int)を挿入していますが,挿入前に比べてセル間の間隔は詰められましたが上のシミュレーターのように一部のセルの間隔が半端に空いている状態となっています.
###補足情報
Xcode 7.3.1
シミュレーター iPhone6s Plus
OSX ElCapitan 10.11.6
あなたの回答
tips
プレビュー


