質問をすることでしか得られない、回答やアドバイスがある。

15分調べてもわからないことは、質問しよう!

新規登録して質問してみよう
ただいま回答率
85.49%
Swift 2

Swift 2は、Apple社が独自に開発を行っている言語「Swift」のアップグレード版です。iOSやOS X、さらにLinuxにも対応可能です。また、throws-catchベースのエラーハンドリングが追加されています。

Q&A

解決済

1回答

1771閲覧

swift2.2 xcode7でTableViewCellの中のUILabelの高さを変更したいが変更されない

kaji

総合スコア648

Swift 2

Swift 2は、Apple社が独自に開発を行っている言語「Swift」のアップグレード版です。iOSやOS X、さらにLinuxにも対応可能です。また、throws-catchベースのエラーハンドリングが追加されています。

0グッド

0クリップ

投稿2016/06/28 15:15

編集2016/06/30 03:40

以下のように記述してますが高さが変更されませんでした。

class DetailViewController: UIViewController ,UITableViewDataSource, UITableViewDelegate {
// 略
func tableView(tableView: UITableView, numberOfRowsInSection section: Int) -> Int {
return 10
}
func tableView(tableView: UITableView, cellForRowAtIndexPath indexPath: NSIndexPath) -> UITableViewCell {
let cell = tableView.dequeueReusableCellWithIdentifier("CustomTableViewCellId") as! CustomTableViewCell
cell.textLabel.numberOfLines = 0
cell.textLabel.sizeToFit()
return cell
}

通常のViewController上のUILabelではviewDidLayoutSubviews()で記述することで対応できましたが、
https://teratail.com/questions/39431
TableViewではviewDidLayoutSubviews()がないので、画面再表示メソッドなど、それっぽいものがあるか探しましたが、
探しきれませんでした。
わかる方お願いします。

追加 2016/06/29 08:04
イメージ説明
イメージ説明

気になる質問をクリップする

クリップした質問は、後からいつでもMYページで確認できます。

またクリップした質問に回答があった際、通知やメールを受け取ることができます。

バッドをするには、ログインかつ

こちらの条件を満たす必要があります。

guest

回答1

0

ベストアンサー

以下のサイトを参考に通常のCellとカスタムセルで例を作ってみました、これでCellの高さが自動で計算されると思います。

UITableViewCellの高さを自動で計算する: UITableViewAutomaticDimension
※参考URL

デフォルトのUITableViewCellを使用した方法

swift

1 2import UIKit 3 4class ViewController: UIViewController, UITableViewDelegate, UITableViewDataSource { 5 6 @IBOutlet weak var myTableView: UITableView! 7 8 override func viewDidLoad() { 9 super.viewDidLoad() 10 11 myTableView.registerClass(UITableViewCell.self, forCellReuseIdentifier: "Cell") 12 13 myTableView.estimatedRowHeight = 20 14 myTableView.rowHeight = UITableViewAutomaticDimension 15 } 16 17 // Data Array 
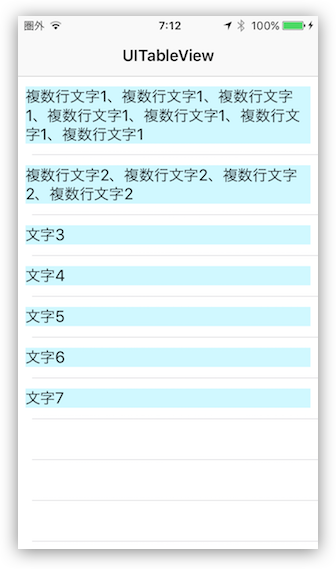
18 var dataArray = ["複数行文字1、複数行文字1、複数行文字1、複数行文字1、複数行文字1、複数行文字1、複数行文字1","複数行文字2、複数行文字2、複数行文字2、複数行文字2","文字3","文字4","文字5","文字6","文字7"] 19 20 // Row Count 21 func tableView(tableView: UITableView, numberOfRowsInSection section: Int) -> Int { 22 return dataArray.count 23 } 24 25 // Generate Cell 26 func tableView(tableView: UITableView, cellForRowAtIndexPath indexPath: NSIndexPath) -> UITableViewCell { 27 let cell = tableView.dequeueReusableCellWithIdentifier("Cell", forIndexPath: indexPath) 28 cell.textLabel?.numberOfLines = 0 29 cell.textLabel?.text = dataArray[indexPath.row] 30 return cell 31 } 32}

カスタムセルを使用した方法

swift

1import UIKit 2 3class ViewController: UIViewController, UITableViewDelegate, UITableViewDataSource { 4 // Storyboardに乗せたUITableView 5 @IBOutlet weak var myTableView: UITableView! 6 7 override func viewDidLoad() { 8 super.viewDidLoad() 9 10 myTableView.estimatedRowHeight = 20 11 myTableView.rowHeight = UITableViewAutomaticDimension 12 } 13 14 // Data Array 15 var dataArray = ["複数行文字1、複数行文字1、複数行文字1、複数行文字1、複数行文字1、複数行文字1、複数行文字1","複数行文字2、複数行文字2、複数行文字2、複数行文字2","文字3","文字4","文字5","文字6","文字7"] 16 17 // Row Count 18 func tableView(tableView: UITableView, numberOfRowsInSection section: Int) -> Int { 19 return dataArray.count 20 } 21 22 // Generate Cell 23 func tableView(tableView: UITableView, cellForRowAtIndexPath indexPath: NSIndexPath) -> UITableViewCell { 24 let cell = tableView.dequeueReusableCellWithIdentifier("CustomCell", forIndexPath: indexPath) as! CustomCell 25 cell.label.text = dataArray[indexPath.row] 26 return cell 27 } 28} 29 30// CustomCell 31class CustomCell: UITableViewCell { 32 // StoryboardのCustomCellにラベルを一つ乗せ紐つける 33 @IBOutlet weak var label: UILabel! 34}

i

結果

u

投稿2016/06/28 22:18

編集2016/06/28 22:46
_Kentarou

総合スコア8490

バッドをするには、ログインかつ

こちらの条件を満たす必要があります。

kaji

2016/06/28 23:04

そのまま貼り付けましたが、上の画像に示す通りでした。 labelのAutolayoutも"Use Auto Layout"にチェックが入っておりました。 またlabelのlinesも0にしております。 Xcodeの再起動も行いました。 class ThirdViewController: UIViewController { @IBOutlet weak var myTableView: UITableView! override func viewDidLoad() { super.viewDidLoad() myTableView.estimatedRowHeight = 20 myTableView.rowHeight = UITableViewAutomaticDimension } var dataArray = ["複数行文字1、複数行文字1、複数行文字1、複数行文字1、複数行文字1、複数行文字1、複数行文字1","複数行文字2、複数行文字2、複数行文字2、複数行文字2","文字3","文字4","文字5","文字6","文字7"] override func didReceiveMemoryWarning() { super.didReceiveMemoryWarning() // Dispose of any resources that can be recreated. } // Row Count func tableView(tableView: UITableView, numberOfRowsInSection section: Int) -> Int { return dataArray.count } // Generate Cell func tableView(tableView: UITableView, cellForRowAtIndexPath indexPath: NSIndexPath) -> UITableViewCell { let cell = tableView.dequeueReusableCellWithIdentifier("CustomCell", forIndexPath: indexPath) as! CustomCell cell.label.text = dataArray[indexPath.row] print(dataArray[indexPath.row]) return cell } } class CustomCell: UITableViewCell { @IBOutlet weak var label: UILabel! }
_Kentarou

2016/06/28 23:19 編集

画像ではラベルに対してAutolayoutの設定がされていない様に見えますが、設定されていますか?
kaji

2016/06/30 03:12

AutoLayoutとは"use Auto Layout"にチェックをつければそのように設定されると思ってました。 下の方に項目がありAddNewConstraintsの上下左右にチェックをつけたところうまく動きました。Kenterouさんのおかげで解決できました。ありがとうございます。
guest

あなたの回答

tips

太字

斜体

打ち消し線

見出し

引用テキストの挿入

コードの挿入

リンクの挿入

リストの挿入

番号リストの挿入

表の挿入

水平線の挿入

プレビュー

15分調べてもわからないことは
teratailで質問しよう!

ただいまの回答率
85.49%

質問をまとめることで
思考を整理して素早く解決

テンプレート機能で
簡単に質問をまとめる

質問する

関連した質問