

ios9, iPod touch, xcode7 初心者です。
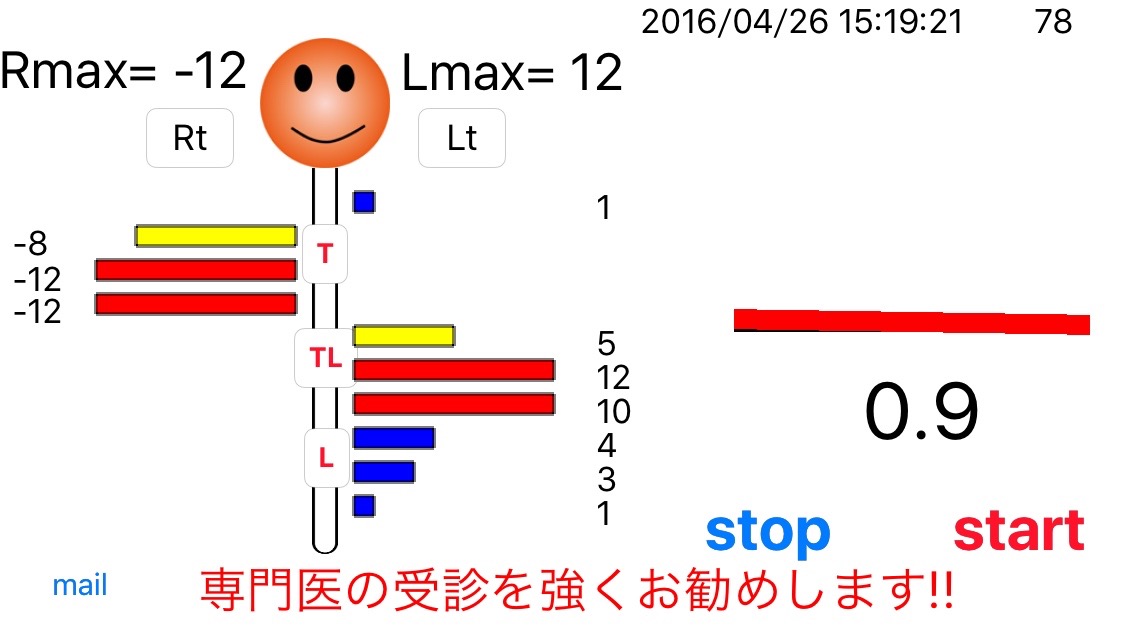
側弯症という背骨が横に曲がる児童を前屈させ
背中の傾斜を加速度センサーを使用し、[start]によって
測定開始し、[stop]によって得られたiPod touch 画面を スクリーンショットし、
写真として本体に記録保存を目指しています。

顔の下の青/黄/赤の横バーは storyboard 上に配置した
image View上に描かせてあります。
!
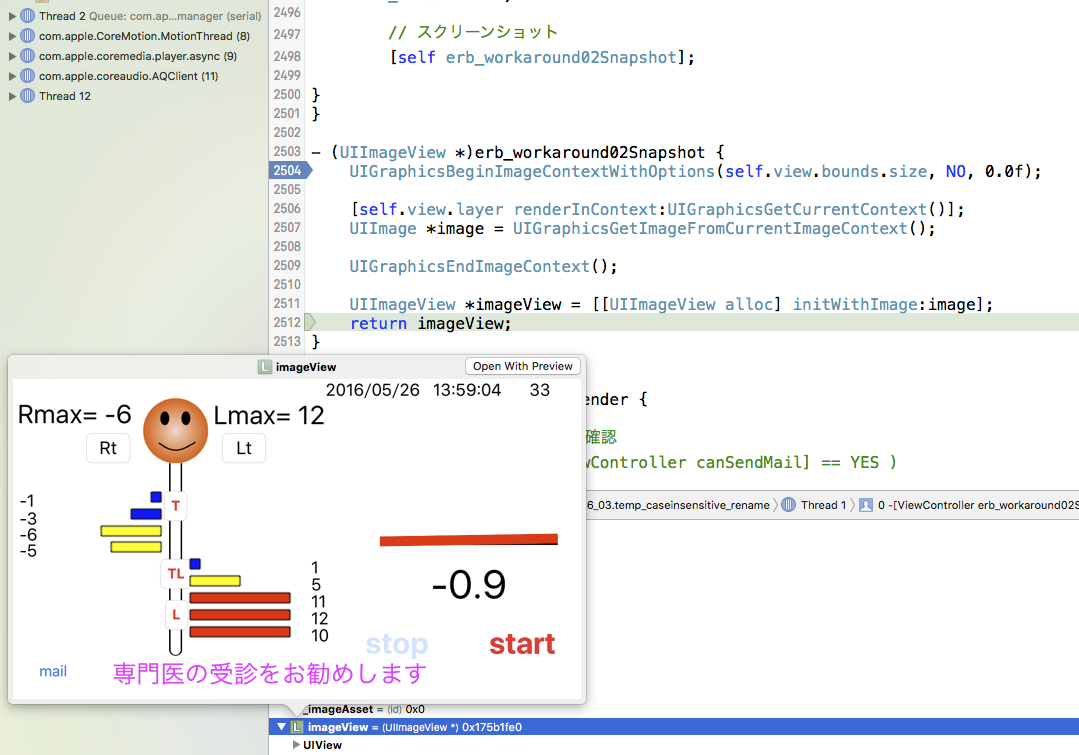
下記プログラムの最後の部分で、スクリーンショットを試みているのですが無反応です。
なお、スイッチ文は、測定時間の長さにかかわらず、表示を標準化するためのものです。
コンパイルエラーは、生じていません。
どなたかご教示頂けたら、幸いです。 よろしくお願いいたします。
画像追加しました。
スクリーンショットのプログラムは実行されており、imageView にも、
正しく、データは格納されいるようです。
ただ、これを、iPodtouch のアプリ「写真」に記録するのに
 //UIImageJPEGRepresentation(*imageView, 0.8f);

// UIImageWriteToSavedPhotosAlbum(*imageView, nil, nil, nil);
など使ってみましたが、エラーが出たり、画像が写真として記録されませんでした。
引数の名前が違うのかもしれません。
宜しくお願い致します。
-(void)stop_standardize {

    // angle_ar[] に入った傾斜角を、10個(0〜9)の配列 angle_disp に再格納し、再表示

    int kizami;
    int kcount;
    int angle_max_temp;

    // angle_bar の表示
    float angle_ratio;

    // 小計のカウンタ
    kcount= -1;

    // kizami は、測定数: jcount を何個ごとにデータ再格納したらよいかの、刻み値
    kizami = round(jcount/10+0.5);

    int i=0;

    while ( i <= jcount) {
        angle_max_temp =0;

        for (int j=0; j <kizami; j++){
            if (abs(angle_max_temp) < fabsf(angle_ar[i+j])) {
                angle_max_temp = angle_ar[i+j];}
        }

        kcount = kcount +1;
        angle_disp[kcount] = angle_max_temp;

        i= i+kizami;
    }

    angle_disp[9] =(angle_ar[jcount-3] + angle_ar[jcount-2] + angle_ar[jcount-1]) /3;

    UIGraphicsBeginImageContext(_Image_View.frame.size);
    CGContextRef context = UIGraphicsGetCurrentContext();  // コンテキストを取得

    self.judge_Label.textColor = [UIColor blackColor];    // "黒"
    self.judge_Label.text = @"";

    // 傾斜角度の初期化
 // 中略
    angle_R = 0;
    angle_L = 0;

    // angle_bar もリセットする spineのみにする

    self.x1.transform = CGAffineTransformMakeScale(0, 0);
// 中略

    for (i=0; i<10; i++) {
        angle_ref = angle_disp[i];
        angle_ratio =  fabs(angle_ref / 10.0);

        if (angle_ratio > 0.99) {angle_ratio =1.0; }
        if (angle_ratio < -0.99) {angle_ratio =-1.0; }

    switch (i+1) {
        case 1:
            if (angle_ref == 0 ){
                self.R10.text =[NSString stringWithFormat:@"%d",angle_ref * 0];
                self.L10.text =[NSString stringWithFormat:@"%d",angle_ref * 0];

                // 白バーできれいに
                CGContextSetRGBStrokeColor(context, 1, 1, 1, 1.0); // 枠色: 白
                CGContextMoveToPoint(context, y10_x, y10_y+5); // 始点
                CGContextAddLineToPoint(context, y10_x+110, y10_y+5); // 終点
                CGContextSetLineWidth(context,12); // 線幅
                CGContextStrokePath(context); // 線描画
            }

            // 角度:正 被検者の左サイド 右バー
            else if (angle_ref > 0 ){
                // 白バーできれいに
                CGContextSetRGBStrokeColor(context, 1, 1, 1, 1.0); // 枠色: 白
                CGContextMoveToPoint(context, y10_x, y10_y+5); // 始点
                CGContextAddLineToPoint(context, y10_x+110, y10_y+5); // 終点
                CGContextSetLineWidth(context,12); // 線幅
                CGContextStrokePath(context); // 線描画

                if (abs(angle_ref) < bndry_1 ) {
                    CGContextSetRGBStrokeColor(context, 0, 0, 1, 1.0);} // 青
                else if (abs(angle_ref) >= bndry_1 && abs(angle_ref) < bndry_2){
                    CGContextSetRGBStrokeColor(context, 1, 1, 0, 1.0);}  // 黄色
                else if (abs(angle_ref) >= bndry_2 ) {
                    CGContextSetRGBStrokeColor(context, 1, 0, 0, 1.0);} // 赤

                CGContextMoveToPoint(context, y10_x, y10_y+5); // 始点
                CGContextAddLineToPoint(context, y10_x+100*angle_ratio, y10_y+5); // 終点
                CGContextSetLineWidth(context,10); // 線幅
                CGContextStrokePath(context); // 線描画

                CGContextSetRGBStrokeColor(context, 0, 0, 0, 1.0);// 枠色: 黒
                CGContextSetLineWidth(context,1); // 線幅
                CGRect r1 =CGRectMake(y10_x, y10_y, 100*angle_ratio, 10);
                CGContextAddRect(context, r1);
                CGContextStrokePath(context);  // 四角描画
                // TakeOne
                _Image_View.image = UIGraphicsGetImageFromCurrentImageContext();

                self.L10.text =[NSString stringWithFormat:@"%d",angle_disp[i]];}

            // 角度:負 被検者の右サイド 左バー
            else if (angle_ref < 0){

                // 白バーできれいに
                CGContextSetRGBStrokeColor(context, 1, 1, 1, 1.0); // 枠色: 白
                CGContextMoveToPoint(context, x10_x-2, x10_y+5); // 始点
                CGContextAddLineToPoint(context, x10_x+102, x10_y+5); // 終点
                CGContextSetLineWidth(context,12); // 線幅
                CGContextStrokePath(context); // 線描画

                if (abs(angle_ref) < bndry_1 ) {
                    CGContextSetRGBStrokeColor(context, 0, 0, 1, 1.0);} // 青
                else if (abs(angle_ref) >= bndry_1 && abs(angle_ref) < bndry_2){
                    CGContextSetRGBStrokeColor(context, 1, 1, 0, 1.0);}  // 黄色
                else if (abs(angle_ref) >= bndry_2 ) {
                    CGContextSetRGBStrokeColor(context, 1, 0, 0, 1.0);} // 赤

                CGContextMoveToPoint(context, x10_x+ 100, x10_y+5); // 始点
                CGContextAddLineToPoint(context, (x10_x+100) - (100*angle_ratio), x10_y+5); // 終点
                CGContextSetLineWidth(context,10); // 線幅
                CGContextStrokePath(context); // 線描画

                CGContextSetRGBStrokeColor(context, 0, 0, 0, 1.0);// 枠色: 黒
                CGContextSetLineWidth(context,1); // 線幅
                CGRect r1 =CGRectMake(x10_x+ (100-fabsf(100*angle_ratio)), x10_y, fabsf(100*angle_ratio), 10);
                CGContextAddRect(context, r1);
                CGContextStrokePath(context);  // 四角描画
                _Image_View.image = UIGraphicsGetImageFromCurrentImageContext();

                self.R10.text =[NSString stringWithFormat:@"%d",angle_disp[i]];}
            break;

// 中略
    }
    // 計測値 angle_disp[] を調べて、左右の最大値を表示する場合 一時的対応

    angle_R =0;
    angle_L =0;

    for (int i=0; i <=9; i++) {
        if (angle_disp[i] > angle_R) { angle_R = angle_disp[i] ;}
        if (angle_disp[i] < angle_L) { angle_L = angle_disp[i] ;}
    }

    self.R_Label.text = [NSString stringWithFormat:@"Lmax= %d", angle_R];
    self.L_Label.text = [NSString stringWithFormat:@"Rmax= %d", angle_L];

    // 傾斜角配列 angle_ar[] の中に bndry_1, bndry_2 以上の傾斜角の有無を調べ
    // bndry_2 ありなら、 赤字で 「専門医受診を強く、勧める。」
    // bndry_1 有りなら、赤字で「専門医受診を勧める」 無しなら、黒字で「正常範囲です」 と表示する

    int judge_count_1;
    int judge_count_2;

    judge_count_1 =0;
    judge_count_2 =0;

    for (int k=0; k <=jcount; k++) {

        // fabs : 絶対値を求める関数
        if (fabs(angle_ar[k]) >= bndry_1 && fabs(angle_ar[k]) < bndry_2) {
            judge_count_1++; }
        if (fabs(angle_ar[k]) >= bndry_2) {
            judge_count_2++; }

    if (judge_count_1 > 0) {
        self.judge_Label.textColor = [UIColor magentaColor];    // "マゼンタ"
        self.judge_Label.text = @"専門医の受診をお勧めします";}
    if (judge_count_2 > 0) {
        self.judge_Label.textColor = [UIColor redColor];    // "赤"
        self.judge_Label.text = @"専門医の受診を強くお勧めします!!";}
    if ( judge_count_1 == 0 && judge_count_2 == 0) {
        self.judge_Label.textColor = [UIColor blackColor];    // "黒"
        self.judge_Label.text = @"   正常範囲内です";}

    //angle_ar[] の初期化
        for (i=0; i <500; i++) {angle_ar[i] = 0; }
    // angle_disp[] 初期化
        for (i=0; i<10; i++) { angle_disp[i] = 0;}
    // jcount の 初期化
    jcount =0;

        // stopボタンを押した時のタイマー停止処理
        [_timer invalidate];
        _timer = nil;

  // スクリーンショット
    [self erb_workaround02Snapshot];

}
}

- (UIImageView *)erb_workaround02Snapshot {
    UIGraphicsBeginImageContextWithOptions(self.view.bounds.size, NO, 0.0f);
    [self.view.layer renderInContext:UIGraphicsGetCurrentContext()];
    UIImage *image = UIGraphicsGetImageFromCurrentImageContext();
    UIGraphicsEndImageContext();
    UIImageView *imageView = [[UIImageView alloc] initWithImage:image];
    return imageView;
}

コード
回答1件
あなたの回答
tips
プレビュー


バッドをするには、ログインかつ
こちらの条件を満たす必要があります。
2016/05/26 05:47
2016/05/26 08:34
2016/05/27 07:40