質問をすることでしか得られない、回答やアドバイスがある。

15分調べてもわからないことは、質問しよう!

新規登録して質問してみよう
ただいま回答率
85.51%
C#

C#はマルチパラダイムプログラミング言語の1つで、命令形・宣言型・関数型・ジェネリック型・コンポーネント指向・オブジェクティブ指向のプログラミング開発すべてに対応しています。

Unity

Unityは、Unity Technologiesが開発・販売している、IDEを内蔵するゲームエンジンです。主にC#を用いたプログラミングでコンテンツの開発が可能です。

HLSL

HLSLは、米マイクロソフト社によって開発された Direct3D APIで使われるプロプライエタリなシェーディング言語です。

Q&A

解決済

2回答

1162閲覧

Unity テクスチャブレンド

退会済みユーザー

退会済みユーザー

総合スコア0

C#

C#はマルチパラダイムプログラミング言語の1つで、命令形・宣言型・関数型・ジェネリック型・コンポーネント指向・オブジェクティブ指向のプログラミング開発すべてに対応しています。

Unity

Unityは、Unity Technologiesが開発・販売している、IDEを内蔵するゲームエンジンです。主にC#を用いたプログラミングでコンテンツの開発が可能です。

HLSL

HLSLは、米マイクロソフト社によって開発された Direct3D APIで使われるプロプライエタリなシェーディング言語です。

0グッド

0クリップ

投稿2020/07/09 11:11

前提・実現したいこと

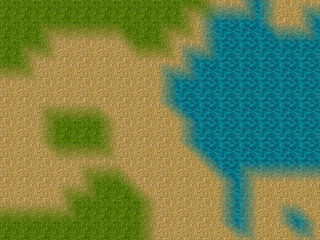
生成したメッシュのテクスチャを、テクスチャブレンドしたい

該当のソースコード

C#

1using System.Collections; 2using System.Collections.Generic; 3using System.Linq; 4using UnityEngine; 5 6public class ExampleClass : MonoBehaviour 7{ 8 Mesh mesh; 9 Matrix4x4[][] matrices; 10 Matrix4x4[][] matrices2; 11 Matrix4x4[][] matrices3; 12 13 int count; 14 public Material material; 15 public Material material2; 16 public Material material3; 17 public int rows = 100; 18 public int columns = 100; 19 public int mapWidth; 20 public int mapHeight; 21 public float noiseScale; 22 23 public int octaves; 24 [Range(0, 1)] 25 public float persistance; 26 public float lacunarity; 27 28 public int seed; 29 public Vector2 offset; 30 31 private void Start() 32 { 33 mesh = new Mesh(); 34 mesh.vertices = new Vector3[] { 35 new Vector3 (-1f, -1f, 0), 36 new Vector3 (-1f, 1f, 0), 37 new Vector3 (1f , -1f, 0), 38 new Vector3 (1f , 1f, 0), 39 }; 40 41 mesh.uv = new Vector2[] { 42 new Vector2 (0, 0), 43 new Vector2 (0, 1), 44 new Vector2 (1, 0), 45 new Vector2 (1, 1), 46 }; 47 48 mesh.triangles = new int[] { 49 0, 1, 2, 50 1, 3, 2, 51 }; 52 53 mesh.RecalculateNormals(); 54 mesh.RecalculateBounds(); 55 56 count = rows * columns; 57 var flatMatrices = new Matrix4x4[count]; 58 var flatMatrices2 = new Matrix4x4[count]; 59 var flatMatrices3 = new Matrix4x4[count]; 60 float[,] noiseMap = Noise.GenerateNoiseMap(mapWidth, mapHeight, seed, noiseScale, octaves, persistance, lacunarity, offset); 61 62 for (var i = 0; i < rows; i++) 63 { 64 for (var j = 0; j < columns; j++) 65 { 66 var index = (i * columns) + j; 67 68 float height = noiseMap[i,j]; 69 70 var position = new Vector3(i, j, 0); 71 72 var rotation = Quaternion.identity; 73 74 var scale = Vector3.one; 75 76 if (height < 0.35f) 77 { 78 flatMatrices[index] = Matrix4x4.TRS(position, rotation, scale); 79 } 80 else if(height < 0.45f) 81 { 82 flatMatrices2[index] = Matrix4x4.TRS(position, rotation, scale); 83 } 84 else 85 { 86 flatMatrices3[index] = Matrix4x4.TRS(position, rotation, scale); 87 } 88 } 89 } 90 91 matrices = flatMatrices.Select((m, i) => (m, i / 1023)) 92 .GroupBy(t => t.Item2) 93 .Select(g => g.Select(t => t.Item1).ToArray()).ToArray(); 94 95 matrices2 = flatMatrices2.Select((m, i) => (m, i / 1023)) 96 .GroupBy(t => t.Item2) 97 .Select(g => g.Select(t => t.Item1).ToArray()).ToArray(); 98 99 matrices3 = flatMatrices3.Select((m, i) => (m, i / 1023)) 100 .GroupBy(t => t.Item2) 101 .Select(g => g.Select(t => t.Item1).ToArray()).ToArray(); 102 } 103 104 void Update() 105 { 106 foreach (var m in matrices) 107 { 108 Graphics.DrawMeshInstanced(mesh, 0, material, m); 109 } 110 111 foreach (var m in matrices2) 112 { 113 Graphics.DrawMeshInstanced(mesh, 0, material2, m); 114 } 115 foreach (var m in matrices3) 116 { 117 Graphics.DrawMeshInstanced(mesh, 0, material3, m); 118 } 119 } 120}

C#

1using UnityEngine; 2using System.Collections; 3 4public static class Noise 5{ 6 7 public static float[,] GenerateNoiseMap(int mapWidth, int mapHeight, int seed, float scale, int octaves, float persistance, float lacunarity, Vector2 offset) 8 { 9 float[,] noiseMap = new float[mapWidth, mapHeight]; 10 11 System.Random prng = new System.Random(seed); 12 Vector2[] octaveOffsets = new Vector2[octaves]; 13 for (int i = 0; i < octaves; i++) 14 { 15 float offsetX = prng.Next(-100000, 100000) + offset.x; 16 float offsetY = prng.Next(-100000, 100000) + offset.y; 17 octaveOffsets[i] = new Vector2(offsetX, offsetY); 18 } 19 20 if (scale <= 0) 21 { 22 scale = 0.0001f; 23 } 24 25 float maxNoiseHeight = float.MinValue; 26 float minNoiseHeight = float.MaxValue; 27 28 float halfWidth = mapWidth / 2f; 29 float halfHeight = mapHeight / 2f; 30 31 32 for (int y = 0; y < mapHeight; y++) 33 { 34 for (int x = 0; x < mapWidth; x++) 35 { 36 37 float amplitude = 1; 38 float frequency = 1; 39 float noiseHeight = 0; 40 41 for (int i = 0; i < octaves; i++) 42 { 43 float sampleX = (x - halfWidth) / scale * frequency + octaveOffsets[i].x; 44 float sampleY = (y - halfHeight) / scale * frequency + octaveOffsets[i].y; 45 46 float perlinValue = Mathf.PerlinNoise(sampleX, sampleY) * 2 - 1; 47 noiseHeight += perlinValue * amplitude; 48 49 amplitude *= persistance; 50 frequency *= lacunarity; 51 } 52 53 if (noiseHeight > maxNoiseHeight) 54 { 55 maxNoiseHeight = noiseHeight; 56 } 57 else if (noiseHeight < minNoiseHeight) 58 { 59 minNoiseHeight = noiseHeight; 60 } 61 noiseMap[x, y] = noiseHeight; 62 } 63 } 64 65 for (int y = 0; y < mapHeight; y++) 66 { 67 for (int x = 0; x < mapWidth; x++) 68 { 69 noiseMap[x, y] = Mathf.InverseLerp(minNoiseHeight, maxNoiseHeight, noiseMap[x, y]); 70 } 71 } 72 73 return noiseMap; 74 } 75 76}

ShaderLab

1Shader "Unlit/World" 2{ 3Properties 4 { 5 _MainTex ("Texture", 2D) = "white" {} 6 [IntRange] _Magnification ("Magnification", Range(1, 32)) = 8 7 } 8 SubShader 9 { 10 Tags { "Queue"="Transparent" "RenderType"="Transparent" } 11 LOD 100 12 13 Pass 14 { 15 ZWrite Off 16 ZTest Always 17 Blend SrcAlpha OneMinusSrcAlpha 18 19 CGPROGRAM 20 #pragma vertex vert 21 #pragma fragment frag 22 #pragma multi_compile_instancing 23 // make fog work 24 #pragma multi_compile_fog 25 26 #include "UnityCG.cginc" 27 28 struct appdata 29 { 30 float4 vertex : POSITION; 31 float2 uv : TEXCOORD0; 32 UNITY_VERTEX_INPUT_INSTANCE_ID 33 }; 34 35 struct v2f 36 { 37 float2 uv : TEXCOORD0; 38 UNITY_FOG_COORDS(1) 39 float4 vertex : SV_POSITION; 40 }; 41 42 sampler2D _MainTex; 43 float4 _MainTex_ST; 44 int _Magnification; 45 46 v2f vert (appdata v) 47 { 48 v2f o; 49 UNITY_SETUP_INSTANCE_ID(v) 50 o.vertex = UnityObjectToClipPos(v.vertex); 51 52 float3 worldPosition = mul(unity_ObjectToWorld, v.vertex); 53 54 float2 blockCoord = worldPosition.xy / _Magnification; 55 56 o.uv = TRANSFORM_TEX(blockCoord, _MainTex); 57 58 UNITY_TRANSFER_FOG(o,o.vertex); 59 return o; 60 } 61 62 fixed4 frag (v2f i) : SV_Target 63 { 64 float2 uv = frac(i.uv); 65 66 // sample the texture 67 fixed4 col = tex2D(_MainTex, uv); 68 // apply fog 69 UNITY_APPLY_FOG(i.fogCoord, col); 70 return col; 71 } 72 ENDCG 73 } 74 } 75}

試したこと

一年ほど前にも、テクスチャブレンドについて質問したのですが、複雑で自分のなかで理解できておらず、どのようにスクリプトやシェーダーを書けばいいか、分かりませんでした。

ネットで検索して、同じようなことをやっている記事を見つけました。

Edge Smoothing

ですが、コードが抜粋で書いてあるだけなので、ぼんやりとしか分かっていません。

どのようにすれば、テクスチャブレンドできるでしょうか? 教えていただけるとありがたいです。

気になる質問をクリップする

クリップした質問は、後からいつでもMYページで確認できます。

またクリップした質問に回答があった際、通知やメールを受け取ることができます。

バッドをするには、ログインかつ

こちらの条件を満たす必要があります。

guest

回答2

0

パート2

マテリアルは下記のように変更しました。同じく変更部分にコメントを入れています。

ShaderLab

1Shader "Unlit/World" 2{ 3Properties 4 { 5 _MainTex ("Texture", 2D) = "white" {} 6 [IntRange] _Magnification ("Magnification", Range(1, 32)) = 8 7 } 8 SubShader 9 { 10 Tags { "Queue"="Transparent" "RenderType"="Transparent" } 11 LOD 100 12 13 Pass 14 { 15 ZWrite Off 16 ZTest Always 17 Blend SrcAlpha OneMinusSrcAlpha 18 19 CGPROGRAM 20 #pragma vertex vert 21 #pragma fragment frag 22 #pragma multi_compile_instancing 23 // make fog work 24 #pragma multi_compile_fog 25 26 #include "UnityCG.cginc" 27 28 struct appdata 29 { 30 float4 vertex : POSITION; 31 float2 uv : TEXCOORD0; 32 UNITY_VERTEX_INPUT_INSTANCE_ID 33 }; 34 35 struct v2f 36 { 37 float2 uv : TEXCOORD0; 38 UNITY_FOG_COORDS(1) 39 float4 vertexColor : TEXCOORD2; // vertからfragへ頂点カラーを伝達できるようにする 40 float4 vertex : SV_POSITION; 41 }; 42 43 sampler2D _MainTex; 44 float4 _MainTex_ST; 45 int _Magnification; 46 47 // インスタンスごとのプロパティとして_VertexColorsを定義する 48 // これの各行に左下・右下・左上・右上の順で頂点カラーが格納されている 49 UNITY_INSTANCING_BUFFER_START(Props) 50 UNITY_DEFINE_INSTANCED_PROP(float4x4, _VertexColors) 51 UNITY_INSTANCING_BUFFER_END(Props) 52 53 v2f vert (appdata v) 54 { 55 v2f o; 56 UNITY_SETUP_INSTANCE_ID(v) 57 o.vertex = UnityObjectToClipPos(v.vertex); 58 59 float3 worldPosition = mul(unity_ObjectToWorld, v.vertex); 60 61 float2 blockCoord = worldPosition.xy / _Magnification; 62 63 o.uv = TRANSFORM_TEX(blockCoord, _MainTex); 64 65 UNITY_TRANSFER_FOG(o,o.vertex); 66 67 // 4つの頂点カラーのうちどれを使用するかはv.uvを使って決める 68 // v.uvが(0.5, 0.5)の点(メッシュ中心)の場合は4点の平均色とする 69 float4x4 vertexColors = UNITY_ACCESS_INSTANCED_PROP(Props, _VertexColors); 70 float4 averageColor = mul((float4)0.25, vertexColors); 71 float vertexIndex = v.uv.x + v.uv.y * 2.0; 72 o.vertexColor = (vertexIndex % 1.0 > 0.0) ? averageColor : vertexColors[(int)vertexIndex]; 73 return o; 74 } 75 76 fixed4 frag (v2f i) : SV_Target 77 { 78 float2 uv = frac(i.uv); 79 80 // sample the texture 81 // colに頂点カラーを乗算し透明度を反映させる 82 fixed4 col = tex2D(_MainTex, uv) * i.vertexColor; 83 // apply fog 84 UNITY_APPLY_FOG(i.fogCoord, col); 85 return col; 86 } 87 ENDCG 88 } 89 } 90}

各地形レイヤーを描画させてみると下図のようになりました。それぞれの地形が外側に1タイル大きくなり、そこにグラデーションがかかってなめらかにブレンドされます。

図1

「なんかタイルのブロック感が残ってカクカクしてるじゃないか...」とお思いかもしれませんが、この方式だとタイルのメッシュをもっと細かくし、グラデーションをより精密にコントロールしてやらないと自然な表現は難しいんじゃないかと思います。

Plump Helmet Studiosさんのスクリーンショットだと、タイルが斜めに隣接する部分では斜めのグラデーションがかかってブロック感が少ないですが、コードのコメント中でも申し上げたようにサイト上には左下から右上にかけてグラデーションが発生する状況しか図示されていません。
あくまでも想像ですが、グラデーションのかかり方から予想しますに、Plump Helmet Studiosさんのタイルメッシュもご質問者さんと同様の左下と右上の2つの三角形で正方形を構成しているような気がします。だとすると、左下から右上の対角線方向のグラデーションは良好そうに見えても、逆に左上から右下の対角線方向には下図のようなブロック状模様が目立ってしまうんじゃないかと思います...

図2

投稿2020/07/12 03:34

Bongo

総合スコア10807

バッドをするには、ログインかつ

こちらの条件を満たす必要があります。

退会済みユーザー

退会済みユーザー

2020/07/12 12:01

回答ありがとうございました。
guest

0

ベストアンサー

サイトの文章中にある...

So to blend the terrain layers, each layer checks for tiles at it's edge, and, where it finds a tile that is dissimilar, it creates a new quad with vertex-level opacity. For example, if the current tile is water and the tile to the north is sand, then the water layer will create a new quad to the north (tile x,y+1) with four vertices, the "southern" two (x,y + x+1,y) with an opacity of 1 and the "northern" two (x,y+1 + x+1,y+1) with an opacity of 0. These quads are part of the same mesh as the rest of the tiles, and therefore benefit from the same UV mapping & tiling.

というのがキモかと思います。私の解釈したところですと、地形の境界部分にさらにタイルを追加して、そのタイルの四隅の頂点カラーのアルファを調節することで周囲との隣接のしかたに応じて透明度をなめらかに変化させる...ということを意味しているんでしょう。
おっしゃる通りサイトのコードは断片的で、全貌がどうなっているかは読み取れませんでした。ですのでPlump Helmet Studiosさんの作例をぴったり完全に再現しようとするよりも、上記の理屈をヒントに自前で実装するのがいいんじゃないかと思います。

ご質問者さんのご提示いただいたコードではGPUインスタンシング機能を利用しています。その条件で頂点カラーを受け渡すにはどうしようかと考えたところ、まずExampleClassは下記のようにしてみました。追加・変更した部分にコメントを入れています。

C#

1using System.Collections.Generic; 2using System.Linq; 3using UnityEngine; 4 5public class ExampleClass : MonoBehaviour 6{ 7 Mesh mesh; 8 Matrix4x4[][] matrices; 9 Matrix4x4[][] matrices2; 10 Matrix4x4[][] matrices3; 11 12 // 頂点カラー受け渡し用のフィールド 13 Matrix4x4[][] vertexColors; 14 Matrix4x4[][] vertexColors2; 15 Matrix4x4[][] vertexColors3; 16 17 // マテリアルへのデータ投入用のMaterialPropertyBlock 18 private MaterialPropertyBlock materialProperties; 19 20 // プロパティアクセス用の識別番号 21 private static readonly int VertexColorsProperty = Shader.PropertyToID("_VertexColors"); 22 23 int count; 24 public Material material; 25 public Material material2; 26 public Material material3; 27 public int rows = 100; 28 public int columns = 100; 29 public int mapWidth; 30 public int mapHeight; 31 public float noiseScale; 32 33 // デバッグ用に、各地形を描画するかどうかを切り替えるフラグを用意する 34 public bool drawTerrain = true; 35 public bool drawTerrain2 = true; 36 public bool drawTerrain3 = true; 37 38 public int octaves; 39 [Range(0, 1)] 40 public float persistance; 41 public float lacunarity; 42 43 public int seed; 44 public Vector2 offset; 45 46 private void Start() 47 { 48 this.mesh = new Mesh(); 49 50 // 当初のコードではメッシュのサイズが2x2になっており、それをそのまま描画すると 51 // タイル同士が重なってしまうようだったので1x1になるように変更 52 // また、メッシュの構造を「4頂点・三角形2枚」から「5頂点・三角形4枚」に変更した 53 // Plump Helmet Studiosさんの実装がどうなっているかは不明だが、スクリーンショットでは 54 // 左下から右上にかけてグラデーションが発生するケースしか示されていない 55 // 頂点単位で透明度を設定する方式だと、三角形2枚方式では左下⇔右上と左上⇔右下の 56 // 構造が異なるためにグラデーションのかかり方が変化してしまうはずだが... 57 this.mesh.vertices = new Vector3[] { 58 Vector3.zero, 59 new Vector3 (-0.5f, -0.5f, 0), 60 new Vector3 (-0.5f, 0.5f, 0), 61 new Vector3 ( 0.5f, -0.5f, 0), 62 new Vector3 ( 0.5f, 0.5f, 0), 63 }; 64 this.mesh.uv = new Vector2[] 65 { 66 new Vector2(0.5f, 0.5f), 67 new Vector2(0, 0), 68 new Vector2(0, 1), 69 new Vector2(1, 0), 70 new Vector2(1, 1), 71 }; 72 this.mesh.triangles = new int[] { 73 0, 4, 3, // 北 74 0, 2, 4, // 東 75 0, 1, 2, // 南 76 0, 3, 1, // 西 77 }; 78 79 this.mesh.RecalculateNormals(); 80 this.mesh.RecalculateBounds(); 81 82 this.count = this.rows * this.columns; 83 var flatMatrices = new Matrix4x4[this.count]; 84 var flatMatrices2 = new Matrix4x4[this.count]; 85 var flatMatrices3 = new Matrix4x4[this.count]; 86 float[,] noiseMap = global::Noise.GenerateNoiseMap(this.mapWidth, this.mapHeight, this.seed, this.noiseScale, this.octaves, this.persistance, this.lacunarity, this.offset); 87 88 for (var i = 0; i < this.rows; i++) 89 { 90 for (var j = 0; j < this.columns; j++) 91 { 92 var index = (i * this.columns) + j; 93 94 // iとjが逆のようだったので変更 95 float height = noiseMap[j, i]; 96 var position = new Vector3(j, i, 0); 97 98 var rotation = Quaternion.identity; 99 100 var scale = Vector3.one; 101 102 if (height < 0.35f) 103 { 104 flatMatrices[index] = Matrix4x4.TRS(position, rotation, scale); 105 } 106 else if (height < 0.45f) 107 { 108 flatMatrices2[index] = Matrix4x4.TRS(position, rotation, scale); 109 } 110 else 111 { 112 flatMatrices3[index] = Matrix4x4.TRS(position, rotation, scale); 113 } 114 } 115 } 116 117 // 当初の通りタイルを配置したあと、ここで各地形レイヤーに 118 // さらに追加の外周タイルを配置する 119 var flatVertexColors = this.AppendOutlineTiles(flatMatrices); 120 var flatVertexColors2 = this.AppendOutlineTiles(flatMatrices2); 121 var flatVertexColors3 = this.AppendOutlineTiles(flatMatrices3); 122 123 // タイルの座標変換行列と同様に、頂点カラー配列も1023個ずつに分割しておく 124 // 結局同じような記述を6回も繰り返すことになってしまったので、この1023個分割操作を 125 // メソッド化してしまうことにした 126 this.matrices = this.GroupBy1023(flatMatrices); 127 this.matrices2 = this.GroupBy1023(flatMatrices2); 128 this.matrices3 = this.GroupBy1023(flatMatrices3); 129 this.vertexColors = this.GroupBy1023(flatVertexColors); 130 this.vertexColors2 = this.GroupBy1023(flatVertexColors2); 131 this.vertexColors3 = this.GroupBy1023(flatVertexColors3); 132 } 133 134 // 配列要素を1023個ずつに分割して返すメソッド 135 T[][] GroupBy1023<T>(IEnumerable<T> source) 136 { 137 return source.Select((m, i) => (m, i / 1023)) 138 .GroupBy(t => t.Item2) 139 .Select(g => g.Select(t => t.Item1).ToArray()).ToArray(); 140 } 141 142 // 地形レイヤーに対して外周タイルを配置するメソッド 143 // 併せて頂点カラーを生成して返す 144 // なお、透明度を操作するだけならシェーダーへ送るデータの型はVector4で間に合うはずだが 145 // 気まぐれでMatrix4x4とした 146 // このため、アルファのみならずRGBも伝達することが可能であり、さらに改造を加えれば 147 // 頂点単位で色を乗せることで地形に色ムラをつけることも可能なはず 148 Matrix4x4[] AppendOutlineTiles(Matrix4x4[] flatMatrices) 149 { 150 var allWhite = (new Matrix4x4(Color.white, Color.white, Color.white, Color.white)).transpose; 151 var allClear = allWhite; 152 allClear.SetColumn(3, Vector4.zero); 153 var colors = Enumerable.Repeat(allWhite, this.rows * this.columns).ToArray(); 154 var needsPlaceTile = new bool[this.rows * this.columns]; 155 for (var i = 0; i < this.rows; i++) 156 { 157 for (var j = 0; j < this.columns; j++) 158 { 159 var index = (i * this.columns) + j; 160 var matrix = flatMatrices[index]; 161 if (matrix[0] > 0.0f) 162 { 163 // この位置にすでに配置済みならスキップ 164 continue; 165 } 166 167 var isLeftEdge = j == 0; 168 var isRightEdge = j == (this.columns - 1); 169 var isBottomEdge = i == 0; 170 var isTopEdge = i == (this.rows - 1); 171 var hasN = !isTopEdge && (flatMatrices[index + this.columns][0] > 0.0f); 172 var hasNE = !isTopEdge && !isRightEdge && (flatMatrices[index + 1 + this.columns][0] > 0.0f); 173 var hasE = !isRightEdge && (flatMatrices[index + 1][0] > 0.0f); 174 var hasSE = !isBottomEdge && !isRightEdge && (flatMatrices[index + 1 - this.columns][0] > 0.0f); 175 var hasS = !isBottomEdge && (flatMatrices[index - this.columns][0] > 0.0f); 176 var hasSW = !isBottomEdge && !isLeftEdge && (flatMatrices[index - 1 - this.columns][0] > 0.0f); 177 var hasW = !isLeftEdge && (flatMatrices[index - 1][0] > 0.0f); 178 var hasNW = !isTopEdge && !isLeftEdge && (flatMatrices[index - 1 + this.columns][0] > 0.0f); 179 180 void MakeOpaque(int vertexIndex) 181 { 182 var color = colors[index].GetRow(vertexIndex); 183 color.w = 1.0f; 184 colors[index].SetRow(vertexIndex, color); 185 needsPlaceTile[index] = true; 186 } 187 188 // まず四隅をすべて透明にしておき... 189 colors[index] = allClear; 190 if (hasN || hasNE || hasE) 191 { 192 // 北~東にかけてタイルが配置されているなら右上を不透明に 193 MakeOpaque(1 + (1 << 1)); 194 } 195 if (hasE || hasSE || hasS) 196 { 197 // 東~南にかけてタイルが配置されているなら右下を不透明に 198 MakeOpaque(1 + (0 << 1)); 199 } 200 if (hasS || hasSW || hasW) 201 { 202 // 南~西にかけてタイルが配置されているなら左下を不透明に 203 MakeOpaque(0 + (0 << 1)); 204 } 205 if (hasW || hasNW || hasN) 206 { 207 // 西~北にかけてタイルが配置されているなら左上を不透明に 208 MakeOpaque(0 + (1 << 1)); 209 } 210 } 211 } 212 213 for (var i = 0; i < this.rows; i++) 214 { 215 for (var j = 0; j < this.columns; j++) 216 { 217 var index = (i * this.columns) + j; 218 if (needsPlaceTile[index]) 219 { 220 // 不透明化処理を行った位置に追加のタイルを設置する 221 var position = new Vector3(j, i, 0); 222 var rotation = Quaternion.identity; 223 var scale = Vector3.one; 224 flatMatrices[index] = Matrix4x4.TRS(position, rotation, scale); 225 } 226 } 227 } 228 229 return colors; 230 } 231 232 void Update() 233 { 234 if (this.materialProperties == null) 235 { 236 this.materialProperties = new MaterialPropertyBlock(); 237 } 238 239 void DrawTerrain(Material mat, Matrix4x4[][] mtx, Matrix4x4[][] vCol) 240 { 241 for (var i = 0; i < mtx.Length; i++) 242 { 243 // プロパティブロックに頂点カラーデータを投入し、DrawMeshInstancedの引数として渡す 244 var m = mtx[i]; 245 this.materialProperties.SetMatrixArray(VertexColorsProperty, vCol[i]); 246 Graphics.DrawMeshInstanced(this.mesh, 0, mat, m, m.Length, this.materialProperties); 247 } 248 } 249 250 // デバッグ用に、各地形レイヤーを描画するかどうかをフラグを見て切り替えさせるようにして 251 // 特定の地形レイヤーを単独で描画したりできるようにした 252 // なお、描画順はDrawMeshInstancedを実行した順番とは異なる可能性があるので要注意 253 // デフォルトではmaterial、material2、material3とも3000だと思うが 254 // たとえばmaterial2は3001、たとえばmaterial3は3002にでもしておけば 255 // 意図通りの順序で描画されるはず 256 if (this.drawTerrain) 257 { 258 DrawTerrain(this.material, this.matrices, this.vertexColors); 259 } 260 261 if (this.drawTerrain2) 262 { 263 DrawTerrain(this.material2, this.matrices2, this.vertexColors2); 264 } 265 266 if (this.drawTerrain3) 267 { 268 DrawTerrain(this.material3, this.matrices3, this.vertexColors3); 269 } 270 } 271}

(パート2へ続く...)

投稿2020/07/12 03:33

Bongo

総合スコア10807

バッドをするには、ログインかつ

こちらの条件を満たす必要があります。

退会済みユーザー

退会済みユーザー

2020/07/12 12:01

いつも回答ありがとうございます。参考になります。
guest

あなたの回答

tips

太字

斜体

打ち消し線

見出し

引用テキストの挿入

コードの挿入

リンクの挿入

リストの挿入

番号リストの挿入

表の挿入

水平線の挿入

プレビュー

15分調べてもわからないことは
teratailで質問しよう!

ただいまの回答率
85.51%

質問をまとめることで
思考を整理して素早く解決

テンプレート機能で
簡単に質問をまとめる

質問する

関連した質問